Table of Contents
Advertisement
Quick Links
Advertisement
Table of Contents

Related Manuals for Planika Rio Table KL21


Summary of Contents for Planika Rio Table KL21
- Page 1 INSTALLATION and USER’S MANUAL KL21 Rio Table G30/G31 (Propane-Butane/Propane) 1061 Produced by: Planika Sp. z o.o. Bydgoskich Przemysłowców 10 85-862 Bydgoszcz, Poland Telephone: + 48 52 364 11 60 Copyright Planika Sp. z o.o. www.planikafires.com IG0367#00 26.09.2023...
-
Page 2: Table Of Contents
T IS OBLIGATORY TO READ AND KEEP THIS INSTRUCTION MANUAL TABLE OF CONTENTS INTRODUCTION ................................. 3 SAFETY INSTRUCTIONS .............................. 3 Safety instruction regarding the use of the gas cylinders................. 4 INSTALLATION ................................5 3.1. Box contents ..............................5 3.2. Unboxing and installation .......................... -
Page 3: Introduction
INTRODUCTION The Rio Table fireplace is a decorative fuel-effect gas appliances destined only for outdoor use. It is obligatory to acquaint oneself with the below installation manual and user’s manual before committing to the installation and use of The Rio Table fireplace. This manual is to be kept safe for the lifetime of the device. WARNING! The device must be installed by the installer who is certified and qualified specialist in gas heating and should have all the qualifications required by local law. -
Page 4: Safety Instruction Regarding The Use Of The Gas Cylinders
• When not being used The Rio Table is to be protected from atmospheric conditions and the main valve of the gas cylinder needs to be turned off. • If The Rio Table is not in use for a longer period of time (e.g. winter time), we advise you to store it inside. •... -
Page 5: Installation
INSTALLATION 3.1. Box contents • 1x complete Rio Table gas fireplace • 2x Tempered glass screen • 4x small glass holders • 2x legs • 1x AAA Batteries (placed under the ignition button) • 1x box of decorative stones • 1x 4 metre rubber gas linkage –... -
Page 6: Installation Of Glass Screens
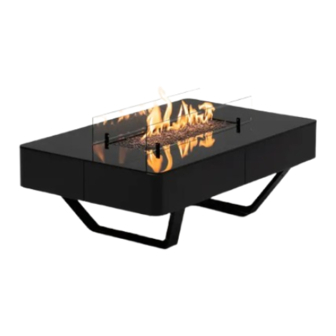
• The decorative stones are to be scattered evenly around the reservoir to completely cover the burner of the fireplace. Fig. 3 – RIO TABLE top view and ignition elements detail • Install carefully the side glass shields • If all the points were completed according to the instruction the gas bottle can be now connected 3.3. -
Page 7: Gas Cylinder Montage (Only Lpg Version)
3.4. Gas cylinder montage (only LPG version) • The gas linkage attached to the device allows to place the gas bottle maximally 3 meters away from the connected control panel, however it cannot be placed closer to the device than 1,5 meters. You can follow the local regulations if it provide different distance requires. -
Page 8: Quick-Release
• Twist-on connection: The most important thing is the black seal. Always check if the seal is present and that it hasn’t been damaged during the gas cylinder replacement. Some connections have a knob to fasten them in place while others require the use of a wrench. Tighten securely (left thread). Using the tool pay attention not to fasten the connection too tightly as this may damage the seal. - Page 9 WARNING!!! Check the gas connection for leakage. If anything suggests a leak is present (for instance a characteristic gas smell) close the gas bottle valve and under no circumstances turn the device on before removing the leak. (See point 5.1). •...
-
Page 10: Regulator Replacement
3.5.2. Regulator replacement You always need to use a pressure regulator between the gas bottle and the device. Replace the pressure regulator every 5 years. Allowed pressures: 30 mbar, 37 mbar (recommended), 50 mbar. Use only the regulators that comply with the EN16129 European Norm. Turn off The Rio Table -–... -
Page 11: Operating Instructions
4. OPERATING INSTRUCTIONS 4.1. General Notes The Rio Table fireplace has a control valve with a built-in ignition for the main burner (without pilot flame). The flame height of the main burner may be appropriately regulated with by turning the knob. Next to the knob is placed elective ignition button (powered by AAA battery). -
Page 12: Regulation Of The Flame Size
• While keeping the knob still pressed start the flame by pressing the ignition button (3). Fig. 9 – Ignition sequence • A spark will appear which ignites the main burner on the minimum flame height. If the flame did not ignite repeat this process 2-3 times. -
Page 13: Replacing The Battery
• Additionally, close also the valve on the gas cylinder. 4.5 Replacing the battery If the battery is inserted incorrectly, the electronic ignitor may be irreparably damaged. Only replace the battery when the appliance has been completely switched off. The battery is placed in the container located on the control pane next to the flame regulation knob •... -
Page 14: Maintenance And Upkeep
6. MAINTENANCE AND UPKEEP 6.1. Testing and cleaning Please check and clean if necessary: • The main burner - if necessary, remove broken parts of stones and the existing dust. • Thermo-couple (if necessary, remove the existing sediment). In the event of visible damage contact your dealer. -
Page 15: Manufacturer's Contact Details
8. MANUFACTURER’S CONTACT DETAILS Company Name: Planika Sp. z o.o. Address: Bydgoskich Przemysłowców 10 Telephone: + 48 52 364 11 60 TECHNICAL SPECIFICATION Applianace Category I3B/P Reference gas Inlet pressure [mbar] 28-30 Injector diamater [mm] Gas consumption [kg/h] 0.55 0,65... - Page 16 SELLER Name: Address: Tel/fax: Date of sale: Seller’s seal and signature BUYER Name: Address: Tel/fax: Date of purchase: The gas fireplace should be installed by a qualified Installer in accordance with the applicable national building regulations and in accordance with the guidelines contained in the Installation and User's Manuals. I hereby declare that having read the User's Manual and the Guarantee Conditions.
Need help?
Do you have a question about the Rio Table KL21 and is the answer not in the manual?
Questions and answers