Advertisement
INSTALLATION MANUAL
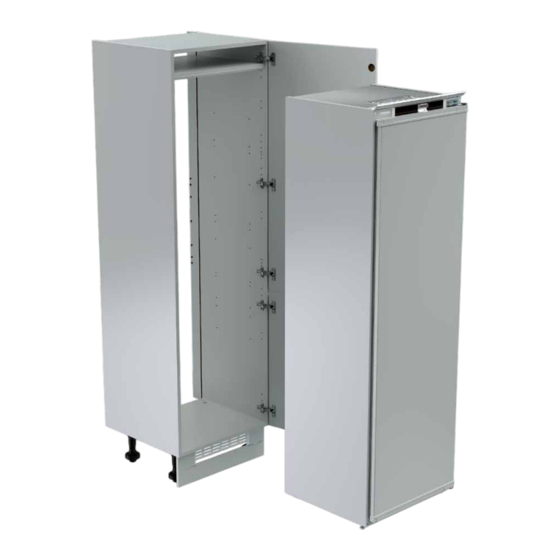
LAMONA TALL INTEGRATED LARDER FRIDGE
LAM6701
LAMONA TALL INTEGRATED FROST FREE FREEZER
LAM6801
Generic instructions, Larder Fridge used for illustrative purposes only.
(To be used in conjunction with User Instructions)
l Please read the Installation Manual to ensure safe fitting and use of the appliance.
l The appliance should be fitted by a suitably competent and qualified person.
l Please keep these instructions in a safe place for future reference.
l Danger of suffocation keep packaging material away from children.
WWW.HOWDENS.COM
Advertisement
Table of Contents

Related Manuals for Lamona LAM6701


Summary of Contents for Lamona LAM6701
- Page 1 INSTALLATION MANUAL LAMONA TALL INTEGRATED LARDER FRIDGE LAM6701 LAMONA TALL INTEGRATED FROST FREE FREEZER LAM6801 Generic instructions, Larder Fridge used for illustrative purposes only. (To be used in conjunction with User Instructions) l Please read the Installation Manual to ensure safe fitting and use of the appliance.
-
Page 2: Safety Information
Safety Information Two person lift. Appliance must be Do not install a fixed securely and level. damaged appliance. WARNING! This appliance must be earthed. NOTE: If the electricity Risk of injury: WARNING! The electric socket must be cable is damaged it Beware of metal edges. -
Page 3: Tools Required
Tools required 2mm drill bit DO NOT use high speed impact power tools. TORX25 cross head screw driver Installation Parts supplied - PLEASE RETAIN, DO NOT THROW AWAY! Remove parts bag from appliance drawer. BAG 2 BAG 3 BAG 1 Top trim x1 Spacer Top spacer... - Page 4 Cabinet pre-build and airflow THE CABINET WILL NEED MODIFYING BEFORE INSTALLING YOUR APPLIANCE. 1. Remove rear panels. 2. Attach feet. 3. Fit and align doors. 4. Fit upper shelf. Ensure the cabinet is secure, level and true. m i n 2 0 0 c m 20mm 70:30/50:50 decor door.
- Page 5 Reverse door opening (if desired), DO IT NOW. (Handle door with care.) - Remove hinge 1 , door 2 - Fit hinge 1 in new position 4 - Remove plastic and hinge 3 . and place washer. cover caps and plug. (DO NOT remove magnet from top of door).
- Page 6 Fit side seal trim - Cut side seal to length, 1710mm. - Apply seal 30mm from top edge of the appliance, removing backing tape as you progress. 30mm 30mm Side sealing strip x1 Fit top trim, (BAG 1) - Cut indicated 3mm off each end - Align the top trim to the non of the top trim and chamfer inwards.
- Page 7 Inserting into cabinet - Protect areas with masking tape. 2 - Carefully lift the appliance. 3 - Place rear feet onto cabinet base. 4 - Level and gently slide into position. Exclusive to Howdens...
- Page 8 Remove appliance door and level - Support door 1 , remove inner screw 2 , - Position the appliance c.40mm rotate hinge upward 3 , remove door 4 , back from cabinet front edge. (Careful not to damage door and fittings). WARNING: Support door when...
-
Page 9: Securing The Appliance
Securing the appliance (Vertically true and level in cabinet.) - Spacer brackets will set the appliance to the correct depth 42mm. Adjust feet and appliance to achieve correct alignment. 4 2 m m Non hinge side (top and bottom), - Non hinge side spacer brackets, (top and bottom). DO NOT fully tighten. (BAG 2) 4 2 m m 4 2 m m... - Page 10 All spacer positions correct. - Once spacing is correct at all four corners, fully secure brackets to cabinet sides. Carefully snap off the distance spacing tabs, (if necessary for finish; remove bracket and trim). 4 2 m m 4 2 m m (3.5x13) x2 (3.5x13) x2 Refit appliance door...
- Page 11 Door slider fitting, (BAG 4) - Fix the slider retainers to the appliance door. - Punch or pilot drill the pre-marked holes on the appliance door. (3.9x13 FH) x12 - Carefully snap off distance spacing tabs. - Locate slider and align with decor door edge, Add cover trims.
- Page 12 Product serial number Howden Joinery Ltd, Thorpe Road, Howden, East Yorkshire, DN14 7PA Product information correct at the time of publication in February 2020. The company has a policy of continuous product development and reserves the right to change any products and specifications given in this manual.
Need help?
Do you have a question about the LAM6701 and is the answer not in the manual?
Questions and answers
I have had this fridge for about 5 years now but its not cooling properly anymore so I think I'll need to replace it. Do you have the dimensions so I can make sure I'm ordering a like-for-like replacement? I can measure it myself but as it's integrated I just want to make sure I'm getting the dimensions correct.