Table of Contents
Advertisement
Advertisement
Table of Contents

Related Manuals for Innova SD-Advisor SD35


Summary of Contents for Innova SD-Advisor SD35
- Page 1 -Advisor Diagnostic Tablet...
- Page 2 WELCOME TO THE INNOVA FAMILY! Hello... On behalf of everyone at INNOVA, we want to welcome you and thank you for purchasing the SD-Advisor! Every automotive diagnostic scan tool we make includes tons of pro- INNOVA ® level features designed to help maximize, and simplify, your OBD2 diagnostic routine. In this manual, we will guide you on how to access your tablet’s intuitive functions including:...
-
Page 3: Table Of Contents
TABLE OF CONTENTS LEGAL INFORMATION � � � � � � � � � � � � � � � � � � � � � � � � � � � � � � � � � � � � � � � 1 SAFETY PRECAUTIONS �... - Page 4 TABLE OF CONTENTS Vehicle Inspection � � � � � � � � � � � � � � � � � � � � � � � � � � � � � � � � � � � � � � � � � � � � � �32 Oil Maintenance Reset �...
-
Page 5: Legal Information
Licensee and End Users acknowledge such ownership, confidential information, and intellectual property rights and will not take any action to jeopardize, limit or interfere in any manner with Innova’s or its licensors’ or other suppliers’ ownership of or rights with respect to the Products and Services. The Products and Services may be protected by Patent, Trademark, Copyright and/or other intellectual property laws and by international treaties. - Page 6 LEGAL INFORMATION Patents Patents Innova Electronics Corp. protects its intellectual property with numerous U.S. patents, which were used to research, design and manufacture this product. Please visit https://www.innova.com/pages/patents for additional information. Firmware Version Please note that the images and functions on this manual may differ based on the current Firmware Version (FW) you have.
-
Page 7: Safety Precautions
SAFETY PRECAUTIONS Safety First! SAFETY PRECAUTIONS Safety First! It is important that every user utilizing this product read all instructions and warnings included within this manual to ensure your safety, the safety of others, and to prevent damage to this product & vehicles being diagnosed and repaired. This manual describes common test procedures used by experienced service technicians. - Page 8 SAFETY PRECAUTIONS Safety Alert Icons Safety Alert Icons As you read this manual, color-coded icons are used throughout to identify safety alerts and warnings. These are provided to help prevent serious injury to you, injury to bystanders, and damage to property or equipment. They are characterized as follows: Yellow Icon –...
-
Page 9: Introduction
INTRODUCTION Tablet Controls and Indicators INTRODUCTION Tablet Controls and Indicators Figure 1� Controls and Indicators See Figure 1 for the locations of items 1 through 11, below. 3.5-inch LCD Screen - Color LCD display shows menus and sub-menus, test results, Tablet Scan Tool functions and vehicle status information. -
Page 10: Home Screen
INTRODUCTION Home Screen Home Screen Home Screen provides access to all the Tablet Scan Tool’s primary functions. See Figure 3 for the explanation of items 1 through 6, below: OBD2 Diagnostics Tab – Perform OBD2 menu, display 10 modes of OBD2. [See page OEM Diagnostics Tab –... - Page 11 INTRODUCTION Tablet Display Functions all fifteen Monitors. When the Tablet Scan Tool is linked to a vehicle, only the icons for Monitors that are supported by the vehicle under test are visible on the display. Link Icon - Indicates whether or not the Tablet Scan Tool is communicating (linked) with...
-
Page 12: Technical Specifications
INTRODUCTION Technical Specifications Bluetooth Icon – Indicates communication status with a compatible mobile application. A solid blue icon indicates an active Bluetooth connection has been established. 17. 12.55V – Displays the vehicle’s current battery voltage. Technical Specifications The following table provides the Tablet Scan Tool Scan Tool’s current technical specifications*: 3.5 Inch Panel Display Type 6-foot Detachable 16-pin OBDII Compliant Connector... - Page 13 INTRODUCTION The RepairSolutions2® App Predicted Repairs – With millions of verified repair solutions, get a statistical probability of what repairs you may need within the next 12 months. TSBs & Recalls – Learn if there are any special NHTSA safety recalls or Technical Service Bulletins (TSBs) issued by your vehicle’s manufacturer.
-
Page 14: Initial Setup (Personal Settings)
INTRODUCTION Initial Setup (Personal Settings) Initial Setup (Personal Settings) The first time the Tablet Scan Tool is connected to a vehicle, it is necessary to complete your setup by performing the following steps: Select the desired display language (English, Spanish, French) and press OK. Select the desired unit of measurement (U.S. -
Page 15: Using The Tablet
USING THE TABLET Getting Started USING THE TABLET Getting Started Connecting The Tablet Turn the vehicle’s ignition OFF. Locate the vehicle’s 16-pin Data Link Connector (DLC). NOTE: Some DLCs have a plastic cover that must be removed before connecting to the Tablet Scan Tool. -
Page 16: Obd2 Diagnostics
USING THE TABLET OBD2 Diagnostics Choose Relink to try again or select OBD2 Menu to return to the OBD2 Menu. ━ Once complete, the tablet displays the OBD2 Diagnostics screen. OBD2 Diagnostics OBD2 Diagnostics provides access to all 10 modes of OBD2. The following functions are available: [See page I/M Readiness Status –... -
Page 17: Read Dtcs - Modes $03, $07, & $0A
USING THE TABLET OBD2 Diagnostics warning message displays “This vehicle does not support this monitor type.” Press the Back button to return to the previous dialog. The Select Monitor screen displays listing all Monitors supported by the vehicle. To view a Monitor description, select the desired Monitor, then choose Description. - Page 18 USING THE TABLET OBD2 Diagnostics button to disable this screen in the next Auto-Link function. NOTE: User can enable or disable this screen in the Settings. The Tablet Scan Tool will retrieve and display any Diagnostic Trouble Codes (DTCs), I/M Monitor Status and Freeze Frame Data retrieved from the vehicle’s computer memory.
- Page 19 USING THE TABLET OBD2 Diagnostics MONITOR NOT RUN STATUS – If the display shows a zero (indicating there are no DTCs present in the vehicle’s computer memory), but the yellow LED is that some of the Monitors supported by the vehicle have not yet run and completed their diagnostic testing.
-
Page 20: Erasing Diagnostic Trouble Codes (Dtcs) - $04
USING THE TABLET OBD2 Diagnostics Erasing Diagnostic Trouble Codes (DTCs) - $04 NOTE: When the Tablet’s ERASE function is used to erase the DTCs from the vehicle’s on-board computer, “Freeze Frame” data and manufacturer-specific enhanced data are also erased. If you plan to take the vehicle to a Service Center for repair, DO NOT erase the codes from the vehicle’s computer. If the codes are erased, valuable information that might help the technician troubleshoot the problem will also be erased. -
Page 21: Freeze Frame - $02
USING THE TABLET OBD2 Diagnostics Freeze Frame - $02 If more than one Diagnostic Trouble Code (DTC) was retrieved and to view Freeze Frame Data, following procedures bellow: From OBD2 Menu, select Freeze Frame - $02 and press the OK button. The Freeze Frame data displays. - Page 22 USING THE TABLET OBD2 Diagnostics Viewing Live Data From OBD2 Menu, select Live Data - $01, then press the OK button. A “One moment please . . .” message displays while the Tablet Scan Tool establishes communication with the vehicle. If the Scan Tool fails to establish communication with the vehicle, a “Communication Error”...
- Page 23 USING THE TABLET OBD2 Diagnostics Choose Merge Graph to view more PID results on one graph. Choose Multi Graph to view more Graphs in one screen. Troubleshoot any diagnostic issues by referencing your vehicle’s repair manual to view and/or compare Live Data (PID) information displayed on the Tablet Scan Tool against recommended vehicle specifications.
-
Page 24: Record Live Data
USING THE TABLET OBD2 Diagnostics To deselect a PID, highlight the PID, then press OK. The check-mark is removed. When you are finished making your selection(s), choose Done to continue. If no PIDs have been selected, an advisory message displays. Press OK to return to the Custom Live Data menu. - Page 25 USING THE TABLET OBD2 Diagnostics ━ Turn the ignition OFF, wait 5 seconds, then back ON to reset the computer. Press Relink to continue. ━ Press UP and DOWN to scroll through the available PIDs. When a PID you wish to display is highlighted, press OK (a “check-mark”...
- Page 26 USING THE TABLET OBD2 Diagnostics The Select PIDs to Record screen displays. If the Scan Tool fails to establish communication with the vehicle, a “Communication Error” message displays. ━ Ensure your vehicle is OBD2 compliant. Verify the connection at the DLC, and verify the ignition is ON. ━...
-
Page 27: O2 Sensor Monitor - $05
USING THE TABLET OBD2 Diagnostics Select Continuous Playback or Frame by Frame, as desired, then press OK. The display shows the recorded Live Data, beginning with the “trigger” frame. Only a limited amount of PID data can be displayed on the screen at one time. -
Page 28: Obd Monitor Test - $06
USING THE TABLET OBD2 Diagnostics From OBD2 Menu, select O2 Sensor Monitor - $05, then press the OK button. The O2 Sensor Monitor - $05 screen displays. NOTE: If the O2 Sensor Monitor is not supported by the vehicle under test, a notification is displayed. Press the Back button to return to the OBD2 menu. -
Page 29: Request Control On-Board System - $08
USING THE TABLET OBD2 Diagnostics When you have finished viewing test data for all desired tests, press Back from Select Test menu to return to OBD2 Menu, or press the Home button to return to Home screen. Request Control On-Board System - $08 The Request Control On-Board System - $08 allows you perform an EVAP Test or Particulate Filter Regeneration and Inducement System Reinitialization. -
Page 30: Viewing Vehicle Information - $09
USING THE TABLET OBD2 Diagnostics displays while the Tablet retrieves Monitor status. NOTE: If the Tablet retrieves Permanent DTCs only, MIL Off and California state is selected, Drive Cycle Procedures can be viewed from the OBD2 Diagnostic screen. When Monitor status has been retrieved, the Drive Cycle Procedures menu displays. - Page 31 USING THE TABLET OBD2 Diagnostics The control module identification number. The vehicle’s calibration ID(s). These IDs uniquely identify the software version(s) for the vehicle’s control module(s). The Vehicle’s Calibration Verification Number(s) (CVNs) required by ODB2 regulations. CVNs are used to determine if emission- related calibrations for the vehicle under test have been changed.
-
Page 32: Oem Diagnostics
USING THE TABLET OEM Diagnostics If In-use Performance Tracking is not available for your vehicle, an advisory message shows on the diagnostic tablet’s display. Press Back to return to the Vehicle Information Menu. When you have finished viewing the list of available modules, press Back to return to the Vehicle Information menu. -
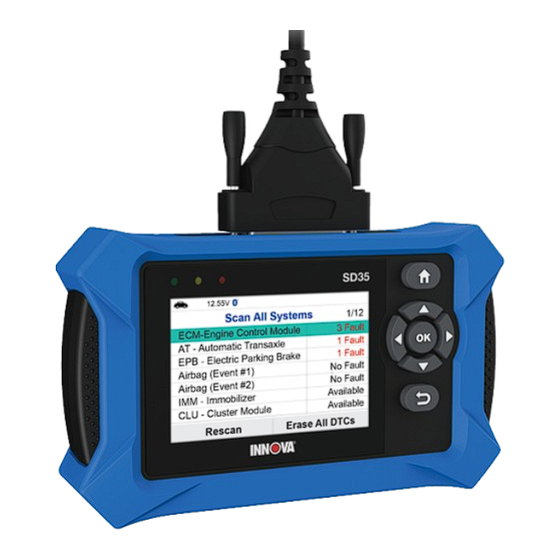
Page 33: Perform A Scan - Scan All Systems
USING THE TABLET OEM Diagnostics Available – Indicates that the module is part of the system but ━ does not report DTCs. The results screen also allows too either: Erase All DTCs - Erases all the module’s retrieved Diagnostic ━ Trouble Codes (DTCs). -
Page 34: Vehicle Inspection
USING THE TABLET OEM Diagnostics Reading DTCs Select the module for which you wish to read DTCs. Select Read DTCs in the selected module screen. The Tablet Scan Tool retrieves and displays DTCs stored in the vehicle’s computer for the currently selected module. NOTE: If no DTCs for the selected module are currently stored in the vehicle’s computer, the message “No ‘modules’... - Page 35 USING THE TABLET OEM Diagnostics or places a message on the vehicle’s Diagnostic Information Center, so following this process can help uncover hidden issues. A good practice is to perform a pre-scan before any work is done to uncover all issues, then a post-scan once repairs are complete to confirm the repairs were completed properly.
-
Page 36: Workshop Tools
USING THE TABLET Workshop Tools An “instructional” dialog displays to confirm selection. Select Yes to rescan the vehicle. Or, No to cancel. When finished viewing all desired information, select Back to return to the OEM Diagnostics menu. Workshop Tools The WORKSHOP TOOLS function allows you to perform several OEM / dealership services, including Vehicle Inspection, Oil Maintenance Reset, Battery Reset, Battery Initialization, EV/HEV/PHEV Battery Health, Battery/Alternator Test, TPMS Relearn. -
Page 37: Battery Reset
USING THE TABLET Workshop Tools Battery Reset You can use the Tablet to view the procedures for resetting the battery monitor system following a battery replacement. Select Battery Reset on the Workshop Tools screen. The Battery Reset Procedures screen displays. Select OK to continue. -
Page 38: Tpms Relearn
USING THE TABLET Workshop Tools To perform battery reset OBD service (Audi / Volkswagen): Select Battery Initialization on Workshop Tools screen. The Battery Reset OBD Service displays. Select Battery Reset OBD Service, then press OK. An “informational” screen display. Choose Next to continue. A series of “instructional”... -
Page 39: Ev/Hev/Phev Battery Health
USING THE TABLET Workshop Tools A “results” screen displays when the reset procedure has been completed. Select End, then press OK to terminate the test. EV/HEV/PHEV Battery Health Follow these steps to check the vehicle’s battery and alternator system (or hybrid/EV battery system) to ensure the system is operating within acceptable limits. - Page 40 USING THE TABLET Workshop Tools NOTE: If the engine is running, an advisory message will show. Turn the engine off, then turn the ignition on. DO NOT start the engine. Press OK to continue. An “instructional” message displays. Turn the vehicle’s headlights on, then choose Continue to proceed. A “countdown”...
-
Page 41: Previous Vehicles
USING THE TABLET Previous Vehicles An “instructional” message show. Start and warm the engine to normal operating temperature. Turn on the headlights. Choose Continue to proceed. An “instructional” message show. Press the accelerator pedal to raise engine speed to 2000 RPM and maintain the engine speed. When engine speed is within the required range, the alternator test begins. -
Page 42: Settings
USING THE TABLET Settings Vehicle Inspection – The Vehicle Inspection Report test results will be displayed. Workshop Tools – The Memory Workshop Tools allows you to review Oil Maintenance Reset procedures and Battery Reset procedures. When you have finished viewing the information, choose Back to return to the Previous Vehicles screen or press Home to exit to the Home Screen. -
Page 43: Autolink Setting
USING THE TABLET Settings AutoLink Setting Select AutoLink Setting in the Settings menu, then press OK. The AutoLink Setting screen displays. Select ON or OFF as desired. NOTE: To return to the Settings menu without making changes, press the Back button. Adjusting Display Brightness Select Adjust Brightness in the Settings menu, then press the OK button. -
Page 44: Viewing The Repairsolutions2 App Qr Code
USING THE TABLET Settings The tablet automatically saves the change. NOTE: To return to the Settings menu without making changes, press the Back button. Viewing the RepairSolutions2 App QR Code ® Select QR RS2 App in the Settings menu, then press the OK button. The QR RS2 App screen displays. -
Page 45: Tool Library
USING THE TABLET Tool Library Tool Library The Tool Library includes valuable reference information for the your tablet. The following functions are available: Icon Definition – Shows the full names for the I/M Monitor Status † icons shown and descriptions of informational icons on the Tablet’s display. -
Page 46: Smog Check Or I/M Program Led Definitions
USING THE TABLET Tool Library Select the remaining digits in the DTC in the same way. When you have selected all the DTC digits, press OK to view the DTC definition. When you have finished viewing the DTC definition, choose Back, to return to the Enter DTC screen to search for additional DTCs. -
Page 47: Monitor Icon Status
USING THE TABLET Tool Library When you have finished viewing the DLC location, choose New Vehicle (to view the DLC location for another vehicle) or choose Back to return to the Tool Library menu. Monitor Icon Status Defines the icon monitor status color coding and provides tips on how to proceed. Select Monitor Icon Status in the Library menu, then press the OK button. -
Page 48: Warranty+ Customer Service
Customer Service Our ASE Certified technical staff is here to help if you have any questions or require service. For information on UPDATES and OPTIONAL ACCESSORIES, please contact your local store, distributor or Innova’s Service Center. USA & Canada: (800) 544-4124... -
Page 49: Glossary
GLOSSARY OBD2 Terminology GLOSSARY OBD2 Terminology The following terms and their definitions are related to OBD2 systems. Powertrain Control Module (PCM) - The PCM is the OBD2 accepted term for the vehicle’s “on-board computer.” In addition to controlling the engine management and emissions systems, the PCM also participates in controlling the powertrain (transmission) operation. -
Page 50: Obd2 Monitors
GLOSSARY OBD2 Monitors model of vehicle to another. Vehicle manufacturers set these procedures. Consult your vehicle’s service manual for OBD2 Drive Cycle procedures. NOTE: Do not confuse a “Trip” Drive Cycle with an OBD2 Drive Cycle. A “Trip” Drive Cycle provides the “Enabling Criteria”... -
Page 51: Additional Terminology + Acronyms
GLOSSARY Additional Terminology + Acronyms = Oxygen Sensor Monitor = Oxygen Sensor Heater Monitor = Catalyst Monitor = Heated Catalyst Monitor = EGR (Exhaust Gas Recirculation) System Monitor = EVAP System Monitor = Secondary Air System Monitor NOTE: The following Monitors became standard beginning in 2010. The majority of vehicles produced before this time will not support these Monitors. - Page 52 Innova Electronics Corp. 17352 Von Karman Ave. Irvine, CA 92614 Copyright © 2024 IEC. All Rights Reserved. v.1.00 / SD35...
Need help?
Do you have a question about the SD-Advisor SD35 and is the answer not in the manual?
Questions and answers
Can I use the sd35 for tpms relearn on a 2017 Honda pilot? I tried and got a message saying tpms relearn was not accessible. Please advise.
Yes, the Innova SD-Advisor SD35 can be used for TPMS relearn, but only if the vehicle supports the TPMS Relearn function. If the 2017 Honda Pilot does not support it, an advisory message will display.
This answer is automatically generated
My sd35 will not auto link Obd2 will not autolink 2015 chrysler 200c 2.4 eng
No rear brake reset
can I print the manual for SD35 Innova