
Subscribe to Our Youtube Channel
Related Manuals for Primera PL 400


Summary of Contents for Primera PL 400
- Page 1 User's Manual © 2024 All rights reserved. For the most recent version of this manual please visit 092324 https://www.primera.com/applicatordownloads...
- Page 2 Trademark Acknowledgments: Primera and Primera Eddie are registered trademarks of Primera Technology, Inc. Windows is a registered trademark of Microsoft Corporation. All other trademarks are the property of their respective owners.
-
Page 3: Table Of Contents
Table of Contents Section 1: Unpacking and Setup ..................... 4 Section 2: Assemble the Liner Rewinder ..................6 Section 3: Loading the Label Stock ....................11 Section 4: Loading the Pouch/Applying the Label ................ 25 Section 5: Settings Overview ......................27 5A. -
Page 4: Section 1: Unpacking And Setup
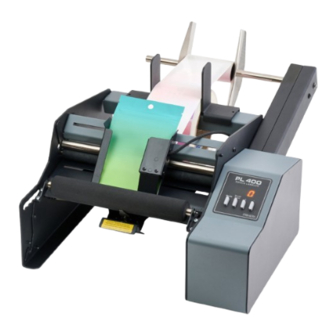
Section 1: Unpacking and Setup Thank you for purchasing the PL400 Pouch Labeler (hereafter referred to as "Labeler"). Bottles, cans, etc. will collectively be referred to as "containers." Please note the parts of the Labeler which will be referenced at multiple points in the manual that follows. - Page 5 Roll Guides Roll Bar Power Switch Power Input (12V) Roll Drag Arm Rewinder Arm Torque Adjustment Nut Liner Rewinder Liner Guides Power Adapter Wrench (for rewinder arm torque adjustment) Page | 5...
-
Page 6: Section 2: Assemble The Liner Rewinder
Section 2: Assemble the Liner Rewinder The rewinder portion of the PL400 requires minor assembly. No tools are required. Follow these instructions. Locate the rewinder arm, liner guides, and two thumbscrews. Rewinder Arm Liner Guides Thumbscrews Find the opening for the rewinder arm on the back of the Labeler above the power switch. Alignment Holes on Frame Opening for... - Page 7 Insert the rewinder arm into the opening as shown. Alignment Holes Screws Align the screws on the side of the arm with the holes in the Labeler frame. Page | 7...
- Page 8 Insert the thumbscrews into the threaded holes. Hand tighten the thumbscrews. Page | 8...
- Page 9 If not already attached to the rewinder arm, the liner guides must be installed on the rewinder. Locate the liner guides. Slide one of the Label guides onto the shaft with the black cylinder facing you. Note that the holes in the cylinder must align with the flats on the shaft. Liner Guide PUSH! Holes...
- Page 10 Push the remaining liner guide onto the shaft with the black cylinder facing away from you. The guides should be calibrated from the factory to stay in place during Label application, but allow adjustment of their position without the use of tools. If more or less sliding force is desired, the set screws in the black cylinders can be tightened or loosened with a 2mm hex key.
-
Page 11: Section 3: Loading The Label Stock
Section 3: Loading the Label Stock Remove the roll bar and roll guides from the Labeler. The roll guides and roll drag arm are removable and adjustable. They are held in place magnetically. Tip! The tab on the roll bar should face toward the the back 2. - Page 12 Tip! For smaller width Label roll cores (less than 3.625 in. [92 mm]) you may need to reverse the roll guides so that the bottom of the guides are facing out to allow the uprights to be placed next to the roll. The roll guides can slide along the bar to accommodate any size roll.
- Page 13 4. Place the roll drag arm under the roll bar. The roll drag arm may be placed on either side of the roll bar but the rounded tip of the roll drag arm should be located inside the core approximately in the center. The arm is spring loaded so that there is downward pressure on the inside of the roll.
- Page 14 6. Position the stock to correspond with the general area where it will be applied to the pouch. 7. Pull the loose end of the Label stock forward and then push it into the feed area from the back of the Pouch Labeler. Move the Label guides to the sides for now. These will be adjusted later.
- Page 15 8. To make it easier to feed the label stock, first pull out the pouch idler roller until it clicks into a locked position. There will be approximately one inch of space between the pouch drive roller and the pouch idler roller. Pull! Click! Pouch Idler Roller...
- Page 16 9. Flip up the pouch guides to allow easy access to feed the label stock through the liner drive roller and liner idler roller. Page | 16...
- Page 17 10. Pull approximately 12 inches [30 cm] of Label stock out beyond the peel edge OVER the Pouch Idler Roller. Remove the labels from this section of the label stock! You may still apply these Labels by hand. Pouch Ilder Roller Page | 17...
- Page 18 11. Take the loose Label stock and feed it between the liner idler roller and the liner drive roller. In order to feed the Label stock between the rollers, the liner idler roller should be in the unclamped position. You may wish to engage the label load mode discussed in section 5D to make feeding through the rollers easier.
- Page 19 13. If necessary, adjust the position of the liner on the peel edge left/right to align the liner with the Label stock roll. Also, adjust the Label sensor using the Label sensor bracket so that the Label sensor flag is roughly centered on the Label stock. Sensor Flag 14.
- Page 20 15. Lower the Pouch Guides. 16. Push down on the buttons on either side of the applicator simultaneously to release the Pouch Idler roller back to its locked position. Buttons Page | 20...
- Page 21 17. Adjust the Label guides so that they are just touching the edge of the Label stock. Do not pinch the Labels between the guides. If the guides are loose, pull them away from the Label stock and tighten the thumbscrews. When the thumbscrews are tight, you can still move the guides.
- Page 22 18. Begin applying Labels until you have enough liner to reach the liner rewinder. Set the position of the liner guides to provide 1/8” [3mm] space on each side of the liner. Liner Guides Page | 22...
- Page 23 19. Fold the leading edge of the liner so the folded edge is in the bottom of the slots on both liner guides. Tip! We recommend trimming the liner to length with scissors to minimize the resulting slack in the liner and to provide a square leading edge to fold. NO SLACK! Cut Liner to Length Liner...
- Page 24 20. Press the foot switch to feed enough Labels for the liner to wrap around the liner guide rolls. The pressure of the liner will keep the folded liner in the slots. Or you can just wait until your container is loaded so you don’t waste any more Labels. Do not hand turn the rewinder.
-
Page 25: Section 4: Loading The Pouch/Applying The Label
Section 4: Loading the Pouch/Applying the Label 1. Power off the PL400 Pouch Labeler using the power switch. This will allow you to setup the pouch position without accidentally triggering a label application. 2. Move the position of the Pouch Guides relative to the label stock. Generally, you will want to center the pouch on the labels. - Page 26 4. Test fit the pouch in between the guides. When you think the position is correct, remove the pouch. 5. Power on the PL400 6. Insert the pouch into the guides. The PL400 will automatically grab the pouch and apply the label.
-
Page 27: Section 5: Settings Overview
Section 5: Settings Overview 5A. Label Position Vertical Labels are positioned on pouches in the vertical direction based on the current label position setting, which represents the approximate distance from the top of the pouch (leading edge as fed into applicator) to the top of the label after application. -
Page 28: Label Counter Mode
High-Torque Mode: 3 in. [7.6 cm] / second This mode provides more motor torque to handle larger supply rolls and the most peel-resistant Labels. To activate High-Torque Mode, hold down the foot switch while switching on the unit. To switch back to High-Speed Mode, hold down the foot switch again while switching on the unit. -
Page 29: Units Of Measure
5F. Units of Measure English (inches) In this configuration, “-” will be the first digit of the firmware version displayed during unit start-up. To change to English from metric, press and hold “Mode” and “+” buttons simultaneous while switching on unit. Metric (centimeters) In this configuration “=”... - Page 30 Advanced Settings (Do not adjust unless directed by Tech Support) These settings can resolve some issues if used appropriately. However, if used in the wrong circumstances, they can cause your applicator to stop functioning normally. 5H. Label Sensor Trigger Mode (Advanced) To check or adjust the trigger point of the label sensor, the applicator has a Label Sensor Trigger Mode.
-
Page 31: Section 6: Label Path Diagram
Section 6: Label Path Diagram Page | 31... -
Page 32: Section 7: Troubleshooting And Maintenance
Section 7: Troubleshooting and Maintenance 7A. Troubleshooting Motor stalling on Labels 6" (15.3 cm) or wider. For Label stock 6 in. [15.3 cm] and wider, it may be necessary to reduce the speed of the Pouch Labeler. The PL400 includes a half-speed mode that generates more torque from the motors for wider Label stock. -
Page 33: Maintenance
Lubricate Bearings Primera recommends oiling the four bearings associated with the liner drive roller and liner idler roller. Oil these four bearings after every 50,000 pouches labeled. They should only be oiled after the first 50,000 labels as they are lubricated with a special grease at the factory. - Page 34 Clean Label Gap Sensor Flag KnowledgeBase Article Over time adhesive from the Labels can build up on the sensor flag just above the container rollers. Periodically clean the top of the sensor flag with a cotton swab and alcohol. Adjusting Rewinder Torque If you find that the rewinder is pulling the liner out of the guide slots, reduce the torque by turning the shaft counterclockwise.
-
Page 35: Section 8: Specifications
Section 8: Specifications Pouch width: 1" to 9" (25mm to 228mm) Supply roll diameter: Up to 8" (203mm) Media liner width: 1" to 8.375" (25mm to 213mm) Supply roll core I.D: 2" to 3" (51mm to 76mm) Electrical rating: 12 VDC, 5 A Power requirements: 100-240 VAC, 50/60 Hz, 60 watts Feed speed:... -
Page 36: Section 9: Certifications And Environmental Policy
Section 9: Certifications and Environmental Policy EMC: Class B Human operator intervention is acceptable for this product in an ESD event. This means it is possible that static electricity may be discharged when touching the screen, which may restart the tablet. FCC: NOTE: This equipment has been tested and found to comply with the limits for a Class B digital device, pursuant to part 15 of the FCC Rules. - Page 37 When a product reached its end of life, contact us at environment@primera.com or +1- 763-475-6676 to arrange its recycling. Primera will work with you to arrange for the recycling of the product.
Need help?
Do you have a question about the PL 400 and is the answer not in the manual?
Questions and answers