Table of Contents

Subscribe to Our Youtube Channel
Related Manuals for Smoke hollow SH17161


Summary of Contents for Smoke hollow SH17161
- Page 1 This Owner's Manual is provided and hosted by Appliance Factory Parts. Smoke Hollow SH17161 Owner's Manual Shop genuine replacement parts for Smoke Hollow SH17161 Find Your Smoke Hollow Grill Parts - Select From 115 Models -------- Manual continues below --------...
-
Page 2: For Outdoor Use Only
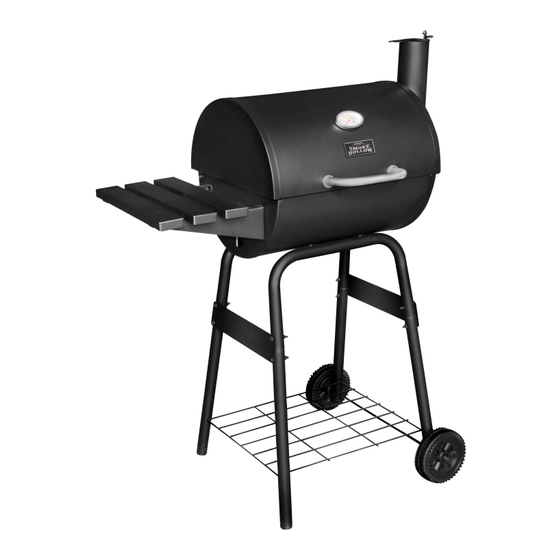
Owner’s Manual Charcoal Grill Model SH17161 THIS IS YOUR ASSEMBLY, CARE & USE MANUAL WITH IMPORTANT WARNING & SAFETY INFORMATION. PLEASE SAVE THESE INSTRUCTIONS. Approximate assembly time: 20 minutes Tools needed for assembly: Phillips head screwdriver FOR OUTDOOR USE ONLY... - Page 3 CAUTION • Do not use gasoline, kerosene or alcohol for lighting. This grill is not intended to be used in or installed on recreational vehicles and/or boats. • Do not attempt to move the grill while it is in use. •...
- Page 4 TOLL FREE 1-866-475-5180 (Monday–Friday, 8:30 am–4:30 pm, CST). NOTE : DO NOT RETURN UNIT TO THE STORE BEFORE CALLING THE TOLL FREE NUMBER. Do not dispose of your cartons until you are completely satisfied with your new Smoke Hollow grill.
-
Page 5: Parts And Tool List
Parts and Tool List Description Quantity Smoke Stack Damper Exploded view Smoke Stack Model Lid Handle Standoffs SH17161 Lid Handle Cooking Grids Charcoal Rack Firebox U-Legs Leg Braces Short Legs Wheels Wheel Axle Wheel Cover Wire Rack Long Legs Side Table... -
Page 6: Grill Assembly
Grill Assembly Step 1 Locate: • (2) U-Legs • (2) Short Legs • (2) Long Legs Instructions: Connect the (2) Short and (2) Long Legs to the (2) U-Legs as shown here. Do not add any bolts at this time. Step 2 Locate: •... - Page 7 Grill Assembly Step 3 Locate: • (2) Leg Braces • (8) M6x45 Bolts • (8) M6 Nuts Instructions: Secure Leg Assembly with (2) Leg Braces as shown using (4) M6x45 Bolts and M6 Nuts for each Leg Brace. Step 4 Locate: •...
- Page 8 Grill Assembly Step 5 Locate: • Firebox • Air Vent • (1) M6x12 Bolt • (1) M6 Nut Instructions: Attach Air Vent to Firebox as shown with an M6x12 Bolt and M6 Nut. Make sure Air Vent handle passes through the opening in the Firebox.
- Page 9 Grill Assembly Step 7 Locate: • Lid • Smoke Stack • Heat Indicator • Nameplate • Lid Handle • Lid Handle Standoffs • (4) M6x12 Bolts • (4) M6 Nuts • (2) M5x15 Bolts Instructions: Attach Smoke Stack to Lid in location shown using (4) M6x12 Bolts with (4) M6 Nuts. Attach Lid Handle and Lid Handle Standoffs to Lid as shown with (2) M5x15 Bolts.
- Page 10 Grill Assembly Step 9 Locate: • Side Table • (4) M6x12 Bolts • (4) M6 Nuts Instructions: Attach Side Table to Firebox with (4) M6x12 Bolts and (4) M6 Nuts as shown here. Step 10 Locate: • (2) Cooking Grids •...
- Page 11 Grill Assembly ASSEMBLY OF YOUR GRILL IS NOW COMPLETE. FOR YOUR SAFETY, FOLLOW ALL SAFE GUARDS AND INSTRUCTIONS.
-
Page 12: Cleaning Ash From The Grill
Operating Instructions SEASONING YOUR NEW GRILL: Before using your grill, you should season the unit to enhance the cooking and to provide better overall durability. Failure to properly follow these steps may damage the finish and/or add metallic flavors to your foods. 1. -
Page 13: Limited Warranty
Limited Warranty This Smoke Hollow ® grill is guaranteed against broken or damaged parts at time of purchase. All parts carry a 1-year limited warranty. Paint is guaranteed to be free of defects for 90 days except for rust, which may appear after repeated use.
Need help?
Do you have a question about the SH17161 and is the answer not in the manual?
Questions and answers