
Related Manuals for AZ-Delivery 1.3 inch OLED I2C Screen


Summary of Contents for AZ-Delivery 1.3 inch OLED I2C Screen
- Page 1 Welcome! Thank you for purchasing our AZ-Delivery 1.3 inch OLED I2C Screen. On the following pages, you will be introduced to how to use and set up this handy device. Have fun!
- Page 2 Areas of application Education and teaching: Use in schools, universities and training institutions to teach the basics of electronics, programming and embedded systems. Research and development: Use in research and development projects to create prototypes and experiments in the fields of electronics and computer science. Prototype development: Use in the development and testing of new electronic circuits and devices.
- Page 3 the requirements of the RoHS Directive (2011/65/EU) and does not contain any hazardous substances in quantities above the permitted limits, residual chemical hazards may still exist. Please note the following safety instructions: Attention: The back of the display and the circuit board can release chemical residues from manufacturing or during operation. Note: Wear protective gloves when handling or installing the display for a long time to avoid skin irritation.
-
Page 4: Table Of Contents
Table of Contents Introduction....................3 Specifications....................4 How to set-up Arduino IDE................5 How to set-up the Raspberry Pi and Python..........9 The pinout....................10 Connecting the screen with Atmega328P Board.........11 Library for Arduino IDE................12 Sketch example..................13 Connecting the screen with Raspberry Pi...........24 Enabling the I2C interface...............25 finding I2C Adresses................26 Python library...................27 Python script....................28... -
Page 5: Introduction
Introduction OLED stands for Organic Light Emitting Diodes. OLED screens are arrays of LEDs stacked together in a matrix. The 1.3 OLED screen has 128x64 pixels (LEDs). To control these LEDs we need a driver circuit or a chip. The screen has a driver chip called SH1106. -
Page 6: Specifications
Specifications Power supply voltage from 3.3V to 5V Communication interface Pixel Color White from -20 to 70 ℃ Operating temperature Low power consumption < 11mA Dimensions 36 x 34 x 3mm [1.4 x1.3 x 0.1inch] To extend the lifetime of the screen, it is common to use a “Screen saver”. It is recommended not to use constant information over a long period of time, because that will shorten the lifespan of the screen and increase the, so called, “Screen burn”... -
Page 7: How To Set-Up Arduino Ide
How to set-up Arduino IDE If the Arduino IDE is not installed, follow the link and download the installation file for the operating system of choice. For Windows users, double click on the downloaded .exe file and follow the instructions in the installation window. - 5 -... - Page 8 For Linux users, download a file with the extension .tar.xz, which has to be extracted. When it is extracted, go to the extracted directory and open the terminal in that directory. Two .sh scripts have to be executed, the first called arduino-linux-setup.sh and the second called install.sh.
- Page 9 Almost all operating systems come with a text editor preinstalled (for example, Windows comes with Notepad, Linux Ubuntu comes with Gedit, Linux Raspbian comes with Leafpad, etc.). All of these text editors are perfectly fine for the purpose of the eBook. Next thing is to check if your PC can detect your board.
- Page 10 If the Arduino IDE is used on Windows, port names are as follows: For Linux users, for example port name is /dev/ttyUSBx, where x represents integer number between 0 and 9. - 8 -...
-
Page 11: How To Set-Up The Raspberry Pi And Python
How to set-up the Raspberry Pi and Python For the Raspberry Pi, first the operating system has to be installed, then everything has to be set-up so that it can be used in the Headless mode. The Headless mode enables remote connection to the Raspberry Pi, without the need for a PC screen Monitor, mouse or keyboard. -
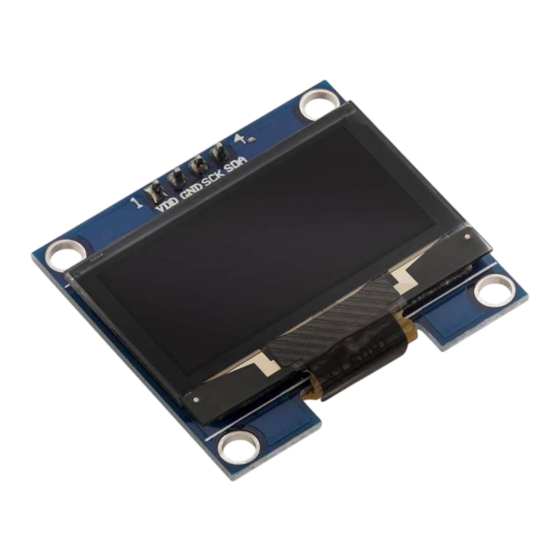
Page 12: The Pinout
The pinout The 1.3 inch OLED screen has four pins. The pinout is shown on the following image: The screen has an on-board voltage regulator. The pins of the 1.3 inch OLED screen can be connected to 3.3V or to 5V power supply without danger to the sensor itself. -
Page 13: Connecting The Screen With Atmega328P Board
Connecting the screen with Atmega328P Board Connect the 1.3 inch OLED screen with the Atmega328P Board as shown on the following connection diagram: Screen pin Pin Wire color Green wire Blue wire Black wire Red wire - 11 -... -
Page 14: Library For Arduino Ide
Library for Arduino IDE To use the screen with an Atmega328P Board, it is recommended to download an external library for it. The library that is going to be used is called the “U8g2”. To download and install it, open Arduino IDE and go to: Tools >... -
Page 15: Sketch Example
Sketch example #include <U8g2lib.h> #include <Wire.h> #define time_delay 2000 U8G2_SH1106_128X64_NONAME_F_HW_I2C u8g2(U8G2_R0, U8X8_PIN_NONE); const char COPYRIGHT_SYMBOL[] = {0xa9, '\0'}; void u8g2_prepare() { u8g2.setFont(u8g2_font_6x10_tf); u8g2.setFontRefHeightExtendedText(); u8g2.setDrawColor(1); u8g2.setFontPosTop(); u8g2.setFontDirection(0); void u8g2_box_frame() { u8g2.drawStr(0, 0, "drawBox"); u8g2.drawBox(5, 10, 20, 10); u8g2.drawStr(60, 0, "drawFrame"); u8g2.drawFrame(65, 10, 20, 10); void u8g2_r_frame_box() { u8g2.drawStr(0, 0, "drawRFrame");... - Page 16 void u8g2_string_orientation() { u8g2.setFontDirection(0); u8g2.drawStr(5, 15, "0"); u8g2.setFontDirection(3); u8g2.drawStr(40, 25, "90"); u8g2.setFontDirection(2); u8g2.drawStr(75, 15, "180"); u8g2.setFontDirection(1); u8g2.drawStr(100, 10, "270"); void u8g2_line() { u8g2.drawStr(0, 0, "drawLine"); u8g2.drawLine(7, 20, 77, 32); void u8g2_triangle() { u8g2.drawStr(0, 0, "drawTriangle"); u8g2.drawTriangle(14, 20, 45, 30, 10, 32); void u8g2_unicode() { u8g2.drawStr(0, 0, "Unicode");...
- Page 17 #define image_width 128 #define image_height 21 static const unsigned char image_bits[] U8X8_PROGMEM = { 0x00, 0x00, 0x00, 0x00, 0x00, 0x00, 0x00, 0x00, 0x00, 0x00, 0x00, 0x00, 0x00, 0x00, 0x00, 0x00, 0x00, 0x00, 0x00, 0x00, 0x00, 0x00, 0x00, 0x00, 0x06, 0x03, 0x00, 0x00, 0x00, 0x00, 0x00, 0x00, 0xfc, 0x1f, 0x00, 0x00, 0xfc, 0x1f, 0x00, 0x00, 0x06, 0x03, 0x00, 0x00, 0x00, 0x00, 0x00, 0x00, 0xfe, 0x1f, 0x00, 0x00, 0xfc, 0x7f, 0x00, 0x00, 0x06, 0x00, 0x00, 0x00, 0x00, 0x00, 0x00, 0x00, 0x07, 0x18, 0x00, 0x00, 0x0c, 0x60, 0x00, 0x00,...
- Page 18 void u8g2_bitmap() { u8g2.drawXBMP(0, 5, image_width, image_height, image_bits); void setup(void) { u8g2.begin(); u8g2_prepare(); float i = 0.0; void loop(void) { u8g2.clearBuffer(); u8g2_prepare(); u8g2_box_frame(); u8g2.sendBuffer(); delay(time_delay); u8g2.clearBuffer(); u8g2_disc_circle(); u8g2.sendBuffer(); delay(time_delay); u8g2.clearBuffer(); u8g2_r_frame_box(); u8g2.sendBuffer(); delay(time_delay); u8g2.clearBuffer(); u8g2_prepare(); u8g2_string_orientation(); u8g2.sendBuffer(); delay(time_delay); u8g2.clearBuffer(); u8g2_line(); u8g2.sendBuffer();...
- Page 19 // one tab u8g2.clearBuffer(); u8g2_triangle(); u8g2.sendBuffer(); delay(time_delay); u8g2.clearBuffer(); u8g2_prepare(); u8g2_unicode(); u8g2.sendBuffer(); delay(time_delay); u8g2.clearBuffer(); u8g2_bitmap(); u8g2.sendBuffer(); delay(time_delay); u8g2.clearBuffer(); u8g2.setCursor(0, 0); u8g2.print(i); i = i + 1.5; u8g2.sendBuffer(); delay(time_delay); - 17 -...
- Page 20 First, two libraries, the U8g2lib and Wire are imported. Next, an object called u8g2 is created with the following line of code: U8G2_SSD1306_128X32_UNIVISION_F_HW_I2C u8g2(U8G2_R0, U8X8_PIN_NONE); The created object represents the screen itself and it is used to control the screen. The U8g2 library can be used for many other OLED screens, thus there are many constructors in the sketch examples from the library.
- Page 21 The third function is called setDrawColor(), which has one argument and returns no value. The argument value is an integer number which represents a color index for all drawing functions. Font drawing procedures use this argument to set the foreground color. The default value is 1. If it is set to 0 then the space around the character is lit up, and the character is not.
- Page 22 The function called drawStr() has three arguments and returns no value. It is used to display a constant string on the screen. The first two arguments represent the X and Y positions of the cursor, where the text is displayed. The third argument represents the text itself, a string value.
- Page 23 The function called drawBox() has four arguments and returns no value. It is used to display a filled rectangle. The first two arguments represent the X and Y positions of the top left corner of the rectangle. The second two arguments represent the width and height of the rectangle.
- Page 24 The function called drawTriangle() has six arguments and returns no value. It is used to display a filled triangle. The first two arguments represent the X and Y positions of the first corner point of the triangle. The second two arguments represent the X and Y positions of the second corner point of the triangle.
- Page 25 u8g2.drawUTF8(95, 20, COPYRIGHT_SYMBOL); //COPYRIGHT SYMBOL The third way of using the function is to use a hexadecimal number for the character itself, like in the following line of code: u8g2.drawUTF8(115, 15, "\xb0"); // DEGREE SYMBOL The function returns a value, an integer number which represents the width of the text (string).
-
Page 26: Connecting The Screen With Raspberry Pi
Connecting the screen with Raspberry Pi Connect the screen with the Raspberry Pi as shown on the following connection diagram: Screen pin Raspberry Pi pin Physical pin Wire color GPIO2 Green wire GPIO3 Blue wire Black wire Red wire - 24 -... -
Page 27: Enabling The I2C Interface
Enabling the I2C interface In order to use the module with Raspberry Pi, I2C interface has to be enabled. Open following menu: Application Menu > Preferences > Raspberry Pi Configuration In the new window, under the tab Interfaces, enable the I2C radio button, as on the following image: - 25 -... -
Page 28: Finding I2C Adresses
Finding the address of the OLED module If it is enabled, we will use the command i2detect to find the module on the I2C bus: i2cdetect -y 1 The result should look like the one shown below: Our device was recognised with the address "0x3c". This is the standard address for this type of device. -
Page 29: Python Library
Python-library For the display of shapes, text and images we will use a Python library. On the current Raspberry Pi OS, Python3, pip3 and git are already pre- installed, but if this is not the case, you can install the whole thing with the following commands: sudo apt-get install python3-dev libffi-dev libssl-dev python3-pil... -
Page 30: Python Script
Python-Script In the folder "pi" we now create a folder called "oled" and go to this folder sudo mkdir oled cd oled luma.oled offers many examples and we can download them with the following command: sudo git clone https://github.com/rm-hull/luma.examples with: cd luma.examples/examples/ we change to the folder in which the examples are located. - Page 31 There are more examples in the folder. With the command: ls -a you can see them. Try out more examples. And with: sudo nano [examplescript] the scripts can be edited. - 29 -...
- Page 32 Internet. If you are looking for the high quality products for and Raspberry Pi, AZ-Delivery Vertriebs GmbH is the right company to get them from. You will be provided with numerous application examples, full installation guides, eBooks, libraries and assistance from our technical experts.
Need help?
Do you have a question about the 1.3 inch OLED I2C Screen and is the answer not in the manual?
Questions and answers