
Related Manuals for Geovent HVUX 300


Summary of Contents for Geovent HVUX 300
- Page 1 I N S T R U C T I O N M A N U A L A T E X H I G H V A C U U M U N I T HVUX 300, 350, 450, 550 and 700 Version 1.0 30.08.2024...
-
Page 3: Table Of Contents
When the manual has been read and understood in full, Do not modify the product or use spare parts from other the table of contents can be used to find the relevant suppliers than Geovent, as this may hamper the product information in each case. and the function. -
Page 4: Machine Overview
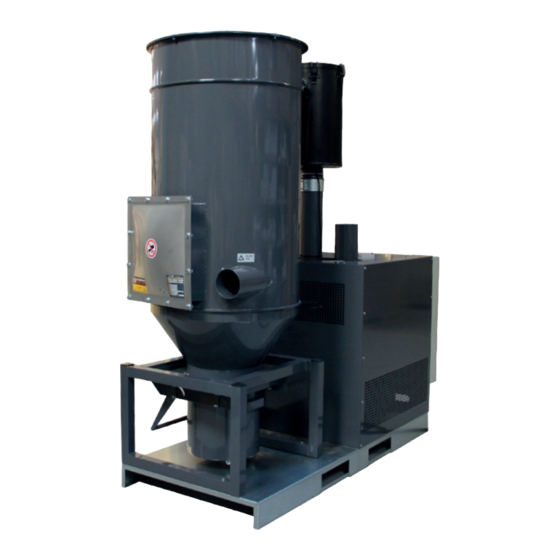
Please follow the instruction for disposal in chapter 10.0. 3.0 Machine overview 3.1. Description The GEOVENT HVUX is a series of High Vacuum Units based on our standard HVU ”Non-ATEX” models. 3.2 Intended use A Ø127mm Outlet B Removable top... -
Page 5: Technical Data
Weight filter AluTex® with a 99.9% filtration efficiency. Expected clone ø700 on class life for normal operation: 4,000-8,000 hours. HVUX 300 Powder coated HVUX 350 Powder coated Engine/ side channel blower: IP-54 standard engine with bypass fan in cast aluminium. Expected life for nor-... -
Page 6: Assembly, Installation And Start Of Operation
5.0 Assembly, installation and start of Connecting the compressed air: operation Connect the clean and dry compressed air. There must BURST SENSOR BURST SENSOR be a pressure regulator. We recommend you to install a 5.1 Location water separator right before the HVU. Type GMG 12000KX Type GMG 12000KX BURST SENSOR... -
Page 7: Control And Test Of The Security System
6. Attach the bracket on the explosion panel. When mounting the sensor you must make sure that the PT- FE-ampoule will be destroyed safely on releasing the bursting pane. Attention: The protection cap is only for transport security and has to be removed carefully by left-hand rotation on installation at the latest. -
Page 8: Emptying Of Bucket
9.0 Troubleshooting 2. Disconnect the compressed air connection. 3. Before emptying the bucket, it is important that the In case of problems with reduced pressure or volume of service technician is equipped with the necessary air, the instructions below could help: personal safety outfit, i.e. -
Page 9: Dismantling, Disabling And Scrapping
10.0 Dismantling, disabling and scrapping 11.0 Dimensions Deactivate the product by disconnection the electrical HVUX mains. Dismantle compressed air pipes and other pipes or wires etc. and dispose of it according to local regula- tions. Clean the collection bucket and remove the filter cartrid- ges as described in chapeter 7.3. -
Page 10: Liability
Directive Council of 2006/42/EF of 17. may 2006 regard- User liability ing machines. In order for Geovent to be capable of granting the decla- Directive 2014/34/EU of 26 of February concerning red warranty, the user/fitter must follow this instruction equipment and protective systems intended for use in manual in all respects. -
Page 11: Spare Part List
14.0 Spare parts list Art. No. Description 92-211 Breaker switch 16A Replacement cartridge ø225 for 03-260 HVUX - 5 m² 16-503-s Burst sensor for explosion membrane 16-505 EX-Membran... - Page 12 HOVEDGADEN 86 • DK-8831 LØGSTRUP (+45) 8664 2211 • salg@geovent.dk...
Need help?
Do you have a question about the HVUX 300 and is the answer not in the manual?
Questions and answers