
Related Manuals for Geovent HVU Elite


Summary of Contents for Geovent HVU Elite
- Page 1 I N S T R U C T I O N M A N U A L H I G H V A C U U M HVU ELITE www.geovent.com Version 1.0 23.11.2023...
-
Page 3: Table Of Contents
Do not modify the product or use spare parts from other suppliers than Geovent, as this may hamper the product The manual must be read in full and understood before and the function. -
Page 4: Machine Overview
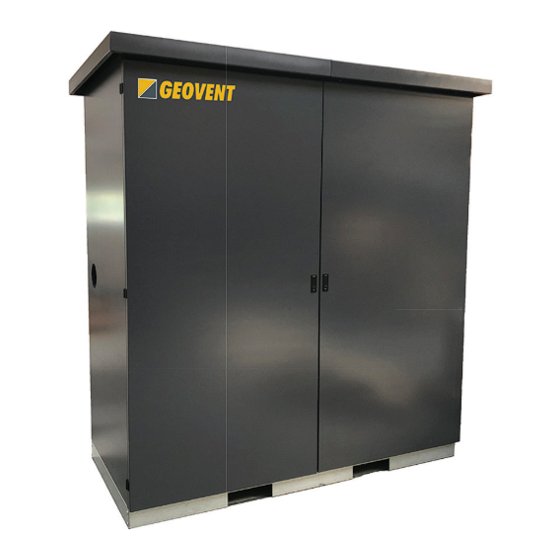
20,000 hour s. 3.1. Description Automation: Control panel in steel cabinet IP 54. Geovent HVU Elite is a compact high vacuum unit for 3.3.2 Technical data collecting dust, smoke and other particles. The unit is prepared for outdoor use. -
Page 5: Assembly, Installation And Start Of Operation
Control panel During transport over a short distance e.g. in a stock or a factory, the product can be moved by means of a for- klift or a stabeler. Before putting into service: When moved it must be secured that the product does During transportation, the control panel is exposed to not tilt or shift. -
Page 6: Commissioning
5. 3 Checking and testing the system 6.1 After installation After installation, check if there is any vibration or sound Check the installation according to chapter 5.3. disturbance. 7.0 Control, test and maintenance Check that the whole system is completely tight. In case 7.1 Control of squeaking, the leakage should be localized and sea- led with sealant. -
Page 7: Replacing Filter
sary. 8. Check switches and circuit breakers. 9. Maintain adequate IP rating: Inspect gaskets for dam- age and replace it if necessary. 10. In general, each component should be maintained according to the manufacturer’s instructions. 11. Verification. Perform measurements and tests ac- cording to EN60 204-1, chapter 18. - Page 8 7.2.3 Repairing the side channel blower 2. Remove the M10 nut at the bottom of the cyclone. 1. Stop the unit and disconnect the power supply. 2. Remove the 2 M6 bolts holding the accessory contai- ner in front of the vacuum unit. 3.
-
Page 9: Cleaning
8.0 Cleaning 10.0 Dismantling, disabling and scrapping The outside of the product is cleaned with a vacuum Deactivate the product by disconnection the electrical cleaner or a cloth. mains. Dismantle compressed air pipes and other pipes or wires etc. and dispose of it according to local regula- 9.0 Troubleshooting tions. -
Page 10: Dimensions
Wear on parts such as filter cartridges and hose is not included in the warranty. User liability In order for Geovent to be capable of granting the decla- red warranty, the user/fitter must follow this instruction manual in all respects. -
Page 11: Declaration Of Conformity
13.0 Declaration of conformity 14.0 Spare part list The manufacturer: GEOVENT A/S Art. No. Description HOVEDGADEN 86 Filter cartridge HVU Elite ø400x800 DK-8831 LØGSTRUP 03-265 Hereby declares that: MultiBox for high vacuum 30 kPa 13-700A 0-10V The product: 03-810AF Relief valve... - Page 12 HOVEDGADEN 86 • DK-8831 LØGSTRUP (+45) 8664 2211 • salg@geovent.dk...
Need help?
Do you have a question about the HVU Elite and is the answer not in the manual?
Questions and answers