Advertisement
Quick Links
Advertisement

Related Manuals for HighPoint SSD6204A


Summary of Contents for HighPoint SSD6204A
- Page 1 SSD6202A 2x M.2 Port to PCIe 3.0 x8 NVMe RAID Controller Quick Installation Guide V1.07...
-
Page 2: System Requirements
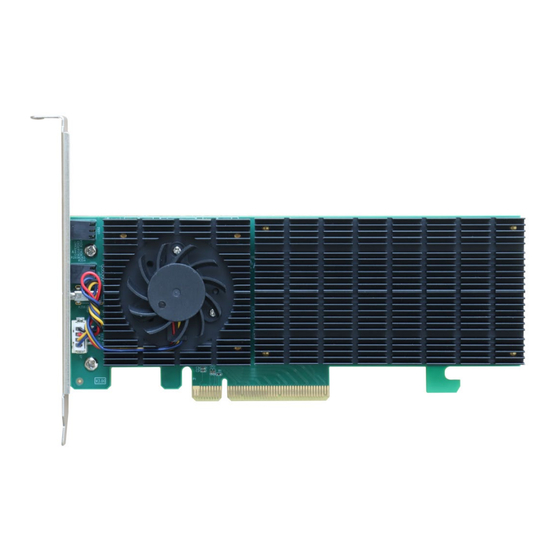
System with a free PCIe 4.0/3.0 x16 or PCIe 4.0/3.0 x8 slot • Windows • Linux (Not supported by Arch linux) • VMware • For more information, please visit the SSD6200 Series Product Page: https://www.highpoint-tech.com/ssd6200-series-overview SSD6202A Kit Content SSD6202A Controller Card • Low-Profile bracket • Quick Installation Guide •... - Page 3 SSD6202A Hardware Front View Fan for NVMe chipset Heat sink for M.2 SSD’s Fan power connector PCIe 3.0 x8 Host Interface...
- Page 4 RAID Switch LED Support...
- Page 5 SSD6202A Hardware Installation Step 1. On the rear of the SSD6202A, remove the four screws that secure the unit’s heat sink to the PCB. After removing the screws, carefully remove the heat sink from the SSD6202A. Step 2. These 2 screws are used to install the NVMe SSDs.
- Page 6 Step 3. Please remove the screws on the right side of the SSD6202A. Gently insert the SSD into the slot. Note: Please make sure all disks are clean before you insert them into the slot to avoid unexpected situations. Step 4. Refasten the screw to secure the SSD. Note: Make sure the SSDs are carefully, but securely installed into each M.2 port.
- Page 7 Step 6. Align and install the heatsink; on the rear of the SSD6202A, refasten the 4 screws that were removed in step 1. Notes: Make sure the aluminum cover is properly aligned with the controller board (PCB), and that it makes full contact with the thermal pad, before refastening it to the SS6202.
- Page 8 RAID Switch RAID Switch: four options are available; when the system starts, the SSD6202A will automatically create the specified array using the hosted NVMe SSDs. None JBOD RAID 1 RAID 0 Note:Using the RAID Switch to configure an array will destroy any data stored on the NVMe SSDs.
- Page 9 There are four LED support in SSD6202A. RAID LED PCIe LED PORT2 SSD LED PORT1 SSD LED RAID LED: when the SSD6202A has no RAID, the RAID LED is off. If there is a normal RAID in the SSD6202A, the RAID LED is green.
-
Page 10: Customer Support
Software Download: https://www.highpoint-tech.com/ssd6200-series-overview Customer Support If you encounter any problems while utilizing the SSD6202A, or have any questions about this or any other HighPoint Technologies, Inc. product, feel free to contact our Customer Support Department. Web Support: https://www.highpoint-tech.com/support-and-services HighPoint Technologies, Inc. websites: https://www.highpoint-tech.com...
Need help?
Do you have a question about the SSD6204A and is the answer not in the manual?
Questions and answers