Table of Contents
Advertisement
Quick Links
Advertisement
Table of Contents

Related Manuals for BBQ GAT1913


Summary of Contents for BBQ GAT1913
- Page 1 This Owner's Manual is provided and hosted by Appliance Factory Parts. BBQ Grillware GAT1913 Owner's Manual Shop genuine replacement parts for BBQ Grillware GAT1913 Find Your BBQ Grillware Grill Parts - Select From 22 Models -------- Manual continues below --------...
- Page 2 ITEM # 41242 WARNING Improper installation, adjustment, Tabletop Gas Grill alteration, service or maintenance can cause injury or property damage. Read the installation, operation and maintenance instructions thoroughly before installing or servicing this equipment. Failure to follow these instructions could result in fire or explosion which could cause property damage, personal injury or death.
- Page 3 • If odor continues, immediately call your gas supplier or fire department. Always read and understand the WARNINGS and INSTRUCTIONS that are contained in this manual before attempting to use this gas barbecue grill, to prevent possible bodily injury or property damage. GAT1913-1 owner' s manual...
-
Page 4: Table Of Contents
11. Do not use the grill unless it is COMPLETELY assembled and all parts are securely fastened and tightened. If there are any missing or damaged parts, contact customer service for a replacement. 12. Do not alter the grill in any manner. GAT1913-1 owner' s manual... - Page 5 To avoid burns, do not touch metal parts of the grill until they have completely cooled for at least 45 minutes or unless you are wearing protective gear such as pot holders, gloves, BBQ mittens, etc. Always open the grill lid carefully and slowly as heat and steam trapped within the grill could cause severe burns.
-
Page 6: Illustrated Part List
4. Cooking grid………..…...1pc 5. Warming rack..……..…1pc 6. Side handle…....…2pcs 7. Side handle support..2pcs 8. Heat insulation board..2pcs 9. Burner..….……..……1pc 10. Heating plate....1 pc 11. Reflection plate.....1pc 12. Front support.....1pc 13. Back support....1pc 14. Regulator valve…...1pc 15.Fastener......2pcs 16. Grease cup....1pc GAT1913-1 owner’s manual... - Page 7 Hardware List (A screwdriver is also included for your convenience.) Bolt Clevis Pin M5 x10MM Ø6.5 X 45MM 8pcs 2pcs Hair Pin Bolt Ø1.3MM M6 x10MM 2pcs Bolt Gasket M5 x 45MM 4pcs 2pcs Lock Washer Ø6.0MM 15pcs 4pcs Flat Washer Screwdriver Ø6MM 15pcs 2pcs GAT1913-1 owner’s manual...
-
Page 8: Assembly Instructions
(11) into the grill body (3) as shown. Step 2 Fix the front support (12) and back support (13) onto the grill body as shown. Pull them outwards and make sure both supports/legs locked in place. GAT1913-1 owner’s manual... - Page 9 Step 3 Fix side handles (6), heat insulation board (8), side handle supports (7) and fastener (15) to the grill body as shown. Step 4 Install the lid handle (2) on lid (1) as shown. GAT1913-1 owner’s manual...
- Page 10 Step 5 Connect the top lid and body by insert the clevis pins (G) as shown. Step 6 Inserting the hair pin (H) through the hole in the end of each clevis pin as shown. GAT1913-1 owner’s manual...
- Page 11 Step 7 Put the heating plate (10) into the grill upon the burner as shown. Step 8 Put the warming rack (5) onto the heating plate as shown. GAT1913-1 owner’s manual...
- Page 12 Step 9 Place the cooking grid upon the heating plate as shown. Make certain the cooking grid is clipped by the fastener. Step 10 Install the grease cup (16) under the grill body as shown. GAT1913-1 owner’s manual...
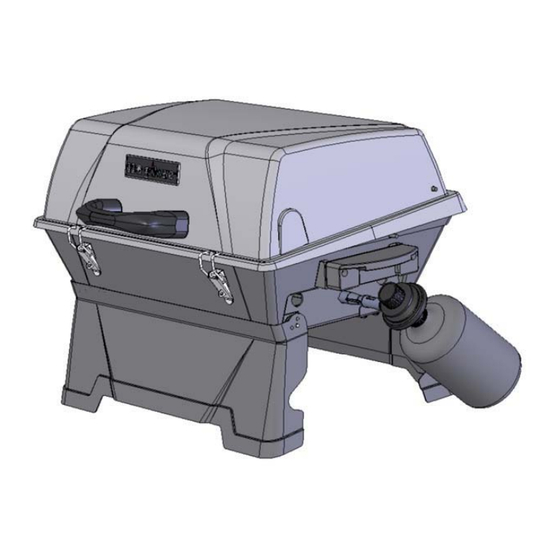
- Page 13 Turning the regulator valve (14) into the burner as shown. Step 12 Turn gas control dial to’’ OFF’’ position. Connect propane cylinder to cylinder regulator inlet fitting by turning as shown. Tighten all bolts after completely assembling. GAT1913-1 owner’s manual...
-
Page 14: Operating Your Grill Propane Tank Connection
Do not use matches, lighters or a flame to check for leaks. Do not use grill until all leaks have been stopped, if you are unable to stop a leak, disconnect the propane supply, and call for gas appliance service or your local propane gas supplier. GAT1913-1 Owner’s Manual... -
Page 15: Checking For Leaks
WARNING: Always monitor the grill closely when cooking and turn the flame level down (LOW) or OFF, if flare- ups intensify. Shutting Off the Burner • Always turn the valve knob clockwise all the way to the “LOCK OFF’’ position. • Promptly disconnect the propane cylinder. GAT1913-1 owner' s manual... -
Page 16: Excess Flow Safety Valve Reset Procedure
Clean any clogged ports with a stiff wire (such as an opened paper clip) Inspect burner for any damage (cracks or holes). If damage is found, replace with new burner. Reinstall burner; check to insure that gas valve orifice is correctly positioned inside burner inlet (venturi). GAT1913-1 owner' s manual... -
Page 17: Award-Winning Barbecue Recipes
Prepare: marinade while they cook. Cooking times will Combine all ingredients and marinate steak for 7-8 vary according to the vegetables chosen. hours. Remove meat from marinade and grill over very high heat to desired doneness. GAT1913-1 owner' s manual... -
Page 18: Troubleshooting
Clean burner and/or burner tube(s)] locked. Inside of lid is peeling – like paint The lid is stainless steel, not painted Baked on grease buildup has turned to peeling carbon and is flaking off. Clean thoroughly GAT1913-1 owner' s manual... -
Page 19: Warranty Program
If you have any questions related to the product or warranty, please call our customer service center at 1-877-885-8227, 6:00 AM to 5:00 PM (PST), Monday through Friday. Manufactured by: Lucas Innovation Inc. Xiekeng District, QingXi Town, Dong Guan, Guang Dong, China Printed in China GAT1913-1 owner' s manual...
Need help?
Do you have a question about the GAT1913 and is the answer not in the manual?
Questions and answers