Hunter Douglas PowerView Gen 3 Automation Manual
Hide thumbs
Also See for PowerView Gen 3 Automation:
- Wiring manual (19 pages) ,
- Installation operation care (50 pages) ,
- Instruction manual (43 pages)
Advertisement
PowerView
The PowerView
Gen 3 Remote
®
has been redesigned with a
modern look while maintaining its
compatibility with the PowerView
Pebble
and Surface. Precisely
®
control your Gen 3 window coverings
throughout your home with the
touch of a button. The following
pages provide all the details on
how to set up and operate both
remote styles.
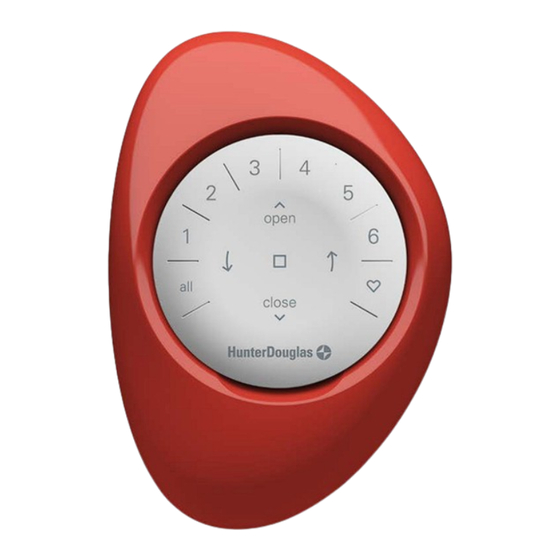
Key Components
Gen 3 Automation
®
REMOTE CONTROL GUIDE
GEN 3 REMOTE MODULE
INCLUDED
Table of Contents
Key Components. . . . . . . . . . . . . . . .
Getting Started. . . . . . . . . . . . . . . . . .
Programming. . . . . . . . . . . . . . . . . . .
Basic Operation. . . . . . . . . . . . . . . . .
Battery Replacement. . . . . . . . . . . .
Troubleshooting. . . . . . . . . . . . . . . . .
OR
1
2
3
4
5
6
1
Advertisement
Table of Contents

Related Manuals for Hunter Douglas PowerView Gen 3 Automation


Summary of Contents for Hunter Douglas PowerView Gen 3 Automation
-
Page 1: Table Of Contents
PowerView Gen 3 Automation ® REMOTE CONTROL GUIDE Table of Contents The PowerView Gen 3 Remote ® has been redesigned with a modern look while maintaining its Key Components....compatibility with the PowerView Getting Started. -
Page 2: Getting Started
Pebble cutout. Inserting the remote module into the PowerView Pebble (hand-held): 1. Center the Hunter Douglas logo Ribs on remote to be on the remote module above the aligned with the indentation on the bottom rim grooves on the Pebble. -
Page 3: Programming
Programming IMPORTANT: All remotes (regardless of how many are in a project) are programmed solely through the PowerView App. ® To download the PowerView App from the Apple or Google Play store, go to www.hdpvapp.com or scan this QR code. PowerView Remotes can be set up in one of two ways: HOW TO CONFIGURE A REMOTE... -
Page 4: Basic Operation
Once the window coverings have been 4. Press CLOSE to close the Basic Operation joined to a GROUP or multiple GROUPS, selected window covering(s). the remote is ready to operate. Multiple 5. For window covering(s) with vanes, window coverings can be operated at louvers, slats, or a middle rail*, the same time. -
Page 5: Battery Replacement
REPLACING BATTERIES Battery Replacement IN THE REMOTE Replacing the batteries in the remote module will not cause the loss of any window covering programming, including GROUPS and FAVORITES. The remote uses two CR 2032 batteries. 1. For the PowerView Gen 3 Remote ®... -
Page 6: Troubleshooting
3. My window covering operates when I 5. How can I tell if my remote Troubleshooting press OPEN or CLOSE, but not when batteries are running low? I press either of the arrow buttons. • The remote is equipped with a •... - Page 7 One Duette Way, Broomfield, CO 80020, • Reorient or relocate the receiving antenna. • Increase the separation between the equipment and receiver. Hunter Douglas hereby declares that the PowerView Remote Control ® • Consult the dealer or an experienced radio/tv technician for help.
Need help?
Do you have a question about the PowerView Gen 3 Automation and is the answer not in the manual?
Questions and answers