Table of Contents
Advertisement
Quick Links
Advertisement
Table of Contents

Related Manuals for Landmann GRILL CHEF 12325


Summary of Contents for Landmann GRILL CHEF 12325
- Page 1 This Owner's Manual is provided and hosted by Appliance Factory Parts. Landmann 12325 Owner's Manual Shop genuine replacement parts for Landmann 12325 Find Your Landmann Grill Parts - Select From 200 Models -------- Manual continues below --------...
- Page 2 ASSEMBLY, CARE AND USE INSTRUCTIONS READ CAREFULLY IMPORTANT: RETAIN THESE INSTRUCTIONS FOR FUTURE REFERENCE Questions, problems, missing parts? Before returning to your retailer, call our customer service department at: 1-800-321-3473 8:00 AM - 5:00 PM (EST) English Only, or Email CustomerService@landmann-usa.com 12325...
-
Page 3: Table Of Contents
Table of Contents Important Safety Information ....... 3-4 Connecting Gas Cylinder ........17-18 Liquid Propane (LP) Safety Information ....5 Main Burner Lighting Instructions ......19 Package Contents ..........6-7 Care and Maintenance........20-21 Preparation ...............8 Cooking Methods and Grilling Tips ......22 Hardware Contents............8 Troubleshooting ............23 Tools Required ............8 Warranty ..............24... -
Page 4: Important Safety Information
Important Safety Information Warnings and Cautions contained in this instruction manual may result in serious bodily injury or death, or may result in a fire or explosion causing damage to property. • Make sure to follow all assembly instructions carefully. Improper assembly of this grill may be dangerous. •... - Page 5 The pressure regulator and hose assembly supplied with this grill must be used. Any requirements for a replacement regulator and hose assembly must be made through the manufacturer, LANDMANN-USA. • DO NOT enlarge the valve orifices or burner ports when cleaning the valves or burners.
-
Page 6: Liquid Propane (Lp) Safety Information
Liquid Propane (LP) Safety Information Please review the below guidelines and safety information when using Liquid Propane (LP) gas. General Information • This grill is designed to be used with a standard 20 lb. LP gas cylinder. • Any brand of 20 lb.LP gas cylinder is acceptable for use on this grill, provided that it is compatible with the grill’s retention means (tank tray bolt). -
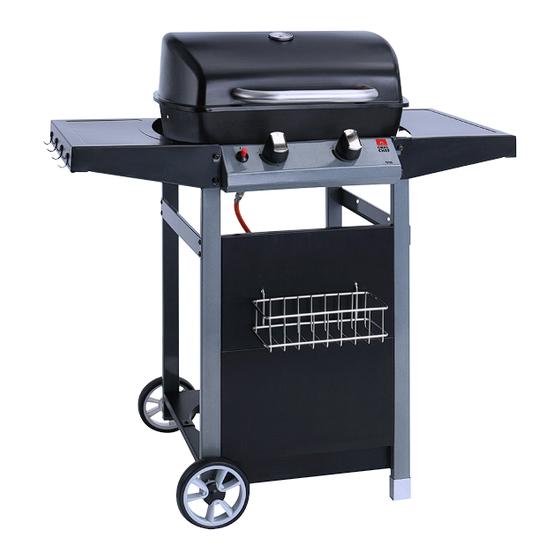
Page 7: Package Contents
Package Contens Part Descriptioin Quantity Thermometer Lid hinge Heat resistance washer Handle Flame tamer Burner Firebowl hinge Firebowl Grease cup holder Grease cup Side table Firebowl supports Side cross plate Piezo Ignition Control knob Upper front plate Vegetable basket Lower front plate Wheels caps Wheels Wheel axle... -
Page 9: Preparation
Preparation Before beginning assembly of this grill, please remove all packing material and verify that all of the assembly parts are included (see Package Contents on page 6). If any part is missing or damaged, Screw card 12325US DO NOT attempt to assemble the product. Estimated assembly time: 60 minutes with two people. -
Page 10: Assembly Instructions
Assembly Instructions Assembly Step 2a... - Page 12 Assemply Step6...
- Page 13 Assemply Step 8...
- Page 14 Assemply Step 9...
- Page 15 Assemply Step 11...
- Page 16 Assembly Step 12a...
- Page 17 Assembly Step 12b...
-
Page 18: Connecting Gas Cylinder
Connecting Gas Cylinder 1. ALWAYS place the propane cylinder on the tank holder under the cart. 2. ALWAYS confirm that all burner control knobs are in OFF position before activating the gas supply. 3. Before connection, be sure that there is no debris caught in the head of the gas cylinder, head of the regulator valve, or in the head of the burner and burner ports. - Page 19 Checking for Leaks 1. Make 2-3 oz of leak solution by mixing one part liquid dishwashing soap with three parts water. 2. Make sure control knobs are in the OFF position. 3. Spray some solution on the tank valve up to the valve connection. (See diagram to below.) 4.
-
Page 20: Main Burner Lighting Instructions
Main Burner Lighting Instructions Prior to the first use, it is important to clean your grill with heat. This will clean the internal parts by burning off any residue and odor from the manufacturing process. To perform this cleaning, operate the grill for approximately 15-20 minutes at the highest heat setting with the cooking hood closed. -
Page 21: Care And Maintenance
Care and Maintenance Please use the following guidelines to keep your grill clean and looking new. Before any cleaning, make sure the control • OFF knobs are in the position and grill is cool to the touch. Cleaning the Outside of the Grill For painted surfaces clean thoroughly with a hot soapy water solution. - Page 22 Checking the Flame The flame coming out of the burners should be a blue/yellow combination and between one to two inches tall (see below). Yellow Yellow 2 in.(5 cm) Light Blue Light Blue Blue Blue Good Flame Bad Flame Assembly Step6b To Remove Burner Make sure all control knobs are in the OFF position, the LP gas supply valve has been closed, and the gas hose is disconnected from the gas supply.
-
Page 23: Cooking Methods And Grilling Tips
Cooking Methods And Grilling Tips Direct Heat Direct heat cooking means that the food is placed on grill grates directly over the lighted burners. • The lid position can be either up or down. • If the lid is in the up position, generally cooking time may be longer. •... -
Page 24: Troubleshooting
Troubleshooting Problem Cause Solution Grill will not light. 1. LP cylinder valve is closed. 1. Turn ON LP cylinder valve. 2. LP cylinder gas level is low. 2. Replace LP cylinder. 3. No ticking sound when electronic 3. Check to make sure that battery is installed igniter button is pushed. -
Page 25: Warranty
This warranty gives you specific legal rights and you may also have other legal rights which may vary from state to state. Landmann USA, Inc. 7405 Graham Rd Fairburn, Ga 30213 www.landmann-usa.com...
Need help?
Do you have a question about the GRILL CHEF 12325 and is the answer not in the manual?
Questions and answers