
Related Manuals for VigilLink The Doug


Summary of Contents for VigilLink The Doug
- Page 1 4x2 HDMI/USB-C 4K 18Gbps Multi-format Collaboration Switcher with HDBaseT 3.0 100m Out VER 1.0...
-
Page 2: Table Of Contents
Thank you for purchasing this product For optimum performance and safety, please read these instructions carefully before connecting, operating or adjusting this product. Please keep this manual for future reference. Surge protection device recommended This product contains sensitive electrical components that may be damaged by electrical spikes, surges, electric shock, lighting strikes, etc. -
Page 3: Introduction
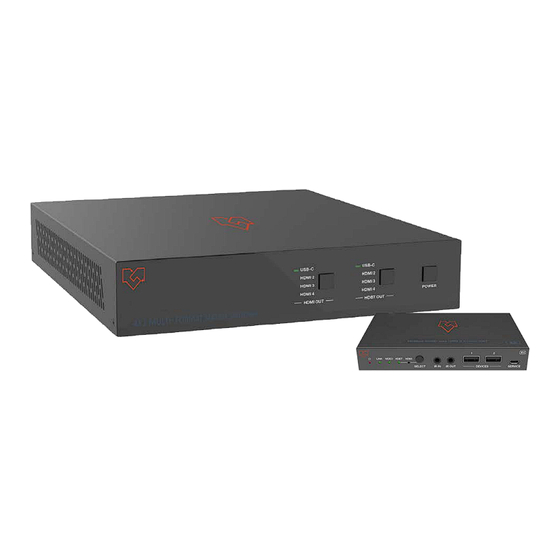
1. Introduction This 4x2 Collaboration Switch features 3 HDMI inputs, 1 USB-C input, 1 HDMI output and 1 HDBT collaboration output. It supports video up to 4K/60 4:4:4 with HDCP 2.3 and features HDBaseT 3.0 extension for uncompressed 4K video, embedded audio, control and USB over distances up to 330 feet (100 meters). -
Page 4: Specifications
4. Specifications Technical HDMI Compliance HDMI 2.0b HDCP Compliance HDCP 2.2 DP Version DP 1.2 Video Bandwidth 18Gbps Video Resolution Up to 4K@60Hz 4:4:4 IR Level 12Vp-p IR Frequency Wideband 20K-60KHz Color Space Input: 8/10/12-bit, 8-bit (4K60Hz 4:4:4) Color Depth RGB, YCbCr 4:4:4 / 4:2:2, YUV 4:2:0 USB-C/HDMI/HDBT: LPCM, Dolby Digital/Plus/EX, Dolby True HD, Dolby Atmos,... -
Page 5: Operation Controls And Functions
Input: 1 x HDMI IN [Type A, 19-pin female] 1 x HDBaseT IN [RJ45] Output: 1 x HDMI OUT [Type A, 19-pin female] 1 x LINE OUT [5pin-3.81mm phoenix connector] Control: 1 x RS-232 [3pin-3.81mm phoenix connector] Remote 1 x USB HOST [USB Type B] 2 x USB DEVICES [USB Type A] 1 x SERVICE [Micro USB] 1 x IR IN [3.5mm stereo mini-jack]... - Page 6 Name Function Description Press the HDBT OUT button to circularly select the HDMI 1 / HDMI 2 / HDBT OUT button HDMI 3 / USB-C 4 port as the signal input channel for HDBT output, the & HDMI 1 / HDMI corresponding LED will be on.
-
Page 7: Hdbaset Remote Panel
Name Function Description ▪ Light on: Transmitter and Receiver are in good connection status. Link Signal ▪ Light flashing: Transmitter and Receiver are in poor connection Indicator status. (Green) ▪ Light off: Transmitter and Receiver are not connected. HDMI signal output port, connected to HDMI display device such HDMI OUTPUT as TV or monitor with HDMI cable. - Page 8 Name Function Description When the HDMI IN port is selected as the signal input channel, HDMI LED the green HDMI LED will be on. SELECT button Press this button to select signal input channel. Connect the IR receiver cable, the IR signal will be sent to the IR IR IN port OUT port of the transmitter.
-
Page 9: Ir Cable Pin Assignment
5.3 IR Cable Pin Assignment The pin assignment of the IR Receiver cable and IR Blaster cable is as below: IR BLASTER IR RECEIVER IR BLASTER IR RECEIVER IR Signal Grounding Power 12V Note: When the angle between the IR receiver and the remote control is ± 45 °, the transmission distance is 0-5 meters;... -
Page 10: Web Gui User Guide
7. Web GUI User Guide The Collaboration Switch can be controlled by Web GUI. The operation method is shown as below: Step 1: Get the current IP Address. The default IP address is 192.168.0.100 (when the system is not connected to a router). You can get the current Collaboration IP address via RS-232 command control. - Page 11 The default usernames and passwords are as below: Username User Admin 1234 1234 Password Select the username “User” and input the password “1234”, then click the “Login” button to enter the User page. ■ User Page You can do the following operations on the User page: ①...
- Page 12 The Information page provides basic information about the model name, software version and the network settings of the device. Besides, you can do the following operations on each page of the Admin interface. ① Display the current username (User or Admin). ②...
- Page 13 ■ Input Page You can do the following operations on the Input page. Input Setting ① Name: The name of the input port. You can name it with a maximum of 8 characters. ② Cable: It indicates the connection status of the input port. ③...
- Page 14 ■ Output Page You can do the following operations on the Output page: ① Name: The name of the output port. You can name it with a maximum of 8 characters. ② Cable: It indicates the connection status of the output port. ③...
- Page 15 ■ RS-232 Page RS-232 Settings ① Local RS-232: You can set the Baud Rate, Data Bit, Parity and Stop Bit for the RS-232 port of the transmitter. ② HDBT(Remote) RS-232: You can set the Baud Rate, Data Bit, Parity and Stop Bit for the RS-232 port of the receiver.
- Page 16 ■ Network Page Network Configuration: You can set the IP Mode (DHCP/Static), IP Address, Subnet Mask. Gateway, Telnet Port and Domain Name. Note: The Domain Name “VLPT-42H100-1215.local” can be used to login the Web GUI. After setting up, click “Save” to take effect. Or you can click “Cancel” to cancel the setting. ■...
-
Page 17: Rs-232 Control Command
③ Auto Power off Timer: Click the drop-down list to select the delay time for sending the command to turn off the display device when the transmitter is in standby mode or there is no signal input. ④ Control Type: Click the drop-down list to select the control type. System Utilities ①... - Page 18 ASCII Command Serial port protocol: Baud rate: 115200 (default), Data bits: 8bit, Stop bits:1, Parity bit: none TCP/IP protocol port: 8000 x - Parameter 1, y - Parameter 2 Function Description Example Feedback Command Code Default Setting System Setting =================== VLPT-42H100 Help Info MCU 1.1.0 Web 1.1.0 FPGA 1.1.0 RX 1.1.0...
- Page 19 Command Code Function Description Example Feedback Default Setting s front button Set front button on/off Set front button on s front button on on/off Front button on r front button r front button Get front button on/off status Set buzzer on/off Set beep on s beep on/off s beep on...
- Page 20 Function Description Example Feedback Command Code Default Setting Set input HDCP (x=0-4) on/off x=0: all inputs s input x HDCP x=1: HDMI 1 s input 0 HDCP on Set all input HDCP: On on/off x=2: HDMI 2 x=3: HDMI 3 x=4: USB-C 4 Input HDMI 1(Name) HDCP: On...
- Page 21 Function Description Example Feedback Command Code Default Setting Set output (x=0-2) auto switch detection mode (y=1-2) Set HDMI(Name) x=0: all outputs (HDMI/HDBT) s output x auto s output 0 auto output auto switch x=1: HDMI output switch mode y switch mode 1 mode: TMDS x=2: HDBT output y=1: TMDS...
- Page 22 Function Description Example Feedback Command Code Default Setting CEC Setting s cec power on Set CEC power on s cec power on/off Set CEC power on/off command s cec power off Set CEC power off s auto power Set display auto power feature s auto power Set auto power feature: feature off...
- Page 23 Function Description Example Feedback Command Code Default Setting Clear a specified preset:x Clear preset 1 s preset clear x s preset clear 1 All settings except network setting. x=[1-5]: Preset 1 - Preset 5 Set preset:x name to y x=[1-5]: Preset 1 - Preset 5 s preset 1 name Set preset 1 name: s preset x name y...
- Page 24 Function Description Example Feedback Command Code Default Setting Set network telnet port s telnet port x s telnet port 23 Set Telnet port: 23 (x=1~65535) Get network telnet port Telnet port: 23 r telnet port r telnet port Searching IP, please wait ...
-
Page 25: Connection Diagram
9. Connection Diagram Computer Computer Host Host Smart Board Keyboard IR Blaster Mouse Power Supply IR Receiver HOST 1 HOST 2 HOST 3 USB 1 USB 2 USB 3 IR IN IR OUT DC 24V HDBT USB-C 4 AUDIO HDMI HDMI 1 HDMI 2 HDMI 3...
Need help?
Do you have a question about the The Doug and is the answer not in the manual?
Questions and answers