Table of Contents
Advertisement
Quick Links
Advertisement
Table of Contents

Subscribe to Our Youtube Channel
Related Manuals for Pulsar Measurement MantaRay


Summary of Contents for Pulsar Measurement MantaRay
- Page 1 PULSAR MEASUREMENT MantaRay Instruction Manual Manual Rev 3.1...
- Page 2 Note: This page has been left blank intentionally.
-
Page 3: Table Of Contents
PULSAR MEASUREMENT CONTENTS CONNECTIONS ......................................... 4 KEYPAD SYSTEM ....................................... 5 BATTERY ..........................................5 PROGRAMMING MENU....................................6 ICONS ........................................... 7 MESSAGE ICON ......................................... 8 STATUS ..........................................8 PASSWORD ......................................... 9 UNITS/MODE ........................................10 CALIBRATION ........................................12 RELAY PARAMETERS ..................................... 17 DATA LOGGING ......................................19 RETRIEVING LOG FILE .................................... -
Page 4: Connections
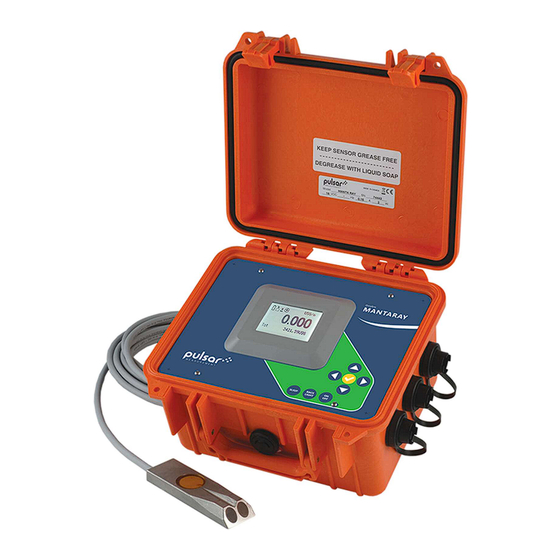
MANTARAY INSTRUCTION MANUAL CONNECTIONS NOTE: Sockets and plugs not drawn to scale. -
Page 5: Keypad System
A 16.5V AC-DC power module is supplied for battery charging and continuous use. The charger connects to the faceplate of the MantaRay or to the exterior of the break-out box. Charge requires 6-9 hours when fully drained. Solid battery icon indicates when battery is very close to fully charged (≥90%), and a power cable icon indicates the battery is fully charged. -
Page 6: Programming Menu
MANTARAY INSTRUCTION MANUAL PROGRAMMING MENU... -
Page 7: Icons
PULSAR MEASUREMENT ICONS On the Main Screen, the following icons may present themselves: A message is waiting. Press to view. Data Logger is Stopped. Data Logger is Running. Data Log is transferring to USB drive. Data Log transfer to USB drive complete. -
Page 8: Message Icon
MANTARAY INSTRUCTION MANUAL MAIN DISPLAY The main display shows the units selected from the Units/Mode menu, Flow or Velocity rate being measured, TOTALIZER and RELAY states. The MantaRay will start-up with this display. MESSAGE ICON Press from the main display to view Data Log state and percent used, Battery fuel gauge, Charger connection state, Sensor Status (Good, Short, Open, Dry, Echo Loss), and measured Temperature of the sensor. -
Page 9: Password
Press to return to the main display. NOTE: Inserting a USB flash drive into the USB port of the MantaRay while on this screen will cause the meter to download the 24 hr log data as a .CSV file to the USB drive. -
Page 10: Units/Mode
to cancel. Default values (US) are shown in the image to the left. Mode selects the measurement mode for the MantaRay. Choose between Flow, Velocity, and Level. Linear selects the engineering units for measuring level, or configuring pipe/channel dimensions. - Page 11 PULSAR MEASUREMENT UNITS/MODE (CONT.) Available Flow Rate Engineering Units: Abbreviation Description Abbreviation Description USG/d US gallons per day liters per day USG/h US gallons per hour liters per hour USG/m US gallons per minute liters per minute USG/s US gallons per second...
-
Page 12: Calibration
1 inch. Level 20mA is only displayed when the Mode in the Units/Mode menu is set to Level. In this mode, the single 4-20mA output from the MantaRay will respond to changes in level measurement. This parameter configures the level equal to a 20mA output. - Page 13 (Damping Mode = LOW PASS). Velocity 20mA is only displayed when the Mode in the Units/Mode menu is set to Velocity. In this mode, the single 4-20mA output from the MantaRay will respond to changes in velocity measurement. This parameter configures...
- Page 14 CALIBRATION (CONT.) Velocity 4mA is only displayed when the Mode in the Units/Mode menu is set to Velocity. In this mode, the single 4-20mA output from the MantaRay will respond to changes in velocity measurement. This parameter configures the velocity equal to a 4mA output.
- Page 15 LCD display and output signals will report 0. Flow 20mA is only displayed when the Mode in the Units/Mode menu is set to Flow. In this mode, the single 4-20mA output from the MantaRay will respond to changes in flow measurement. This parameter configures the flow equal to a 20mA output.
- Page 16 MANTARAY INSTRUCTION MANUAL CHANNEL SETUP (CONT.) Trapezoid (Cont.) SLOPE =x TRAPEZOIDAL CHANNEL WIDTH Select Egg for egg shaped channels. Enter the Max Height of the channel. HEIGHT = 3R Custom Define Max Height of the channel, and number of Divisions for defining Width at each Increment.
-
Page 17: Relay Parameters
PULSAR MEASUREMENT RELAY PARAMETERS From the Main Menu, press the button while the cursor is on Relay Parameters to access this menu. The configuration parameters available in the Relay Parameters menu are described below. Use the or button to move the cursor up or down, and the ... - Page 18 MANTARAY INSTRUCTION MANUAL RELAY PARAMETERS (CONT.) Flow Like Level and Velocity, will provide an ON and OFF setpoint for flow alarm. When ON>OFF, the flow alarm functions like a high flow alarm. When measured flow is greater than ON setpoint, the relay will turn on, and the relay will turn off when measured flow goes below OFF setpoint.
-
Page 19: Data Logging
When set to Telemetry, pressing the SLEEP button on the meter will put the meter into a low-power state, but instead of automatically “waking up” at the proper interval, the MantaRay will wait for a signal from an external telemetry device, like a SignalFire RANGER, then go back to a low-power state after being signaled. -
Page 20: Retrieving Log File
MANTARAY INSTRUCTION MANUAL DATA LOGGING (CONT.) Interval is used to set the length of time between data log entries. Choose between 10s, 30s, 1min, 2min, 5min, 10min, 15min, 30min, and 60min. IMPORTANT: Using the SLEEP button when Log Mode is Sleep Btn or Telemetry will only work when the Interval is 30s or greater. -
Page 21: Special Functions
Insrt USB to appear, then insert your USB flash drive into the plug on the MantaRay, at which point the meter will flash SAVING on the screen a couple times then return to NO. When this happens, you are OK to remove the flash drive. -
Page 22: Simulation
MANTARAY INSTRUCTION MANUAL SPECIAL FUNCTIONS (CONT.) Restore Defaults can be used to return all programming parameters, except limited parameters like Cal Constant, to their default values. Choose the US option to restore parameters to Imperial units, or Metr to restore values to metric/SI units. -
Page 23: Installation - Sensor Location
PULSAR MEASUREMENT INSTALLATION – SENSOR LOCATION For the most accurate flow measurement possible, careful consideration should be made to the placement of the sensor in relation to flow disturbances. In general, the best accuracy will occur where flow is evenly distributed across the channel/pipe and free of turbulence. - Page 24 MANTARAY INSTRUCTION MANUAL INSTALLATION – SENSOR LOCATION (CONT.) 2. Hydraulic Dams When the QZ02 sensor is to be mounted in front (upstream) of a hydraulic dam, or a Greyline VD pipe dam, the sensor should be placed at least 20 inches in front of the dam.
- Page 25 PULSAR MEASUREMENT INSTALLATION – SENSOR LOCATION (CONT.) 1. Flow Profile Distortion The pipe/channel in which the QZ02 sensor is mounted should be free of bends, tees, sudden changes in slope, and there should not be objects in the pipe/channel which disturb the flow profile in front of the sensor.
- Page 26 MANTARAY INSTRUCTION MANUAL QZ02L VELOCITY-LEVEL SENSOR MOUNTING Mount the QZ02L sensor with the stainless steel bracket and hardware supplied. Ensure that the sensor is parallel to the water surface (check with a level). Mount with the tapered end of the sensor pointing upstream and the sensor cable pointing downstream.
- Page 27 PULSAR MEASUREMENT GOOD END VIEW SENSOR SENSOR FLOW FLOW SENSOR SENSOR SENSOR SENSOR END VIEW END VIEW...
- Page 28 MANTARAY INSTRUCTION MANUAL OPTIONAL VSJ PIPE BAND MOUNTING WITH QZ02L SENSOR Install the stainless steel pipe band with the sensor mounting bracket at the invert (bottom) of the pipe. Ensure that the sensor bracket is parallel to the water surface (check with a level). Mount so the tapered end of the sensor will point upstream and the sensor cable will point downstream.
-
Page 29: Break-Out Box
The break-out box provides connection for optional external battery, two relay outputs, a single 4-20mA/0-5V output, and the barrel plug charger for the MantaRay. As shown in the diagram below, the left side of the terminals come factory terminated with wires already on them, with connection back through the cable to the MantaRay. -
Page 30: Sleep Button And Telemetry Logging Instructions
To bring the MantaRay out of sleep mode, press the “SLEEP” button on the front of the meter. If there is sufficient battery life, the LCD display will turn back on and you can return to normal operation of the meter. If the battery has completely drained, you will need to connect the external charger before using the MantaRay again. - Page 31 PULSAR MEASUREMENT TELEMETRY LOGGING (CONT.) The telemetry logging feature of the MantaRay was validated to be compatible with the RANGER wireless telemetry system from SignalFire. Follow these wiring and configuration instructions for proper operation. Wiring: Break-out Box Terminal Marking SignalFire RANGER Terminal...
-
Page 32: Applications Hotline
Obtain an RMA Number from Pulsar Measurement - Before shipping a product to the factory please contact Pulsar Measurement by telephone, fax or email to obtain an RMA number (Returned Merchandise Authorization). This ensures fast service and correct billing or credit. - Page 33 If a product manufactured by Pulsar should prove defective within the first year, return it freight prepaid to Pulsar Measurement along with a copy of your invoice. This warranty does not cover damages due to improper installation or handling, acts of nature, or unauthorized service.
-
Page 34: Specifications
MANTARAY INSTRUCTION MANUAL SPECIFICATIONS Electronics Channel Types: Round pipe, rectangular, trapezoid, egg or custom shapes Electronics Enclosure: Polycarbonate, IP67 while plugs connected or covered Operating Temp. (Electronics): -5° to 140°F (-20° to 60°C) Accuracy: Level: ±0.25% of reading or ±0.08in (±2.03mm), whichever is greater Velocity: ±2% of reading or ±0.04ft/s (±0.012m/s), whichever is greater. - Page 35 PULSAR MEASUREMENT...
- Page 36 MANTARAY INSTRUCTION MANUAL www.pulsarmeasurement.com service@pulsarmeasurement.com Copyright © 2020 Pulsar Measurement Ltd.. Registered Address: 1 Chamberlain Square CS, Birmingham B3 3AX Registered No.: 3345604 England & Wales Rev 3.1...
Need help?
Do you have a question about the MantaRay and is the answer not in the manual?
Questions and answers