Advertisement
Quick Links
Designer Series
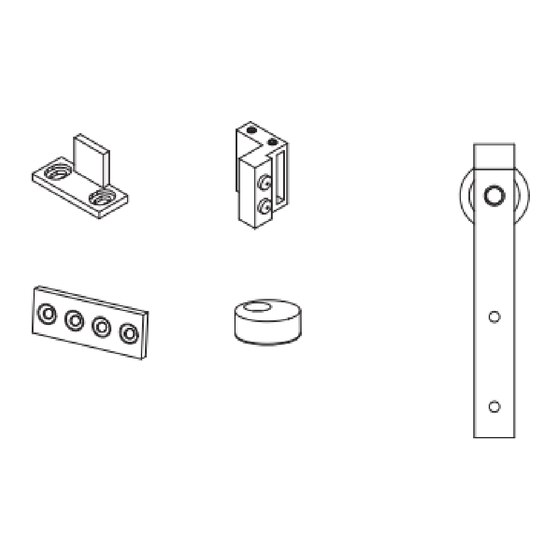
Parts Included
6
Lag Screw
SS-10.1006
Wall Anchor
6
SS-10.1002
6
Spacer
SS-10.1143
Bolt (M10-1.5 x 55)
4
SS-10.1077
Washer
4
SS-10.1009
2
Rail
SS-10.1142
Recommended Tools
Wrench/Socket
1/2" (13mm)
3/32"
9/16" (14mm)
7/32"
11/16" (17mm)
1/4"
● READ ALL INSTRUCTIONS AND CHECK PARTS BEFORE STARTING INSTALLATION
Planning
● RETAIN ALL PACKING MATERIALS UNTIL INSTALLATION IS COMPLETE
NOTE: This kit is best suited for doors up to 1-
150 pounds.
Before installing the Rail, identify secure points to attach the Rail.
For most wall installations, it is necessary that the Lag Screws are secured to wall studs.
For Lag Screws that cannot be secured
to a wall stud, it will be necessary to
use the Wall Anchors to secure the
Lag Screws into the wall.
Home construction varies; holes may
be added to the Rail to allow Lag
Screws to attach to wall studs.
IMPORTANT:
If at least FOUR Lag Screws (TWO
Lag Screws for each Rail) cannot
be secured to wall studs or other
structural points, DO NOT INSTALL
THIS RAIL KIT.
Installation Manual
4
Socket Head Screw (M6)
SS-10.1004
Nut (M10-1.5)
4
SS-10.1010
4
Floor Anchor
SS-10.1011
4
3/4" Screw
2
SS-10.1075
Drill Bit
Allen Wrench
3/8"
3mm
7/16"
4mm
Barn Door Rail Kit
2
Door Guide
SS-10.1013
1
1-1/4" Screw
SS-10.1012
Joint Plate
SS-10.1144
Driver Bit
#8 Phillips
3
/
" thick, up to 36" wide, and no more than
8
A
A
B
Door
Height
(H)
A - 8" [203mm]
B - 4" [102mm]
2
Door Stop
SS-10.1065
2
Anti-Jump Pad
SS-10.1076
2'-3' Level
Power Drill
80" [2032mm]
A
A
A
A
/
" [9.5mm] Gap
3
8
4310470
W-DS-KIT-1-WH-2PC
White
2
Marion
Trolley
SS-10.1058
Tape Measure
12'
A
A
A
B
(H)
plus
1-
5
/
"
8
[41.5mm]
Advertisement

Related Manuals for Forge Designer Series

Summary of Contents for Forge Designer Series
- Page 1 Designer Series Installation Manual 4310470 W-DS-KIT-1-WH-2PC Barn Door Rail Kit White Parts Included Lag Screw Socket Head Screw (M6) SS-10.1006 SS-10.1004 Wall Anchor Nut (M10-1.5) SS-10.1002 SS-10.1010 Door Guide Door Stop SS-10.1013 Floor Anchor Spacer SS-10.1065 SS-10.1011 SS-10.1143 Marion Trolley Bolt (M10-1.5 x 55)
- Page 2 Planning (continued) Door Trolley Top Door to Bypass Trolley Bolt Door Thickness to Rail Center Rail Center Clearance Clearance Clearance Clearance (1) (3) ” 4” ” ” ” ” ” 1” 4” ” ” ” ” ” Allow at least 3/4” clearance above the trolley. The nominal distance with the door hung to run vertical and the wall straight and plumb.
- Page 3 2 - Assemble and Mount the Rail (Continued) IMPORTANT The widest part of the Spacer should be placed on the wall. The Joint Plate should be on the side of the Rail facing away from wall, and towards the BOTTOM of the Rail. Place a Lag Screw through the hole in the Rail aligning with the outermost pilot hole on one side, through a Spacer, and drive the Lag Screw into the pilot hole.
- Page 4 BEFORE beginning installation. NOTE: If installing bypass brackets (431-0446, 431-0447, 431-0452) check the bypass bracket instructions BEFORE beginning installation. OTHER QUESTIONS? Contact Customer Care DO NOT RETURN TO THE STORE Designer Series 1-800-721-4191 Monday – Friday 8 - 5 Central Time REV-08...
Need help?
Do you have a question about the Designer Series and is the answer not in the manual?
Questions and answers
Do you have a step by step vídeo