Table of Contents
Advertisement
Quick Links
USA office: Fontana
AUS office: Truganina
DEU office: FDS GmbH, Neuer Höltigbaum 36, 22143 Hamburg, Deutschland
GBR office: FDS Corporation Limited,Unit 4, Blackacre Road, Great Blakenham,Ipswich, Ip6 0FL,United Kingdom
ITA office: Milano
POL office: Gdańsk
FRA office: Saint Vigor d'Ymonville
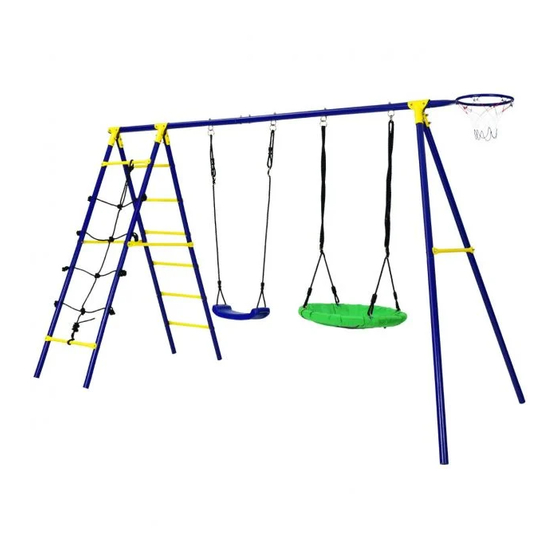
Outdoor Swing Set
Outdoor-Schaukelset
Ensemble de Balançoire d'Extérieur
Juego de Columpios para Exterior
Set di Altalene da Esterno
Huśtawka ogrodowa
Buitenschommelset
NP11619
THIS INSTRUCTION BOOKLET CONTAINS IMPORTANT SAFETY INFORMATION.
PLEASE READ AND KEEP FOR FUTURE REFERENCE.
Advertisement
Table of Contents

Subscribe to Our Youtube Channel
Related Manuals for Costway NP11619


Summary of Contents for Costway NP11619
- Page 1 Outdoor-Schaukelset Ensemble de Balançoire d'Extérieur Juego de Columpios para Exterior Set di Altalene da Esterno Huśtawka ogrodowa Buitenschommelset NP11619 THIS INSTRUCTION BOOKLET CONTAINS IMPORTANT SAFETY INFORMATION. USA office: Fontana AUS office: Truganina ITA office: Milano POL office: Gdańsk PLEASE READ AND KEEP FOR FUTURE REFERENCE.
-
Page 2: Before You Start
ASSEMBLY ADVICE Please follow the assembly instructions exactly as given. - This product must be assembled by an adult. - Keep a copy of your assembly instructions for future reference. This can be particularly useful for identification of parts if any after sales service is required. -
Page 3: Maintenance
- As this product contains small parts that could be swallowed, sure the drilled end of the sealing legs is above the level of the please keep parts away from children under 36 months. concrete. - This product is only for private use at home and must never be - Once the concrete is set, screw the feet into the sealing legs. -
Page 4: Bevor Sie Beginnen
Safety Safety checks should be carried out regularly on this product. These checks should include, if necessary, removing any sharp edges, replacing missing screw covers, and tightening the nuts and bolts. These checks should be done to avoid any danger or overturning of the swing set through normal wear and tear. - Page 5 SICHERHEITSHINWEISE MONTAGEHINWEIS - Dieses Produkt darf nicht von Kindern unter 36 Monaten verwendet Bitte befolgen Sie die Montageanleitung genau wie angegeben. werden. Es ist nur für Kinder zwischen 3 und 12 Jahren mit einem - Dieses Produkt muss von einem Erwachsenen zusammengebaut Maximalgewicht von 50 kg geeignet.
-
Page 6: Wartung
BEFESTIGUNG IM BODEN überprüft werden, insbesondere für die Befestigungen wie Haken am - Bauen Sie das Schaukelset komplett zusammen und platzieren Sie Deckenbalken. Wenn die Halterungen und Haken eine Abnutzung es an der gewünschten Stelle. von mehr als 10 % ihrer ursprünglichen Dicke aufweisen, sollten sie - Suchen und markieren Sie die Position für die Dichtbeine. -
Page 7: Avant De Commencer
Schraubenabdeckungen und das Anziehen der Muttern und Schrauben umfassen. Diese Kontrollen sollten durchgeführt werden, um jede Gefahr oder ein Umkippen der Schaukel durch normalen Verschleiß zu vermeiden. Komfort Avant de Commencer Wenn die Schaukel quietscht, tragen Sie ein geeignetes Gleitgel auf. Verwenden Sie kein flüssiges Schmiermittel, da es an den Veuillez lire attentivement toutes les instructions et les conserver pour la référence ultérieure. -
Page 8: Conseils De Sécurité
CONSEILS DE MONTAGE CONSEILS DE SÉCURITÉ Veuillez suivre les instructions de montage exactement comme -Ce produit ne doit pas être utilisé par indiqué. enfants de moins de 36 mois. Il convient uniquement aux enfants - Ce produit doit être assemblé par un adulte. âgés de 3 à... -
Page 9: Entretien
FIXATION AU SOL présentent une usure supérieure à 10 % de leur épaisseur d'origine, ils doivent être remplacés par les mêmes fixations que celles - Assemblez complètement la balançoire et placez-le à l'endroit fournies à l'origine. désiré. - Toutes les pièces soumises à des frottements constants doivent - Localisez et marquez la position des pattes d'étanchéité. -
Page 10: Antes De Empezar
Confort Si la balançoire grince, appliquez un gel lubrifiant approprié. N'utilisez pas de lubrifiant liquide car il coulerait sur les fixations et les appareils. La hauteur de la balançoire peut être réglée à l'aide de la fixation à œillet en plastique. En tirant la corde à travers la fixation, la hauteur du siège peut être ajustée pour convenir à... - Page 11 CONSEJOS DE MONTAJE CONSEJOS DE SEGURIDAD Siga exactamente las instrucciones de montaje. - Este producto no debe ser utilizado por niños menores de 36 - Este producto debe ser montado por un adulto. meses. Solo es adecuado para niños de 3 a 12 años con un peso - Guarde una copia de las instrucciones de montaje para futuras máximo de 50 kg.
-
Page 12: Mantenimiento
FIJACIÓN EN EL SUELO - Las superficies de todas las piezas deben revisarse al menos una vez al mes, especialmente las fijaciones, como los ganchos de la - Monte completamente el juego de columpios y colóquelo en el viga superior. Si las fijaciones y los ganchos muestran un desgaste lugar deseado. -
Page 13: Prima Di Iniziare
Confort Si el columpio chirría, aplique un lubricante en gel adecuado. No utilice lubricante líquido, ya que se deslizaría por las fijaciones y el aparato. La altura del columpio puede ajustarse utilizando la fijación de ojal de plástico. Tirando de la cuerda a través de la fijación, la altura del Prima di Iniziare asiento puede ajustarse para adaptarse al usuario. - Page 14 CONSIGLI PER IL MONTAGGIO altalene con altezza pari o inferiore a 1200 mm 200 mm; altalene con altezza superiore a 1200 mm 350 mm. Seguire esattamente le istruzioni di montaggio. - Questo prodotto deve essere assemblato da un adulto. CONSIGLI DI SICUREZZA - Conservare una copia delle istruzioni di montaggio per riferimento Questo prodotto non deve essere utilizzato da bambini di età...
-
Page 15: Manutenzione
FISSAGGIO NEL TERRENO fissaggio come i ganci sulla trave aerea. Se gli elementi di fissaggio e i ganci presentano un'usura superiore al 10% dello spessore - Assemblare completamente l'altalena e posizionarla nel luogo originale, è necessario sostituirli con gli stessi elementi forniti in desiderato. -
Page 16: Zanim Zaczniesz
Conforto Se l'altalena cigola, applicare un lubrificante in lubrificante adatto. Non utilizzare un lubrificante liquido per evitare che coli sui fissaggi e sull'apparecchio. L'altezza dell'altalena può essere regolata utilizzando il dispositivo di fissaggio ad occhiello in plastica. Tirando la corda attraverso l'occhiello, è possibile regolare l'altezza del Zanim Zaczniesz sedile in base alle esigenze dell'utente. -
Page 17: Uwagi Dotyczące Bezpieczeństwa
UWAGI DOTYCZĄCE MONTAŻU UWAGI DOTYCZĄCE BEZPIECZEŃSTWA Zapoznaj się i postępuj zgodnie z informacjami zawartymi w - Produkt nieodpowiedni dla dzieci poniżej 3 roku życia. Produkt jest instrukcji. przeznaczony wyłącznie dla dzieci w wieku 3-12 lat. Maksymalna - Wymagany montaż przez osobę dorosłą. waga jednego dziecka nie powinna przekraczać... - Page 18 MOCOWANIE DO PODŁOŻA - Wszystkie części podlegające ciągłemu tarciu muszą być regularnie natłuszczane odpowiednim smarem. - Całkowicie zmontuj huśtawkę umieść w wybranym miejscu. - Nawierzchnia, na której stoi huśtawka, powinna być regularnie - Zlokalizuj i zaznacz położenie kotew montażowych. sprawdzana. Wszystkie elementy, takie jak kamienie lub inne - Sprawdź...
-
Page 19: Voordat U Begint
regulować za pomocą plastikowego pierścienia. Przeciągnij linę przez pierścień, aby dostosować wysokość siedziska do wzrostu dziecka. Podane w instrukcji wymiary są wyłącznie wymiarami orientacyjnymi i mogą się różnić w zależności od sposobu montażu. Podczas użytkowania huśtawki wymagany jest stały nadzór osoby dorosłej. - Page 20 MONTAGE ADVIES VEILIGHEIDSADVIES Volg de montage-instructies precies zoals aangegeven. - Dit product mag niet worden gebruikt door kinderen jonger dan 36 - Dit product moet door een volwassene in elkaar worden gezet. maanden. - Bewaar een kopie van uw montage-instructies voor toekomstig Het is alleen geschikt voor kinderen tussen de 3 en 12 jaar met een gebruik.
- Page 21 BEVESTIGING IN DE GROND slijtage vertonen van meer dan 10% van hun oorspronkelijke dikte, moeten ze worden vervangen door de dezelfde armaturen als - Zet het schommelstel volledig in elkaar en plaats het op de oorspronkelijk meegeleverd. gewenste plek. - Alle onderdelen die onder constante wrijving staan, moeten - Zoek en markeer de positie voor de sealpoten.
- Page 22 Comfort X38+2 X30+6 X46+6 Als de schommel een piepend geluid maakt, breng dan een geschikt gel-smeermiddel aan. Gebruik geen vloeibaar glijmiddel, aangezien X32+2 X30+4 X38+4 dit langs de bevestigingen en apparaten naar beneden loopt. De hoogte van de schommel kan worden aangepast met behulp van T1 X4 X28+1 Z3 X14+1...
- Page 23 X8+1 C40 x 1 C50 x 2 C51 x 2 C52 x 2 S16 x 1 S17 x 2 P12 X1 two holes face down...
- Page 24 PL: Włóż P29 do P28, umieść S16 na drugim końcu P28 i włóż S19. two holes face down /zwei Löcher nach unten gerichtet Dwie śruby S17 zamontuj w P15 zablokuj śrubami. Włóż P3 i P4 na dole /deux trous vers le bas /dos agujeros boca abajo S17, a P9 na dole S16 i dokręć...
- Page 25 EN: Insert P5 into P3, P6 into P4, P8 into P9, and place the S5 plastic piece on both ends of the P10 and G1 X 6 tighten with screws. L6 X 6 DE: Setzen Sie P5 in P3, P6 in P4, P8 in P9 ein, setzen Sie das Kunststoffteil S5 auf beide Enden von D6 X 6 P10 und ziehen Sie es mit den Schrauben fest.
- Page 26 EN: Place the S5 plastic piece into the two ends of P7 and connect P3, P4, P5, and P6 respectively. After G1 X 16 assembling the cloth swing, hang it on the shelf with D3 BH19 G2 X 8 and tighten the screws. BH20 L6 X 16 DE: Setzen Sie das Kunststoffteil S5 in die beiden...
- Page 27 EN: Tie the knot according to the picture and install the YD2 ground stake. DE: Binden Sie den Knoten entsprechend der Abbildung und installieren Sie den YD2-Erdspieß. FR: Faites le nœud selon l'image et installez le piquet de terre YD2. ES: Ate el nudo según la imagen e instale la estaca de tierra YD2.
- Page 28 Return / Damage Claim Instructions DO NOT discard the box / original packaging. In case a return is required, the item must be returned in original box. Without this your return will not be accepted. Take a photo of the box markings. A photo of the markings (text) on the side of the box is required in case a part is needed for replacement.
- Page 29 Instructions De Retour / Réclamation De Dommages Istruzioni Per La Restituzione / Reclamo Per Danni NE PAS jeter la boîte/l'emballage d'origine. NON scartare la scatola / confezione originale. Dans le cas où un retour est requis, l'article doit être retourné dans sa boîte Nel caso in cui sia richiesto un reso, l'articolo deve essere restituito nella scatola d'origine.
- Page 30 Instructies voor Retournering/Schadeclaim GOOI DE doos/het originele verpakkingsmateriaal NIET weg. In het geval van een retournering moet het artikel in de originele doos teruggestuurd worden. Zonder dit wordt uw retourzending niet geaccepteerd. Maak een foto van de markeringen op de doos. Een foto van de markeringen (tekst) op de zijkant van de doos is vereist in het geval dat een onderdeel vervangen moet worden.
Need help?
Do you have a question about the NP11619 and is the answer not in the manual?
Questions and answers