Advertisement
Quick Links
Advertisement

Related Manuals for Reform CORNER-R CABINET


Summary of Contents for Reform CORNER-R CABINET
- Page 1 PRODUCT ASSEMBLY GUIDE CORNER-R CABINET UNI-D-CAB99-DOC007...
- Page 2 PRODUCT ASSEMBLY GUIDE: CORNER-R CABINET PAGE 1 / 27 English Important information. Read carefully. Follow each step of the instruction carefully. Keep this information for further reference. WARNING Serious or fatal crushing injuries can occur from furniture tip-over. To prevent this furniture from tipping over it must be permanently fixed to the wall with the included wall attachment devices.
-
Page 3: Hardware Required
PRODUCT ASSEMBLY GUIDE: CORNER-R CABINET PAGE 2 / 27 We’ve created this guide to help you assemble your new Reform cabinets in CORNER-R CABINET a quick and simple way. Please note that the assembly should be performed by qualified individuals. - Page 4 PRODUCT ASSEMBLY GUIDE: CORNER-R CABINET PAGE 3 / 27 CORNER-R BASE CABINET CORNER-R WALL CABINET...
- Page 5 PRODUCT ASSEMBLY GUIDE: CORNER-R CABINET PAGE 4 / 27 CORNER-R BASE CABINET Place both side panels on the floor. Insert 4 dowels using a hammer. Screw metal angle brackets that allow to fix the cabinet to the wall.
- Page 6 PRODUCT ASSEMBLY GUIDE: CORNER-R CABINET PAGE 5 / 27 0-1 mm / 0-3/64" Lift one side panel on the side so the groove is facing up. Identify the bottom part by the leg holes and slide it onto the dowels on the opposite side of where you attached the metal angle brackets. Screw the bottom part using 3 screws.
- Page 7 PRODUCT ASSEMBLY GUIDE: CORNER-R CABINET PAGE 6 / 27 0-1 mm / 0-3/64" Using dowels to guide you, slide the remaining panel and screw it to the stiffener and bottom using 5 screws. Lift the cabinet up.
- Page 8 PRODUCT ASSEMBLY GUIDE: CORNER-R CABINET PAGE 7 / 27 (For the US market): Slide the back panel into the groove. (For the EU market): Unfold the back panel and slide it into the groove.
- Page 9 PRODUCT ASSEMBLY GUIDE: CORNER-R CABINET PAGE 8 / 27 0-1 mm / 0-3/64" Install the stiffener in the back using 4 screws. Turn the cabinet on the side. See illustrations above on which way you should turn the cabinet depending on which...
- Page 10 PRODUCT ASSEMBLY GUIDE: CORNER-R CABINET PAGE 9 / 27 0-1 mm / 0-3/64" Install the panel in the front using 6 screws. 0-1 mm / 0-3/64" Install the middle stiffener using 7 screws.
- Page 11 PRODUCT ASSEMBLY GUIDE: CORNER-R CABINET PAGE 10 / 27 Turn the cabinet facing down. Measure diagonals to make sure they are equal.
- Page 12 PRODUCT ASSEMBLY GUIDE: CORNER-R CABINET PAGE 11 / 27 Fix the back panel with the corner fixation hardware. Slide the plastic into the groove of the back panel and screw it in. See the illustrations above for placement. Remove the tape and attach 4 spacers on each corner.
- Page 13 PRODUCT ASSEMBLY GUIDE: CORNER-R CABINET PAGE 12 / 27 Install 6 leg parts. See illustrations above for placement. Use a hammer to knock the rest of the leg parts in.
- Page 14 PRODUCT ASSEMBLY GUIDE: CORNER-R CABINET PAGE 13 / 27 Lift the cabinet up. Knock in 5 nails per stiffener. See the illustration above for the nail placement.
- Page 15 PRODUCT ASSEMBLY GUIDE: CORNER-R CABINET PAGE 14 / 27 If you have a shelf in your cabinet, install it now. Press in 3 cover caps. The last one is inside the cabinet behind the corner.
- Page 16 PRODUCT ASSEMBLY GUIDE: CORNER-R CABINET PAGE 15 / 27 See general installation guide on how to fix the cabinet to the wall. Screws need to be sourced separately by the mounter. Screw 2 metal angles to the filler piece. Measure and make markings where the filler piece will be located.
- Page 17 PRODUCT ASSEMBLY GUIDE: CORNER-R CABINET PAGE 16 / 27 Install the filler piece by using 4 screws. You made it.
- Page 18 PRODUCT ASSEMBLY GUIDE: CORNER-R CABINET PAGE 17 / 27 CORNER-R WALL CABINET Place both side panels on the floor. Insert 4 dowels using a hammer. Knock in metal hanging brackets that allow to fix the cabinet to the wall.
- Page 19 PRODUCT ASSEMBLY GUIDE: CORNER-R CABINET PAGE 18 / 27 0-1 mm / 0-3/64" Lift one side panel on the side so the groove is facing up. Identify the bottom part by the leg holes and slide it onto the dowels on the opposite side of where you attached the metal hanging brackets. Screw the bottom part using 2 screws.
- Page 20 PRODUCT ASSEMBLY GUIDE: CORNER-R CABINET PAGE 19 / 27 Slide the back panel into the groove. 0-1 mm / 0-3/64" Using dowels to guide you, slide in the remaining side panel and screw it to the top and bottom using 4 screws.
- Page 21 PRODUCT ASSEMBLY GUIDE: CORNER-R CABINET PAGE 20 / 27 Turn the cabinet on the side. See illustrations above on which way you should turn the cabinet depending on which side your door will be located. 0-1 mm / 0-3/64" Install the panel in the front using 4 screws.
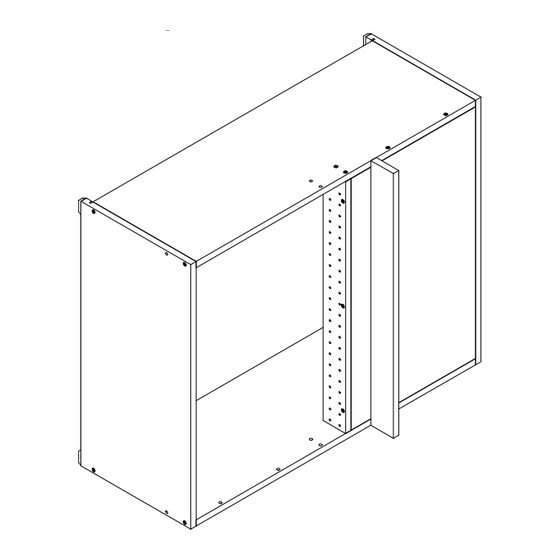
- Page 22 PRODUCT ASSEMBLY GUIDE: CORNER-R CABINET PAGE 21 / 27 0-1 mm / 0-3/64" Install the middle stiffener using 7 screws. Turn the cabinet facing down.
- Page 23 PRODUCT ASSEMBLY GUIDE: CORNER-R CABINET PAGE 22 / 27 Measure diagonals to make sure they are equal. Fix the back panel with the corner fixation hardware. Slide the plastic into the groove of the back panel and screw it in. See the illustrations above for placement.
- Page 24 PRODUCT ASSEMBLY GUIDE: CORNER-R CABINET PAGE 23 / 27 Remove the tape and attach 4 spacers on each corner. Lift the cabinet up.
- Page 25 PRODUCT ASSEMBLY GUIDE: CORNER-R CABINET PAGE 24 / 27 Cabinet inner with / 6 Knock in 5 nails. See the illustration above for the nail placement. If you have a shelf in your cabinet, install it now.
- Page 26 PRODUCT ASSEMBLY GUIDE: CORNER-R CABINET PAGE 25 / 27 Press in 4 cover caps. See general installation guide on how to fix the cabinet to the wall. Screw 2 metal angles to the filler piece.
- Page 27 PRODUCT ASSEMBLY GUIDE: CORNER-R CABINET PAGE 26 / 27 Measure and make markings where the filler piece will be located. Install the filler piece using 4 screws.
- Page 28 PRODUCT ASSEMBLY GUIDE: CORNER-R CABINET PAGE 27 / 27 You made it.
Need help?
Do you have a question about the CORNER-R CABINET and is the answer not in the manual?
Questions and answers