Advertisement
FROBISHER
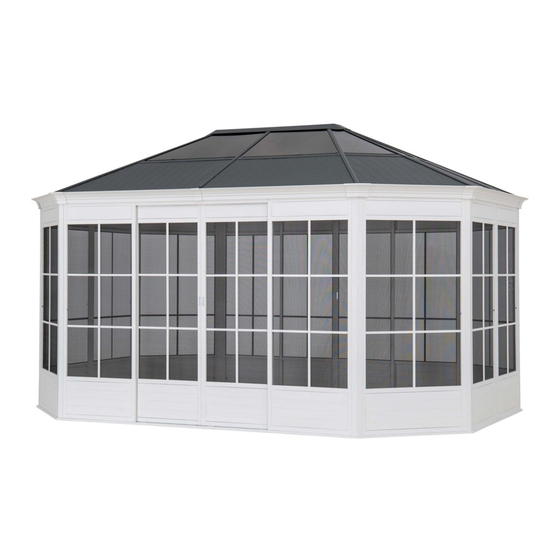
12' X 16' SOLARIUM GAZEBO
PRODUCT NO. 188-1396-6
MODEL NO. A108002230
ASSEMBLY INSTRUCTIONS
HAVING TROUBLE?
TOLL-FREE:
1-888-670-6684
IMPORTANT: Please read this manual carefully
before beginning assembly of this product.
Keep this manual for future reference.
P
r
o
d
u
t c
o i
n
N
u
m
b
e
: r
x
x
x
x
x
x
x
x
Advertisement
Table of Contents

Related Manuals for Canvas FROBISHER A108002230


Summary of Contents for Canvas FROBISHER A108002230
- Page 1 FROBISHER 12’ X 16’ SOLARIUM GAZEBO PRODUCT NO. 188-1396-6 MODEL NO. A108002230 ASSEMBLY INSTRUCTIONS HAVING TROUBLE? TOLL-FREE: 1-888-670-6684 IMPORTANT: Please read this manual carefully before beginning assembly of this product. Keep this manual for future reference.
- Page 2 To the trend seekers and design mavens, CANVAS™ is the furniture and décor brand that helps you imagine and create a space you can be proud of. That’s because CANVAS™ offers style with ease with product tha are made for real life and Canadian inspired.
-
Page 3: Tools Required
TABLE OF CONTENTS Parts List Before You Begin Assembly Step-by-step Guide Technical Data Troubleshooting Caring for Your Item Warranty WARNING! To reduce the risk of serious injury, read the following safety instructions before assembling and using the pavilion. CAUTION! Always keep children and pets under close supervision while they are using or around this product. - Page 4 WARNINGS CAUTION! • Proper placement of your pavilion is essential. Do not place the product underneath electrical lines. • Keep children away during assembly.This product contains small parts which can be swallowed by children. • Keep fingers away from places where they can be pinched or trapped. •...
- Page 5 Left Bottom Tube P00050222501 (Long Side) Right Bottom Tube P00050222601 (Long Side) Bottom Tube P00050222701 (Short Side) P00050222801 Bottom Tube P00020091501 Post 1 P00020091601 Post 2 Left Fixed Screen P00630017101 (Long Side) Right Fixed Screen P00630017201 (Long Side) P00630017301 Screen (Short Side) P00630017401 Screen (Oblique Side) Left Sliding Screen...
- Page 6 Support Tube 2 P00500090201 (Long Side) Support Tube P00500090301 (Short Side) P00500090401 Support Tube Support Tube P00630017701 Connector P00570043601 Decoration Tube Upper Rail P00570043701 (Long Side) P00060305201 Rafter P00060305301 Middle Beam P00630017801 Rafter Connector 1 P00630017901 Rafter Connector 2 Middle Beam P00630018001 Connector 2 P00630018101...
- Page 7 Small Beam 2 P00060305501 (Long Side) Small Beam 1 P00060305601 (Short Side) Small Beam 2 P00060305701 (Short Side) P00060305801 Short Small Beam P00090022101 Top Cover P00580015401 Hook Roof Panel 1 P00070147901 (Long Side) Roof Panel 2 P00070148001 (Long Side) Roof Panel 1 P00070148101 (Short Side) Roof Panel 2...
- Page 8 Roof Panel 3 P00070148601 (Short Side) Roof Panel 4 P00070148701 (Short Side) Roof Panel 2 P00070148801 (Oblique Side) P00220047001 Slot for Long Side 1 P00220047101 Slot for Long Side 2 P00220047201 Slot for Short Side 1 P00220047301 Slot for Short Side 2 P00220047401 Slot Decoration Groove 1...
- Page 9 P00220047501 Rafter Middle Beam P00050223001 Connector 1 P00560058201 Post P00010056701 Post Base FROBISHER 12' x 16' SOLARIUM GAZEBO...
-
Page 10: Exploded Parts
EXPLODED PARTS FROBISHER 12' x 16' SOLARIUM GAZEBO... - Page 11 8+ Spare Bolt M6*20 Bolt M6*20 12+1 Spare Bolt M6*4 112+6 Spare Bolt M6*55 12+1 Spare Flat Washer M6 12+1 Spare Nut M6 H070010003 Stake 8*180 H090010017 M6 Wrench + Spare Bolt M6*20 FROBISHER 12' x 16' SOLARIUM GAZEBO...
-
Page 12: Before You Begin Assembly
BEFORE YOU BEGIN ASSEMBLY MAKE SURE ALL PARTS ARE PRESENT ASSEMBLE IN A CLEARED AREA REMOVE PACKAGING MATERIALS READ EACH STEP CAREFULLY 1-888-670-6684 FROBISHER 12' x 16' SOLARIUM GAZEBO... - Page 13 NOTE: Install all bolts by hand loosely threaded BEFORE fully tightening any bolts. Once all bolts are installed loosely, then secure the bolts before FROBISHER 12' x 16' SOLARIUM GAZEBO moving on to the next step.
- Page 14 NOTE: Install all bolts by hand loosely threaded BEFORE fully tightening any bolts. Once all bolts are installed loosely, then secure the bolts before moving on to the next step. FROBISHER 12' x 16' SOLARIUM GAZEBO...
- Page 15 FROBISHER 12' x 16' SOLARIUM GAZEBO...
- Page 16 NOTE: Install all bolts by hand loosely threaded BEFORE fully tightening any bolts. Once all bolts are installed loosely, then secure the bolts before moving on to the next step. FROBISHER 12' x 16' SOLARIUM GAZEBO...
- Page 17 FROBISHER 12' x 16' SOLARIUM GAZEBO...
- Page 18 FROBISHER 12' x 16' SOLARIUM GAZEBO...
- Page 19 FROBISHER 12' x 16' SOLARIUM GAZEBO...
- Page 20 FROBISHER 12' x 16' SOLARIUM GAZEBO...
- Page 21 NOTE: Install all bolts by hand loosely threaded BEFORE fully tightening any bolts. Once all bolts are installed loosely, then secure the bolts before moving on to the next step. FROBISHER 12' x 16' SOLARIUM GAZEBO...
- Page 22 NOTE: Install all bolts by hand loosely threaded BEFORE fully tightening any bolts. Once all bolts are installed loosely, then secure the bolts before moving on to the next step. FROBISHER 12' x 16' SOLARIUM GAZEBO...
- Page 23 NOTE: Install all bolts by hand loosely threaded BEFORE fully tightening any bolts. Once all bolts are installed loosely, then secure the bolts before moving on to the next step. FROBISHER 12' x 16' SOLARIUM GAZEBO...
- Page 24 NOTE: Install all bolts by hand loosely threaded BEFORE fully tightening any bolts. Once all bolts are installed loosely, then secure the bolts before moving on to the next step. FROBISHER 12' x 16' SOLARIUM GAZEBO...
- Page 25 NOTE: Install all bolts by hand loosely threaded BEFORE fully tightening any bolts. Once all bolts are installed loosely, then secure the bolts before moving on to the next step. FROBISHER 12' x 16' SOLARIUM GAZEBO...
- Page 26 STEP Note: This step will need one an additional Install all bolts by hand loosely threaded BEFORE fully tightening person to lift up the beam (J1). any bolts. Once all bolts are installed loosely, then secure the bolts before moving on to the next step. FROBISHER 12' x 16' SOLARIUM GAZEBO...
- Page 27 NOTE: Install all bolts by hand loosely threaded BEFORE fully tightening any bolts. Once all bolts are installed loosely, then secure the bolts before moving on to the next step. FROBISHER 12' x 16' SOLARIUM GAZEBO...
- Page 28 STEP NOTE: Install all bolts by hand loosely threaded BEFORE fully tightening any bolts. Once all bolts are installed loosely, then secure the bolts before moving on to the next step. FROBISHER 12' x 16' SOLARIUM GAZEBO...
- Page 29 FROBISHER 12' x 16' SOLARIUM GAZEBO...
- Page 30 NOTE: Install all bolts by hand loosely threaded BEFORE fully tightening any bolts. Once all bolts are installed loosely, then secure the bolts before moving on to the next step. FROBISHER 12' x 16' SOLARIUM GAZEBO...
- Page 31 FROBISHER 12' x 16' SOLARIUM GAZEBO...
- Page 32 NOTE: Slot (Q1/Q2/Q3/Q4/Q5) should slide onto panel (P1/P2/P3/P4/P5) FROBISHER 12' x 16' SOLARIUM GAZEBO...
- Page 33 NOTE: Panel (P6/P7/P8/P9/P10) slide into slot (Q1/Q2/Q3/Q4/Q5) FROBISHER 12' x 16' SOLARIUM GAZEBO...
- Page 34 STEP 22 NOTE: Assemble R1 first, then assemble R2 after. FROBISHER 12' x 16' SOLARIUM GAZEBO...
- Page 35 STEP 23 NOTE: Install all bolts by hand loosely threaded BEFORE fully tightening any bolts. Once all bolts are installed loosely, then secure the bolts before moving on to the next step. FROBISHER 12' x 16' SOLARIUM GAZEBO...
- Page 36 STEP 24 NOTE: Install all bolts by hand loosely threaded BEFORE fully tightening any bolts. Once all bolts are installed loosely, then secure the bolts before moving on to the next step. FROBISHER 12' x 16' SOLARIUM GAZEBO...
- Page 37 STEP 25 NOTE: Install all bolts by hand loosely threaded BEFORE fully tightening any bolts. Once all bolts are installed loosely, then secure the bolts before moving on to the next step. FROBISHER 12' x 16' SOLARIUM GAZEBO...
- Page 38 STEP 26 FROBISHER 12' x 16' SOLARIUM GAZEBO...
- Page 39 4.8 cm (189") 4.8 m (15' 9") 4.8 x 3.6 x 2.97 m 15' 9" x 11' 10" x 9' 7" 235 kg 518 lb FROBISHER 12' x 16' SOLARIUM GAZEBO...
- Page 40 1-888-670-6684 If you have questions regarding your product or require warranty assistance, please call our customer service helpline. CAUTION! CHECK ALL SCREWS AND NUTS PERIODICALLY FOR TIGHTNESS, TIGHTENING THEM AGAIN AS REQUIRED. Do not light any fires below or near the product. Periodically check and ensure that all bolts are tight and secure during use.
-
Page 41: Warranty Information
WARRANTY INFORMATION 2 YEAR LIMITED WARRANTY* This CANVAS™ product carries a two (2) year warranty against defects in workmanship and materials on the frame and a one (1) year warranty for the remaining parts. Trileaf Distribution agrees to replace a defective product free of charge within the stated warranty period, when returned by the original purchaser with proof of purchase.
Need help?
Do you have a question about the FROBISHER A108002230 and is the answer not in the manual?
Questions and answers