
Related Manuals for Kreg FOREMAN


Summary of Contents for Kreg FOREMAN
- Page 1 DB210-EUR FOREMAN Pocket-Hole Machine INSTRUCTION MANUAL Item# DB210-EUR ENGLISH Version 2 - 11/2016 www.kregtool.com • 1.800.447.8638...
-
Page 2: General Safety Instructions
Use safety equipment. Use a face or dust mask when the cutting power tool is maintained. operation is dusty. Safety equipment such as a dust mask, non- 6) Additional Safety Rules for the DB210 Foreman skid safety shoes, hard hat, or hearing protection used for appropriate a) Do not reach inside the machine base from the bottom when the conditions reduces personal injuries. - Page 3 Total mass including accessories ..11 kg A ..amperes V ..volts A ..amperes amperes Hand-Arm Vibration Level of the Foreman DB210-EUR Pocket-Hole Machine W ..watts W ..watts Vibration total values determined according to EN 61029 Hz ..hertz W ..watts...
- Page 4 Owning a Foreman gives you all the advantages of a true production pocket-hole machine with the compactness and portability of a bench-top tool. This manual guides you through the steps necessary to adjust your machine and drill pocket holes. In addition to this...
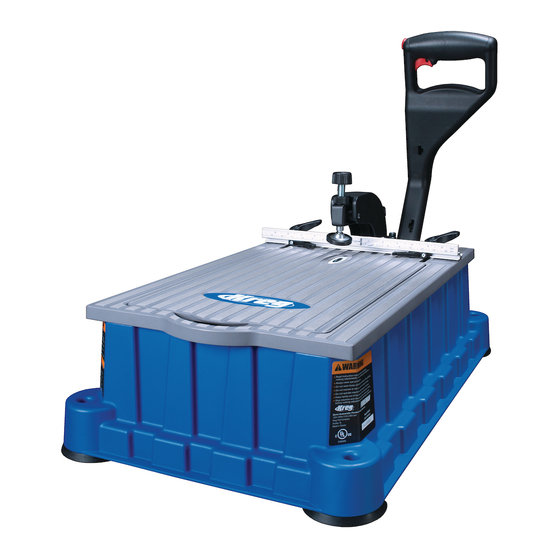
- Page 5 Parts...
- Page 6 Parts...
- Page 7 The Foreman can be used without the chip-collection system in place. If you install the system and find that you must use your Foreman without a shop vacuum, simply disconnect the vacuum hose from the vacuum shroud.
- Page 8 Assembly Adjust the fence-lock pressure Rotate the ¼-turn fence-lock handles (15) clockwise (locked position). If the fence (16) can be moved with moderate pressure, tighten the fence-lock screws (17). Rotate the handles counterclockwise (unlocked position) and verify that the fence moves freely. Should it ever be necessary to disassemble the fence locks, the fence-lock bases (18) must be oriented with the flat area indicated in the drawing facing the fence.
-
Page 9: Operation
Operation To create strong joints, you’ll adjust machine settings to match the thickness of the workpiece and the length of the screw. The Foreman makes this easy, in just four simple steps: Do not reach inside the machine base from the bottom WARNING when the machine is connected to power. - Page 10 Operation Using the Drilling-Depth Setting Block (3) Set the drilling depth Drill Guide & Bit Material Thickness Screw Length Setting Block Step Pull the control arm (1) down, advancing the drill bit (22) until the tip Micro* [13mm] [19mm] ¾" touches the fence (16).
- Page 11 Operation Mitered Corners Two pocket holes with our recommended minimum spacing of 14mm center-to center fit entirely on the face of a 19mm-thick board at least 60mm wide. Simply set up the machine for 19mm-thick stock. Then with the mitered end of the workpiece against the fence, drill one hole 11mm from the miter heel and a second hole 60mm from the miter toe.
-
Page 12: Accessory Storage
(39) in the left front foot (40). Secure mounting For flexibility in securing your Foreman to a work surface, the foot (40) at each corner of the machine base features a flat surface for temporarily clamping the machine to a work bench as well as a mounting hole (41) for attachment with a bolt or screw. -
Page 13: Maintenance
Motor service To ensure product safety and reliability, all motor repairs should be performed by the Kreg Tool Company factory service center. Call Kreg Customer Service (1.800.447.8638) for return authorization and shipping instructions. Replacement parts... -
Page 14: Protecting The Environment
6. Clamp Correctly Use fine-thread screws in hardwood. These #7 screws Center the pads of your Kreg Face Clamp™ on the joint line displace less wood than the #8 coarse-thread screws used with the large clamp pad on the face side (opposite the pocket for softwood, plywood, MDF, and particleboard. -
Page 15: Warranty
The warranty contained herein may not be modified and no other warranty, expressed or implied, shall be made by or on behalf of Kreg Tool Company. This warranty is in effect only if the accompanying registration card is fully and properly completed and returned to Kreg Tool Company within ten (10) days of date of delivery to the original purchaser. -
Page 16: Optional Accessories
WARNING with this tool could be hazardous. To reduce the risk of injury, only Kreg recommended accessories should be used with this product. Recommended accessories for use with your tool are available at extra cost from your distributor or local service center. The following accessories are available for the Kreg Foreman DB210-EUR from your Kreg dealer or online at www.kregjig.com.
Need help?
Do you have a question about the FOREMAN and is the answer not in the manual?
Questions and answers