Table of Contents
Advertisement
Advertisement
Table of Contents

Related Manuals for Kreg K3


Summary of Contents for Kreg K3
- Page 1 Kreg Jig ® K3 Pocket Hole System INSTRUCTIONAL MANUAL Item# K3MS Item# K3SP Products covered by one or more of the following patents: 4,955,766 5,676,500 6,481,937 6,726,411 Other patents pending. Item# K3UP The Blue Mark of Quality. Version 2005701 NK3022...
-
Page 2: Table Of Contents
Warnings and Cautions Package Contents Parts Identification Benchtop Base Assembly Portable Base Assembly Quickstart Guide To Building Your First Pocket Hole Joint Getting To Know Your K3 System 9-16 Selecting The Correct Screw 17-19 Self-Tapping Screw FAQ’s Face Frames 21-22... -
Page 3: Warnings And Cautions
Warnings and Cautions Thank you for your purchase! Kreg Tool Company is proud to manufacture top quality tools and accessories that are surpassed only by our commitment to customer service. If after reviewing this manual you still have a question or concern that you would like addressed please visit our website at www.kregtool.com, call 800-447-8638 or email... -
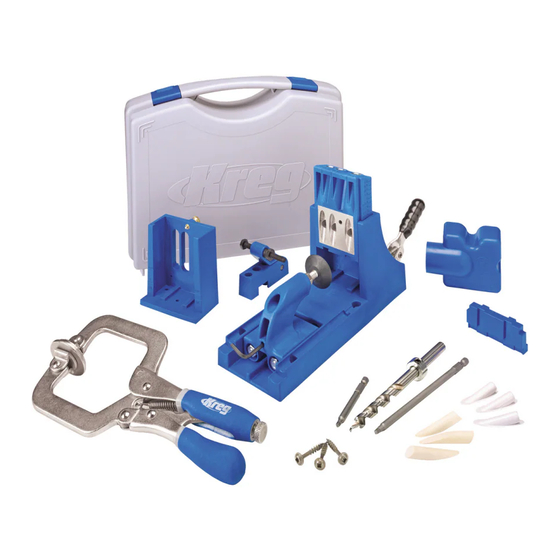
Page 4: Package Contents
Allen Wrench - 1/8” (AW18) Depth Collar (KJSC) Premium Face Clamp (PFC) Material Support Stop (KJSS) Dust Collection Shroud (NK3005) Portable Base (NK3036) K3 Drill Guide Block (NK3003) Benchtop Base (NK3035) SPS-C1 Screws SML-F125 Screws SML-C125 Screws SML-C150 Screws SML-C2 Screws... -
Page 5: Parts Identification
Parts Identifi cation Brass K3 Drill Guide Block Benchtop Index Pin Base Portable Base Brass Index Pin Depth Collar/Allen Wrench Dust Collection Shroud 3”-#2 Square Driver Bit Material Support 3/8” Step Drill Bit Stop 6”-#2 Square Driver Bit Premium Face Clamp... -
Page 6: Benchtop Base Assembly
Store the Allen Wrench (Fig. 5D) 1. The 1/8” Allen Wrench is used to lock the Depth Collar in position on the Kreg Jig Drill ® Bit for different depths of pocket holes. 2. The Allen Wrench may be stored either in the designated location in the case or it can be held conveniently in the rear of the Clamp Follower. -
Page 7: Portable Base Assembly
K3 Portable Base surrounding the openings used for wood chip ejection. These raised ribs are provided so that any clamp may be used to secure the K3 Portable Base and Drill Guide Block to the material to be drilled. Attach the Index Pin (Fig. -
Page 8: Quickstart Guide To Building Your First Pocket Hole Joint
Quick-Start Guide... To Building Your First Pocket Hole Joint Ready to jump in and start building? Here is a quick-start guide to creating your first pocket hole joint. Before you start... a few Pocket Hole Joinery Facts • You only need to drill a pocket hole into ONE of the workpieces to be joined. - Page 9 If you are joining the two pieces in a flat plane, such as a frame, position the large pad of the Kreg Premium Face Clamp over the joint line and clamp with firm pressure to hold them perfectly flush as shown in figure 8C.
- Page 10 Getting to Know Your K3 System Choosing the Correct 2-Hole Spacing Spacing pocket holes across the width of a workpiece is important in maximizing the strength of a joint. When framing most woodworking projects, it is recommended to place two pocket holes across the width of a rail to keep the workpiece from twisting once it has been assembled.
- Page 11 Kreg Jig ® K3; or it is awkward to clamp the Drill Guide Block in Fig. 10C position. For these occasions the Drill Guide Block has...
- Page 12 Getting to Know Your K3 System Markings on the Benchtop Base (Fig. 11A&B) Fig. 11A A series of markings have been added to the Benchtop Base that mark the exit point of the screw for a given Drill Guide Block setting. These markings will allow you to “estimate”...
- Page 13 About Dust Collection (Fig. 12C) One of the most unique features of the K3 Pocket Fig. 12C Hole System is the addition of a Dust Collection Shroud. The Drill Guide Block has been designed...
- Page 14 Getting to Know Your K3 System About Dust Collection Cont. (Fig. 13A&B) Fig. 13A When the pressure opposite the openings is reduced to less than standard air pressure the wood chips will flow more freely from the drill guides. This reduction in pressure is achieved when a shop vacuum or dust collector is connected to the rear of the Benchtop Base.
-
Page 15: Getting To Know Your K3 System
C-clamp may be used to hold the Portable Base to the workpiece being drilled. The Locking tabs capture small pad of K3 Portable Base provides a convenient way to drill clamp on backside of Portable Base. pocket holes in large panels or cumbersome work pieces by simply locating the step of the Portable Fig. - Page 16 Getting to Know Your K3 System Fig. 15A Adjusting the Premium Face Clamp (Fig. 15A) Turn the adjustment screw of the Premium Face Clamp in the counter-clockwise direction for thicker materials and clockwise direction for thinner materials. Clamping pressure is also adjusted using the same adjustment screw;...
- Page 17 Fig. 16D hardware pack for mounting to the Kreg Mini Trak. By adding a length of Kreg Mini Trak to either side of the K3 Benchtop Base an adjustable Support/Stop system may be created to allow the drilling of several pocket holes across the width of large panels at repeatable locations.
-
Page 18: Selecting The Correct Screw
Selecting the Correct Screw Selecting the Correct Screw for Your Application Selecting the correct screw for your application is a function of three variables. 1. Jig setting - Set jig to the same setting as your wood thickness (ie. 3/4” setting for 3/4”... - Page 19 Selecting the Correct Screw Joining 1” to 1” material Joining 1-1/8” to 1-1/8” material 1-1/2” recommended screw length 1-1/2” recommended screw length Joining 1-1/4” to 1-1/4” material Joining 1-3/8” to 1-3/8” material 2” recommended screw length 2” recommended screw length Standard Depth Collar Settings Joining 1-1/2”...
- Page 20 Selecting the Correct Screw Kreg self-tapping screws are specially designed for pocket hole joinery. They feature a self-tapping auger point that eliminates pre-drilling and a large round head that seats flush in the bottom of the pocket hole. All of our screws utilize a #2 square drive recess. The deep recess of the square drive provides positive driver engagement to reduce cam-out.
-
Page 21: Self-Tapping Screw Faqs
If you are having problems with the head breaking off in a box of KREG Pocket Hole Screws please let us know so we may make it right with you. -
Page 22: Face Frames
5/8” up to 2” thick. For cabinets, 3/4” thick material is the standard. The goal is to always use the setting of the Kreg Jig® that will allow you to place a pocket hole so that the screw will exit the mid-point of your material (ie. -
Page 23: Face Frames
No pre-drilling is required of the stile as long as you are using a self-tapping wood screw. Add glue to the joint line at this time if desired. Place the KREG Face Clamp or Bench Klamp on the joint line to hold the rail and stile perfectly flush as the screws are driven. -
Page 24: Leg And Rail
Leg and Rail The Leg and Rail joint is a standard with table and chair assembly. Design options include either a set-back or flush rail. Use corner braces or a gusset to stiffen the joint. Pocket holes can also be drilled upwards into the rail to attach the table top at a later time. -
Page 25: Leg And Rail
(make sure to check the amount of screw penetration in a scrap workpiece before final assembly). You can also place a pocket hole into the corner of the gusset with the Mini Kreg Jig® to further tie it into the leg. -
Page 26: Mitered Joints
Mitered Joints This section relates to mitered joints that are assembled in a flat plane such as a picture frame. This is probably one of the most challenging types of joints to produce with pocket hole joinery. Understanding how the orientation of the pocket hole and the width of the stock being joined varies will allow you to join frames more easily. - Page 27 On this 3” wide piece, use the A-C setting of the Kreg Jig K3 or a ® 1-1/2” center to center pocket hole spacing.
-
Page 28: Angled Joints/Curves
Angled Joints/Curves Angles and curves are a great application for pocket hole joinery. With other methods of joinery an angled joint must by held in alignment for a substantial amount of time with bar clamps. Uneven pressure along the joint line can result in bowing, gaps or misalignment. -
Page 29: Angled Joints/Curves
Angled Joints/Curves Steps to Building an Angled Joint 1. Plane stiles to same thickness, rip to width and cut square to length. Place desired angle on inside edge of one stile. 2. Build an assembly jig from scrap stock. We recommend that you first cut a plywood base 8”... -
Page 30: Edgebanding
Kreg Bench Klamp. Then slide the ply material into position and drive a fine thread self-tapping screw. Make sure that you test the amount of screw travel in scrap pieces... -
Page 31: Edgejoining
Edgejoining Edgejoining, or assembling workpieces edge to edge such as for a solid wood tabletop is easily accomplished with pocket hole joinery. In traditional edgejoining, the workpieces are only glued together and then pipe clamped overnight to allow for the glue to set-up. With pocket hole joinery one simply glues and screws to assemble one layer at a time. -
Page 32: Plugging A Pocket Hole
From time to time however, you may find the need to place one in a visible location. In this event, KREG manufactures solid wood pocket hole plugs that can be glued in over the head of the screw and sanded flush to conceal the hole. These plugs are available in a variety of wood species. -
Page 33: General Faq's
General FAQ Why do I need to use a 2,000+ rpm drill to make the pocket holes? What brand do you recommend? A drill that is rated at 2,000 RPM or above is considered a woodworking drill. RPM’s be- low that are normally seen in metal-working drills. The higher the RPM, the cleaner the hole and the longer the drill bit lasts. - Page 34 Drill bit life directly correlates to material composition. Can the Kreg drill bit be sharpened? Yes, we have a factory sharpening service for KREG bits only. KREG drill bits have “Kreg” stamped into the shank of the bit. We recommend sharpening the Kreg Jig® KJD bit every 2,500 holes and the DKDB (machine) bit every 8,000 holes.
-
Page 35: Warranty And Contact Information
System carries a lifetime warranty on the hardened steel drill guides when used with the KREG KJD drill bit. All of our tools also carry a 30-day complete satisfaction guarantee. If for any reason you are not completely satisfied within 30 days of purchase return the product along with your proof of purchase to the location you purchased the product from. - Page 36 Kreg Tool Company 201 Campus Drive Huxley, IA 50124 Phone: 515.597.2234 Toll Free: 800.447.8638 Fax: 515.597.2354 www.kregtool.com...
Need help?
Do you have a question about the K3 and is the answer not in the manual?
Questions and answers