
Related Manuals for Kreg Jig R3


Summary of Contents for Kreg Jig R3
- Page 1 Kreg Jig ® ITEM# R3 Owner’s Manual Guide d’utilisation Manual del propietario www.kregtool.com www.kregtool.com...
-
Page 2: Safety Guidelines
Safety Guidelines WARNING: This product contains one or more chemicals known to the State of California to cause cancer and birth defects or other reproductive harm. Wash hands after handling. WARNING • Read this manual and these safety guidelines. Learn the applications and limitations of the tool as well as the hazards specific to it. Operating the tool before understanding safe and proper use could result in personal injury. - Page 3 Kreg Owners’ Community www.kregjig.ning.com Join thousands of other Kreg product owners and share your projects, ask questions, offer advice, check out product reviews, and much more! www.pinterest.com/ www.twitter.com/ kregtool kregtoolcompany Kreg Plus Newsletter Sign up at www.kregtool.com to...
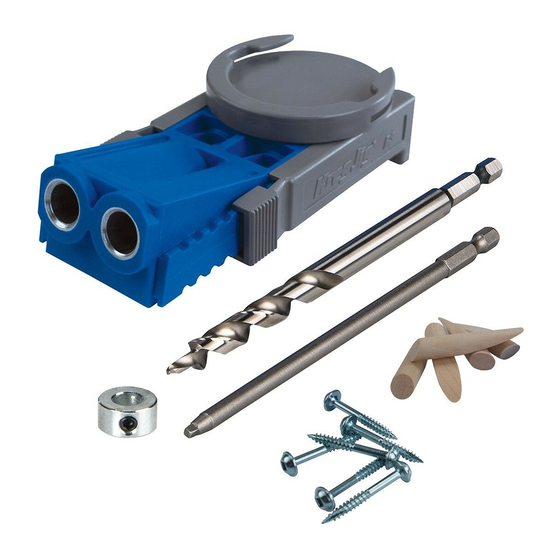
- Page 4 Parts 800-447-8638...
- Page 5 Parts Clamp Pad Adapter: The adapter accepts the large pad of all Kreg face clamps and snaps into the back of the jig, turning clamp and jig into one assembly for fast jig positioning. Drill Guide: This two-hole drill guide keeps your drilling stroke straight and true. The hardened steel guides are guaranteed for the life of the tool.
- Page 6 Settings To create strong joints, you’ll set the drilling depth, adjust the jig position sliders, and select a screw length to match the thickness of the workpiece. The Kreg Jig R3 makes this easy, ® in just three simple steps: The example shows the stop collar positioned for a ¾"...
- Page 7 Settings The example shows the sliders positioned for a ¾" (19mm)-thick workpiece. Step 2: Adjust the Positioning Sliders To adjust the jig so the screw exits at the center of the workpiece, turn the jig over so the bottom faces up. Press the ridged tab on each slider with your thumb and slide it until the mark on the slider that matches the thickness of your workpiece aligns with the arrow on the jig body.
- Page 8 Choosing a Screw Step 3: Select a Screw Use this chart to select the correct screw length. Kreg offers a complete line of pocket screws for every workpiece thickness and type. All Kreg pocket screws are available at your Kreg dealer or online at www.kregtool.com.
- Page 9 Choosing a Screw Self-Tapping auger point eliminates the Coarse Thread need to drill a pilot hole. Due to the large diameter and thread pitch, our #8 coarse-thread screws offer a strong hold in softwoods and composite materials. Use in woods and composites such as: •...
- Page 10 Using Your Kreg Jig ® Clamping Position the jig with the slider lugs hooked on the edge of the workpiece. A bar clamp or C-clamp works just fine to secure the jig to the workpiece. With the included clamp pad adapter, the Kreg Jig ®...
- Page 11 "-1 ⁄ " [38mm-48mm] Drilling In addition to the proper Kreg Jig settings, spacing pocket ® holes evenly across the workpiece is an important part of making a strong joint. The two-hole drill guide allows you to drill holes in narrow workpieces (1½"-1⅞" [38mm-48mm]) without having to reposition the jig.
Need help?
Do you have a question about the Jig R3 and is the answer not in the manual?
Questions and answers