
Related Manuals for Sharp MultiSync EA272Q


Summary of Contents for Sharp MultiSync EA272Q
- Page 1 Desktop Monitor MultiSync® EA272Q EA272U Setup Manual Manuel d’installation Manual de configuración MODEL: DD-EA272Q, DD-EA272QW, DD-EA272U, DD-EA272UW...
- Page 2 Supplier’s Declaration of Conformity SHARP LCD MONITOR, DD-EA272Q, DD-EA272QW, DD-EA272U, DD-EA272UW This device complies with Part 15 of the FCC Rules. Operation is subject to the following two conditions: (1) This device may not cause harmful interference, and (2) this device must accept any interference received, including interference that may cause undesired operation.
- Page 3 Supplied Components USB-C Power cord [US] https://www.sharpnecdisplays.us [Global website] https://www.sharp-nec-displays.com/dl/en/dp_manual/index.html...
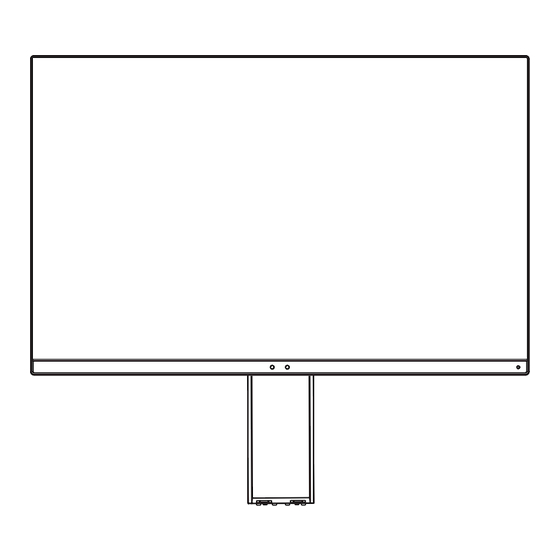
- Page 4 Installation nAttaching the base 90° Screw nHeight and angle adjustment NOTE: nRemoving the stand...
- Page 5 Connections Master monitor EA272Q EA272U Headphone USB Type-C (DownStream) USB Type-A power power outlet outlet HDMI HDMI DisplayPort DisplayPort USB Type-A USB Type-A Power cord Power cord IN IN Type-C Type-C Type-B Type-B (Supplied) (Supplied) Ethernet Hub Ethernet Hub HDMI HDMI DisplayPort DisplayPort...
- Page 6 Using the cable holder Turning power on/off...
-
Page 7: Table Of Contents
Table of Contents [English] Important Information .........................English-1 DEAR CUSTOMER ........................English-2 Safety Precautions and Maintenance ................. English-2 Mounting precautions .........................English-7 Turning Power On/Off ........................ English-8 Status of the monitor and patterns of the Power LED............English-8 Operations after first power-on ................... English-8 NOTE: ... -
Page 8: Dear Customer
DEAR CUSTOMER Thank you for purchasing this product. To ensure safety and many years of trouble-free operation of your product, please read the “Safety Precautions and Maintenance” carefully before using this product. NOTE: Product warranty does not cover damage caused by improper installation. Failure to follow these recommendations could result in voiding the warranty. - Page 9 WARNING Handling the power cord. Do not scratch or modify the cord. • Do not place heavy objects on the cord. • Do not let the weight of the product rest on the cord. • Do not cover the cord with a rug, etc. •...
- Page 10 WARNING Prevent tipping and falling for earthquakes or other shocks. To prevent personal injury or damage to the product caused by tipping over due to earthquakes or other shocks, make sure to install the product in a stable location and take measures to prevent falling.
- Page 11 WARNING Usage of the product must not be accompanied by fatal risks or dangers that, could lead directly to death, personal injury, severe physical damage or other loss, including nuclear reaction control in nuclear facility, medical life support system, and missile launch control in a weapon system. PROHIBITED CAUTION Handling the power cord.
- Page 12 CAUTION Installation, removal, and adjustment of the stand. • Handle with care when pulling the stand as it might pinch your fingers. • Please securely hold the monitor stand while removing the screws to prevent the monitor stand from falling. It may case personal injury. •...
-
Page 13: Mounting Precautions
Mounting precautions • To attach a VESA-compliant mounting bracket, use M4 screws that are 6 mm to 10 mm longer than the thickness of the mounting bracket. 6 - 10 mm Screws (M4) Mounting bracket Monitor mounting • Be sure to use a wall-mount bracket designed or designated for mounting the monitor. •... -
Page 14: Turning Power On/Off
Turning Power On/Off nStatus of the monitor and patterns of the Power LED Power LED Status Blue* Normal operation Amber Standby mode Off mode : When [LED BRIGHTNESS] is set to low, LED may not lit. nOperations after first power-on Initial Setting of USB FUNCTIONALITY USB Hub/Type-C function/[USB LAN] in OSD menu are disabled as the default condition set at the factory and in the product’s firmware;... - Page 15 Table des matières [Français] Informations importantes ......................Français-1 CHER CLIENT, ........................Français-2 Consignes de sécurité et d’entretien ................. Français-2 Précautions de montage ......................Français-7 Mise sous/hors tension ......................Français-8 État du moniteur et schémas du voyant ................Français-8 Opérations après la première mise sous tension ............. Français-8 REMARQUE : ...
-
Page 16: Cher Client
CHER CLIENT, Merci d’avoir acheté ce produit. Afin de protéger votre produit et de bénéficier de nombreuses années de fonctionnement sans défaillance, lisez attentivement les précautions de montage et conseils d’entretien avant utilisation. REMARQUE : La garantie ne couvre pas les dommages découlant d’une mauvaise installation. Le non-respect de ces recommandations pourrait entraîner l’annulation de la garantie. - Page 17 AVERTISSEMENT Câble d’alimentation. Ne modifiez pas le cordon. • Ne placez pas d’objets lourds sur le cordon d’alimentation. • Ne laissez pas le poids du produit reposer sur le câble. • Ne le couvrez pas à l’aide d’un tapis ou autre. •...
- Page 18 AVERTISSEMENT Évitez les chutes suites à un séisme ou autre. Pour éviter toute blessure ou que le produit ne tombe suite à un séisme ou autre, par exemple, et ne soit endommagé, assurez-vous de l’installer à un emplacement stable et de prendre les mesures nécessaires.
- Page 19 AVERTISSEMENT L’utilisation du moniteur ne doit présenter aucun risque mortel ni danger pouvant provoquer directement la mort, des blessures, des dommages physiques graves ou d’autres pertes, y compris en ce qui concerne le contrôle de réactions nucléaires dans une installation nucléaire, les systèmes médicaux de maintien des fonctions vitales, et le contrôle de lancement de missiles dans un INTERDICTION système d’armes.
- Page 20 ATTENTION Installation, retrait et réglage du support. • Manipulez-le avec précaution lorsque vous tirez sur le support, car vous pourriez vous pincer les doigts. • Maintenez fermement le support du moniteur tout en retirant les vis pour éviter qu’il ne tombe. Cela pourrait entraîner des blessures.
-
Page 21: Précautions De Montage
Précautions de montage • Pour fixer un support VESA, utilisez des vis M4 de 6 à 10 mm plus longues que l’épaisseur du support de montage. 6 à 10 mm Vis (M4) Support de montage Montage du moniteur • Assurez-vous d’utiliser un support de montage mural conçu ou désigné comme adapté pour le montage du moniteur. -
Page 22: Mise Sous/Hors Tension
Mise sous/hors tension nÉtat du moniteur et schémas du voyant Voyant État Bleu* Fonctionnement normal Orange Mode veille Éteint Arrêt : lorsque le paramètre [LUMINOSITÉ DEL] est défini sur une valeur faible, il est possible que le voyant ne s’allume pas. nOpérations après la première mise sous tension Réglage initial de FONCTION USB La fonction Hub USB/Type-C/[USB LAN] du menu OSD est désactivée par défaut dès l’usine et dans le... - Page 23 Tabla de contenido [Español] Información importante ......................Español-1 ESTIMADO CLIENTE ....................... Español-2 Medidas de seguridad y mantenimiento ................Español-2 Precauciones de montaje ......................Español-7 Encendido/apagado del aparato ....................Español-8 Estado del monitor y patrones del LED de encendido ............Español-8 Operaciones después del primer encendido ..............
-
Page 24: Estimado Cliente
ESTIMADO CLIENTE Gracias por comprar este producto. Para garantizar la seguridad y muchos años de funcionamiento sin problemas de su producto, lea atentamente el apartado “Medidas de seguridad y mantenimiento” antes de utilizar este producto. NOTA: La garantía del producto no cubre los daños causados por una instalación incorrecta. La garantía podría quedar anulada en el caso de no seguir estas recomendaciones. - Page 25 ADVERTENCIA Manipulación del cable de alimentación. No rasgue ni modifique el cable. • No coloque objetos pesados sobre el cable de alimentación. • No deje que el peso del producto descanse sobre el cable. • No cubra el cable con una alfombra o similar •...
- Page 26 ADVERTENCIA Evite inclinaciones y caídas provocadas por terremotos u otros seísmos. Para evitar lesiones personales o daños al producto causados por caídas provocadas por terremotos u otros seísmos, asegúrese de instalar el producto en una ubicación estable y tome medidas para evitar que se caiga.
- Page 27 ADVERTENCIA El monitor no debe usarse cuando existan daños o riesgos fatales que pudieran provocar directamente la muerte, lesiones personales, daños físicos graves u otras pérdidas, incluyendo el control de una reacción nuclear en una instalación nuclear, un sistema de reanimación cadiopulmonar avanzada y el control del lanzamiento de misiles en un sistema de armas.
- Page 28 PRECAUCIÓN Instalación, retirada y ajuste del soporte. • Manipule con cuidado el soporta ya que podría pillarse los dedos. • Sujete con seguridad el soporte del monitor mientras retira los tornillos para evitar que dicho soporte se caiga. Podría lesionarse. •...
-
Page 29: Precauciones De Montaje
Precauciones de montaje • Para fijar un soporte de montaje compatible con VESA, utilice tornillos M4 que sean entre 6 mm y 10 mm más largos que el grosor del soporte de montaje. 6 - 10 mm Tornillos (M4) Escuadra de montaje Montaje del monitor •... -
Page 30: Encendido/Apagado Del Aparato
Encendido/apagado del aparato nEstado del monitor y patrones del LED de encendido LED de encendido Estado Azul* Funcionamiento normal Ámbar Modo de espera Apagado Modo apagado : Cuando [LED BRIGHTNESS] (BRILLO DEL LED) está establecido en un valor bajo, es posible que el LED no se encienda. nOperaciones después del primer encendido Configuración inicial de la FUNCIÓN USB Hub USB/Función Tipo-C/[LAN USB] en el menú... - Page 31 ) in the United States ® and other countries. MultiSync is a trademark or registered trademark of Sharp NEC Display ® Solutions, Ltd. in Japan and other countries. The terms HDMI, HDMI High-Definition Multimedia Interface, HDMI Trade dress and the HDMI Logos are trademarks or registered trademarks of HDMI Licensing Administrator, Inc.
- Page 32 Printed in China Rev.1...
Need help?
Do you have a question about the MultiSync EA272Q and is the answer not in the manual?
Questions and answers