Advertisement
Quick Links
INSTRUCTION
MANUAL
BEDIENUNGSANLEITUNG
MANUEL D'INSTRUCTIONS
MANUAL DE INSTRUCCIONES
MANUALE DI ISTRUZIONI
取扱説明書
Rev00(A)
PSTVS02
Table Top TV Stand
EN
Tisch-TV-Ständer
DE
Support de TV sur Table
FR
Soporte de mesa para TV
ES
Porta TV da tavolo
IT
テーブルトップTVスタンド
JP
(US / CA) 1-800-556-6806
(UK) 44-808-196-3891
supportus@perlesmith.com
supportjp@perlesmith.com (JP)
www.perlesmith.com
WWW.
Advertisement

Related Manuals for Perlesmith PSTVS02


Summary of Contents for Perlesmith PSTVS02
- Page 1 INSTRUCTION MANUAL BEDIENUNGSANLEITUNG MANUEL D'INSTRUCTIONS MANUAL DE INSTRUCCIONES MANUALE DI ISTRUZIONI 取扱説明書 Rev00(A) PSTVS02 Table Top TV Stand Tisch-TV-Ständer (US / CA) 1-800-556-6806 Support de TV sur Table (UK) 44-808-196-3891 Soporte de mesa para TV supportus@perlesmith.com supportjp@perlesmith.com (JP) Porta TV da tavolo www.perlesmith.com...
- Page 2 If you DO NOT understand the instructions or have any concerns or questions, please contact our technical support line at 1-800-556-6806 (US / CA) / 44-808-196-3891 (UK) or customer service at supportus@perlesmith.com. · Not all hardware included in this package will be used. CAUTION Important Safety ·...
- Page 3 Contents · Inhalt· Contenu · Contenido · Contenuti · 梱包内容 M6 / M8 M4 / M5 [B2] x 4 [B3] x 4 [B1] x 4 L2.5mm L10mm L22mm [F3] x 4 [F1] x 8 [F2] x 4 M4 x 12mm M4 x 30mm [C1] x 4 [C2] x 4...
- Page 4 Plastic Washer Steel Washer Kunststoffscheibe Stahlscheibe Rondelle Plastique Rondelle en Acier Lavadora de plástico Arandela de acero Rondella di Plastica Rondella d'Acciaio プラスチックワッシャー プラスチックワッシャー [H] x 6 [I] x 1 [J] x 3 [K] x 3 M6 x 25mm M6 x 12mm M6 x 35mm M5 x 8mm [L] x 3...
- Page 5 Step 1 Attach TV Brackets to TV · SCHRITT 1 Befestigen der TV-Halterungen am Fernseher · ETAPE 1 Fixer les équerres TV à la TV · PASO 1 Coloque los soportes de TV en el televisor · FASE 1 Fissare le staffe al televisore ·...
- Page 6 1-2 Spacer and Bolt Configurations · 1-2 Abstandshalter- und Bolzen konfigurationen · 1-2 Configurations des entretoises et des boulons · 1-2 Configuraciones de espaciadores y pernos · 1-2 configurazione bulloni e distanziatori · 1-2 スペーサーとボルトの構成 Cables Bump Recessed Holes Flat Back TV Curved TV See Option D See Option C...
- Page 7 1-3 Attach the TV Brackets to Your TV · 1-3 Erforderliche Teile, wenn Sie einen Fernseher wie unten gezeigt haben · 1-3 Pièces nécessaires si vous avez un téléviseur comme indiqué ci-dessous · 1-3 Piezas necesarias si tiene un televisor como se muestra a continuación ·...
- Page 8 Option B · Möglichkeit B · Variante B · Opción B · Opzione B · オプションB C1 / D1 / E1 C2 / D2 / E2 / E3 B1 / B2 F1 / F2 / F3 Option B: For Curved-Back TVs Spacers must be tall enough so that the curved back of the TV does not interfere with the mounting plate.
- Page 9 Option C · Möglichkeit C · Variante C · Opción C · Opzione C · オプション C C1 / D1 / E1 C2 / D2 / E2 / E3 B1 / B2 F1 / F2 / F3 C1 / D1 / E1 B1 / B2 (If needed) (Falls erforderlich)
- Page 10 Option D · Möglichkeit D · Variante D · Opción D · Opzione D · オプションD C2 / D2 / E2 / E3 B1 / B2 F1 / F2 / F3 Option D: For TVs with Protruding Cables For protruding cables, use spacers [F1], [F2] or [F3] to create extra space between the TV and TV brackets.
- Page 11 Option E · Möglichkeit E · Variante E · Opción E · Opzione E · オプションE F1 / F2 / F3 C2 / D2 / E2 / E3 B1 / B2 Option E: For TVs with Recessed Holes Spacers [F1], [F2] or [F3] need to fill in the recessed holes on the back of the TV, while keeping the TV brackets as close to the TV as possible.
-
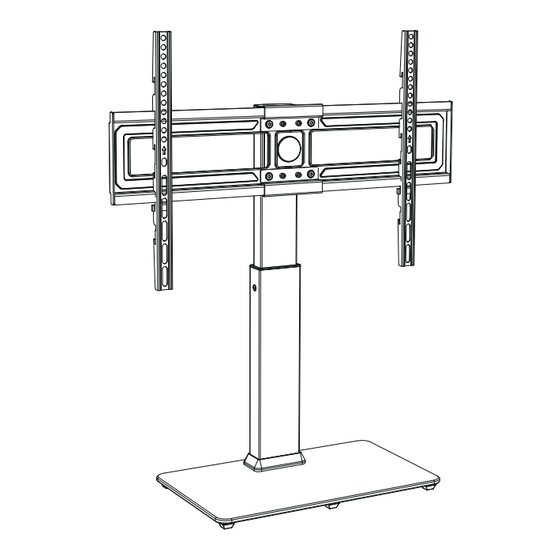
Page 12: Step 2 Assemble The Base
Step 2 Assemble the Base · SCHRITT 2 Montieren Sie die Basis · ÉTAPE 2 Assemblez la base · PASO 2 Montar la base · PASSAGGIO 2 Assemblare la base · ステップ2ベースを組み立てます Place rubber feet [H] to the frosted side of the tempered glass base [02]. NOTE: The tempered glass base is designed to show the shiny glass side facing up. - Page 13 Stretch the upper support pillar [03a] from lower support pillar [03b]. Ziehen Sie die obere Stützsäule [03a] von der unteren Stützsäule [03b] ab. Étirez le pilier de support supérieur [03a] du pilier de support inférieur [03b]. Estire el pilar de soporte superior [03a] desde el pilar de soporte inferior [03b]. Allungare il montante di supporto superiore [03a] dal montante di supporto inferiore [03b].
- Page 14 Step 3 Connect the Upper Support Pillar to the Lower Support Pillar · Verbinden Sie die obere Stützsäule mit der unteren Stützsäule · Connectez le pilier de support supérieur au pilier de support inférieur · Conecte el pilar de soporte superior al pilar de soporte inferior ·...
- Page 15 ① ② Step 4 Assemble the TV Plate · Montieren Sie die TV-Platte · Assemblage de la plaque TV · Montar la placa de TV · Montare la piastra TV · TVプレートを組み立てる · Front Side · Vorderseite · Avant · Cara delantera ·...
- Page 17 Step 5 Attach TV to the TV Plate [04] · SCHRITT 5 Verbinden Sie die TV-Platte [04] · ÉTAPE 5 Connectez la plaque TV [04] · PASO 5 Conecte la placa de TV [04] · PASSAGGIO 5 Collegare la piastra TV [04] ·...
- Page 18 Insert the safety locks [P] into the upward-facing hooks at the midway to lower part of the TV bracket. Please note this is where the lower part of the TV bracket meets the TV plate. Then tighten the bolts of the safety locks [P] until the bolts touch the TV plate. Stecken Sie die Sicherheitsverriegelungen [P] in die nach oben gerichteten Haken an der in der Mitte bis zum unteren Teil der TV-Halterung.
-
Page 19: Step 6 Swivel Adjustment
Step 6 Swivel Adjustment · Schwenkeinstellung · Réglage du pivotement · Ajuste del giro · Regolazione della rotazione · スイベル調整 If necessary,the TV plate or TV can be swivelled manually. Bei Bedarf kann die TV-Platte oder der Fernseher manuell geschwenkt werden. Si nécessaire,la plaque TV ou le téléviseur peuvent être pivotés manuellement. - Page 20 Si vous avez besoin de pièces de rechange, veuillez contacter notre ligne d'assistance technique au 1-800-556-6806 (US / CA) / 44-808-196-3891 (UK) ou le service client à supportus@perlesmith.com. ATTENTION · Ce produit contient de petits objets qui peuvent présenter un risque d'étouffement en cas d'ingestion.
Need help?
Do you have a question about the PSTVS02 and is the answer not in the manual?
Questions and answers