Table of Contents
Advertisement
Quick Links
Advertisement
Table of Contents

Related Manuals for Hidoes HD-BF1


Summary of Contents for Hidoes HD-BF1
- Page 1 HD-BF1 ELECTRIC BIKE USER MANUAL...
- Page 2 USER MANUAL PLEASE READ THE INSTRUCTIONS CAREFULLY BEFORE RIDING Scan QR Code Or Enter URL for Online Installation Video https://www.youtube.com/watch?v=VfA5kk6aYGY...
- Page 3 1、 This manual was written to help you understand the proper use and maintenance of the Hidoes line of Electric electric bike. 2、 It is important to understand the functions and features of the new Hidoes before operating it as it will allow you to enjoy it from every ride.
-
Page 4: Table Of Contents
CONTENT Product & Component Display ······································································· 1~2 Product Parameters ···················································································· 3 Products & Accessories ··············································································· 4 Product Installation ···················································································· 5~10 Product Folding ······················································································· 11~12 Power On & Unlock···················································································· 13 Safe Driving Warning ················································································· 14~15 Battery & Charging ··················································································· 16~18 Cleaning&Storage&Disposal at End-of-Life························································19~20 Error Code ·····························································································... -
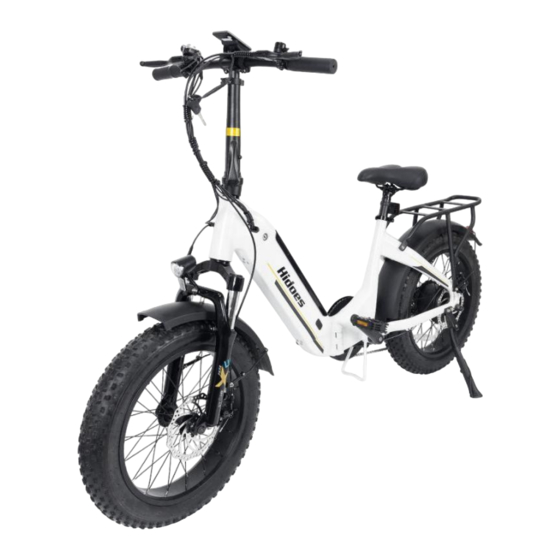
Page 5: Product & Component Display
Product & Component Display 01:Brake 07:Front fender 19:Rear wheel fender 13:Pedal 02:Handle 08:Front fork 20:Rear wheel 14:Chain 03:Meter 09:Disc brake plate 21:Rear wheel brake 15:Seat stool 04:Fixed fastener 10:Front wheel 22:Motor 16:Reflector 05:Riser folding clip 11:Key hole 23:Disc brake plate 17:Rear wheel seat 06:Headlights 12:Battery box... - Page 6 Product & Component Display 01:Brake lever 06:Settings 11:Total mileage 02:Bell 07:Power on button 12:Transmission gear 03:Acceleration control gear 08:Battery level 13:Brake lever 04:Lamp Button 09:Speed 14:Throttle 05:Reduction control gear/assisted 10.Gear model...
-
Page 7: Product Parameters
Product Parameters Model HD-BF1 Tire Size 20 inch(20" x 4.0" Fat Tire) Battery 48V/13Ah Tyre Type Off-road Air tires Power Charging time 5~7 hours Black and white LCD Display Screen Frame Material Aluminum alloy display Max Speed 25-40KM/H Net Weight 30.6KG... -
Page 8: Products & Accessories
Products & Accessories SERIAL NUMBER ITEM QUANTITY Charger Toolkit Instructions Lock... -
Page 9: Product Installation
Product Installation Align the foot brace and Remove the electric bike Use tools to tighten screws screw with the hole from the packaging box Erect the riser in the The foot brace is in place Lock the riser latch direction shown... - Page 10 Install the nut on the other Lift the frame and align the Attach the nut to the bearing side to the bearing and front fork with the bearing and tighten the nut tighten the nut screws on the front wheel Use a tool to tighten the screws to secure the front fender and Connect the wiring to...
- Page 11 Align "→" on the headlights Screw the retaining brackets on Remove the internal screws cable connector to connect both sides of the fender the headlights cable Adjust the Angle of the button, Align the button interface Install the screws and the button is assembled with the handlebar tube...
- Page 12 Align " → " on the meter cable Align instrument interface Install the screws connector to connect the meter with handlebar tube cable Each pedal comes with an "L" Insert the seat tube, adjust Lock the quick release handle in sticker or "R"...
- Page 13 By turning the right pedal Hold down the power button Enter the default boot password clockwise and the left pedal for 3-5 seconds 0000 counterclockwise with your hand,Use tools to tighten pedal screws When the instrument display Press taillight switch Turn the half handle on the right lights up, it is successfully button with your finger...
- Page 14 The tail light is on Assembly completed...
-
Page 15: Product Folding
Product Folding Open the retaining clip on Find the safety clip on the the vertical rod and release Folding riserit vertical the safety lock Open the retaining buckle Take out seat Hold the safety switch of the seat tube... - Page 16 You can fold the frame down Press the foot pedal inward Open the safety lock the middle with your fingers Folding Fold the two pedals...
-
Page 17: Power On & Unlock
Power On & Unlock Long press to power on/off the display. If you do not use the electric bike for more than 10 minutes, the meter will automatically shut down. When the display is powered on, it will show the Current Speed (km/h) and Odometer (km) by default. -
Page 18: Safe Driving Warning
If you are uncertain about any part of his manual, please bring your Hidoes and this manual to a local bike shop for professional inspection,assembly and instructions. To keep yourself safe and to prolong the lifespan of your Hidoes, it is extremely important that you follow the safety guidelines in this manual. - Page 19 Do not lend your Hidoes to someone who is unfamiliar with operating the bike. If you do choose to lend your Hidoes to anyone, make sure that they read and understand the instructions in this manual.
-
Page 20: Battery & Charging
Battery & Charging BATTERY Do not charge indoors. - Do not turn on and operate the electric bike while charging. - Keep the battery away from children, pets or direct heat. - Do not expose the battery to high temperature and pressure. - Please use the charger included with the electric bike for charging. - Page 21 Battery & Charging First Charge It is important to fully charge the battery before your first use of the electric bike. Your electric bike’s battery comes with these built-in features: 1. Balanced charging protection: During charging, the battery automatically balances the voltage among the internal cells to protect each cell.
- Page 22 Battery Maintenance Do not store the battery in a location that exceeds the temperature range of 20℃-25℃/68F-77F. Do not pierce the battery. Refer to local laws and regulations on battery recycling and/or disposal. If maintained properly, a battery can continue to perform at optimal levels well even powering your bike for many miles.
-
Page 23: Cleaning&Storage&Disposal At End-Of-Life
Storage Here are some tips on how to store your Hidoes E-Bike. Before storing the bike, charge the battery fully to prevent over-discharge due to lack of use. Even if you have not been using your E-Bike for more than one month, you should discharge and charge the battery at east once a month. - Page 24 The chemicals inside the battery are chemical pollutants. We recommend that all Hidoes products be disposed of as a whole or through an e-waste recycling center, program, or facility.
-
Page 25: Error Code
Error Code Error Code Fault Diagnostic Step Solution 1.Under-charged battery. 1.Charge battery Follow battery care procedures. Battery undervoltage 2.Motor internal fault. 2.Replace. Check whether the motor wires are connected properly or If there is no problem with each circuit, the Motor Hall failure whether the colored wires are connected incorrectly. -
Page 26: Troubleshooting
Troubleshooting Malfunction Possible Cause Possible Solution 1.Under-charged battery. 1.Charge battery. Follow battery care procedures. 2.Battery no longer serviceable. 2.Have battery checked. Replace if faulty. Pedal assistance not working 3.Battery charger faulty. 3.Have charger checked. Replace if faulty. 4.Motor electrics or switches damaged / faulty. 4.Seek diagnosis and repair from authorised service centre. - Page 27 Malfunction Possible Cause Possible Solution 1.Pedal bearings too tight. 1.Adjust. 2.Bottom bracket bearings too tight. 2.Adjust. Grinding noise when pedalling 3.Rear wheel not straight. 3.Align so chain is straight. 4.Chain too tight. 4.Adjust. 5.Derailleur dirty. 5.Clean and lubricate. 1.Pads worn. 1.Replace.
- Page 28 Malfunction Possible Cause Possible Solution Motor "clicks" / has reduced 1.Under-charged battery. 1.Charge battery. Follow battery care procedures. power and / or shuts off 2.Motor internal fault. 2.Replace. 1.Blown fuse. 1.Replace. No power when pedal assistance 2.Loose connectors / wiring damage. 2.Check connectors / wiring.
-
Page 29: Maintenance Schedule
Maintenance Schedule Check Before *Check Clean / Adjust / Tighten / Component / Condition Every Ride Periodically Lubricate Replace as Required Tyre Pressure Tyre Wear / Damage Brake Adjustment Handlebar Tightness Controls and Display Seat Post Tightness Fasteners / Mounting Hardware Brake Pads / Shoes Brake Cable Wear Chain... - Page 30 Derailleur Wheel Spoke Tension Wheel Trueness Wheel Bearings Bottom Bracket (Crank) Bearings * Every 5 to 10 rides depending on ride length and conditions.
-
Page 31: After Sales
We hope these videos will help you better understand and use our product. If you still have questions or concerns after watching the videos, please feel free to contact our customer service team, and we will be happy to assist you. Thank you again for your purchase and support! Wishing you a pleasant user experience! https://www.Hidoes.com https://www.youtube.com/@Hidoes https://www.facebook.com/HidoesBike/... -
Page 32: Limited Warranty
11. Defects or damages from improper storage, exposure to moisture or dampness, modifications, connections, repairs (except as carried out by Hidoes or its authorised centres), misuse, neglect, abuse, accident, alteration, improper installation, or other acts which are not the fault of Hidoes, including damage caused by dropping, blown fuses, liquid entering the interior of the product. -
Page 33: Warranty Card
Battery serial number Name Distributor Contact Note Shenzhen Tianshengle Technology Co., Ltd. Address: Room 502 ,5th Floor, Building 1, Liuwei Business Center, No.5, Longjing Community, Yangmei Community, Bantian Street, Longgang District, Shenzhen, China WhatsApp: +8613612953725 Customer support: support@hidoes.com Official website: www.Hidoes.com...
Need help?
Do you have a question about the HD-BF1 and is the answer not in the manual?
Questions and answers