Advertisement
Introduction
This bait boat fish finder is the ultimate edition fishing sonar in LUCKY fish finder family. Which comes with different base support options.
The 100m detective depth will satisfy most of anglers who want to go fishing on their boats.
This fish finder will make everything beneath your boats clear and effective.

This user mode allows you to operate the FF918CS-WL Long-distance wireless signal tower and cable sonar sensor. When signal indicator {  } is displayed on the screen, the unit is in Long-distance Wireless mode.

Use the Wireless sensor mode
This FF918CS-WL fishfinder is designed to be used with a bait boat. Only simply install the Long-distance signal tower to your bait boat, power on the signal tower, then enjoy fishing with your fish finder.
Considering the mounting holes of most bait boats, we have specially equipped two types of rubber pads to fit different bait boats to ensure the easy installation.

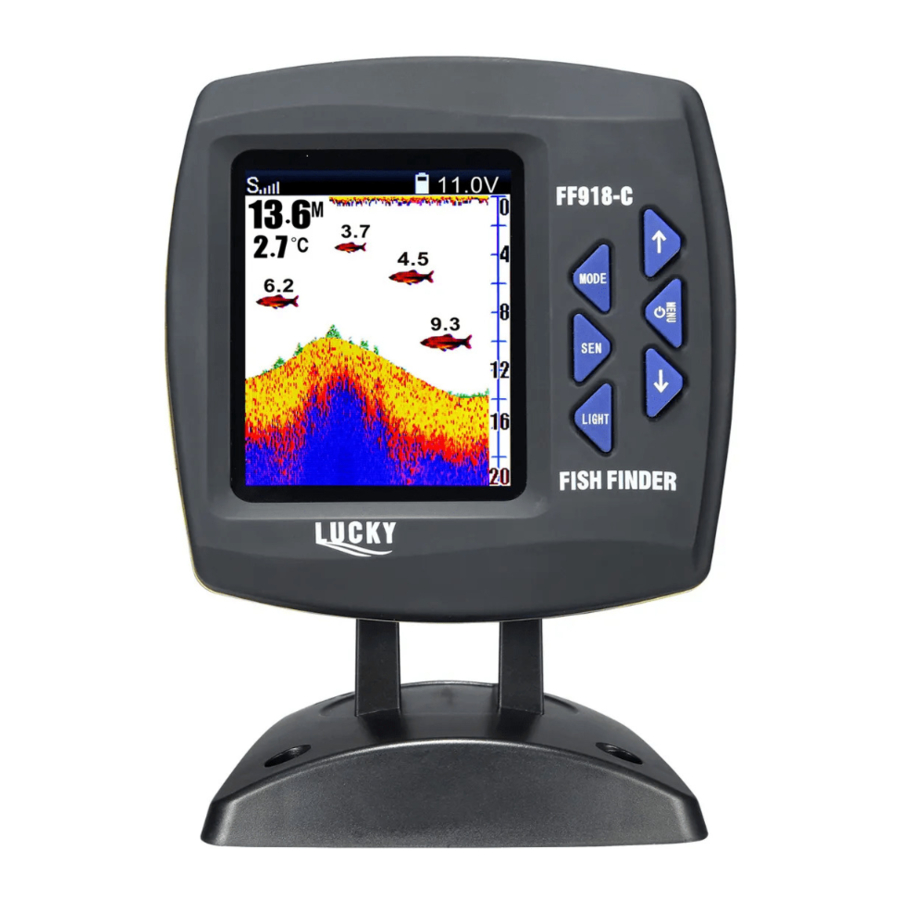
Display View
The FF918CS-WL displays underwater information in an easy to understand format. The top of the display corresponds to the water surface under the sensor, and the bottom of the display corresponds to the current water depth and the automatically selected depth range.
The bottom contour changes with water depth beneath the boat. It provides precise data information such as water depth, fish depth and water temperature.
As the boat moves, terrain and bottom structure changes are displayed. Fish, bait fish and thermoclines (underwater temperature changes) are displayed when detected. Underwater conditions vary greatly, so if you want to fully understand the benefits of FF918-CWLS you need some experience and interpretation. Use picture as a guide in most common conditions and use FF918CS-WL to explore unknown underwater types.

- Battery Capacity
- Depth Upper Range
- Water Surface Line
- Small Fish Icon
- Depth Gauges
- Medium Fish Icon
- Depth Low Range
- Signal Indicator
- Sensitivity
- Water Depth
- Water Temperature
- Large Fish Icon
- Bottom Contour
Power ON/OFF

Press the POWER-MENU botton for 3 seconds and release it to power on the FF918CS-WL.
Press and hold the POWER-MENU key until the dispaly goes off to power off the FF918CS-WL.
- Up arrow key
- Mode key
- Power/Menu key
- Sensitivity key
- Down arrow key
- Light Key
When the FF918CS-WL is turned on, the  will temporarily on the screen and last for 3 seconds. Then it will show up
You can use the arrow keys to select either Start-Up or Simulation.
If you do nothing, the unit will default to normal mode when use it on the water.
- Select the Start-Up to enter the work mode.
![]()
- Select Simulation mode to learn how to use the system with simulated data; Pressing the Down Arrow Key to enter simulation mode.
![]()

The Menu System
A simple menu system allows you to adjust the settable options to your individual needs. To activate the menu by pressing the POWER-MENU key.
Press the POWER-MENU key continuously to show one menu setting option at a time. When the menu settings are shown on the display, use the up and down arrow keys to select the setting.
After a few seconds, the menu settings will automatically disappear from the screen.
Most settings in normal operating mode are automatically saved and will not return to their default values when the device is turned off. For more information, see the individual menu options.
NOTE: Each time the POWER-MENU key is pressed, the backlight momentarily illuminates for easy viewing at night. Adjust the Brightness menu setting to keep the backlight on.
User mode

User mode will be selected between these two modes.

Sensitivity

Press the POWER-MENU key until SENSITIVITY appears. Sensitivity symbol controls how much detail is shown on the display. Increase the sensitivity to show more sonar returns from small baitfish and suspended debris in the water; however, the display may become too cluttered. When operating in very clear water or greater depths, increased sensitivity shows weaker returns that may be of interest. Decrease the sensitivity can eliminates the clutter from the display that is sometimes present in murky or muddy water. If Sensitivity is adjusted too low, the display may not show many sonar returns that could be fish. Sensitivity levels from 1 to 9 (1 –9).
Depth low Limit

Press the POWER - MENU key until DEPTH LOW LIMIT appears. AUTO is the default setting. When in AUTO setting, the lower depth will be adjusted by the unit to follow the operation. If the depth low limit is setted as 20 then you only see the underwater information below 20 meters from the water surface. (Auto, 1-100)
Depth upper Limit

Press the POWER - MENU key until DEPTH UPPER LIMIT appears. OFF is the default setting. When in OFF setting, the depth upper limit function will not work If you set the depth upper limit as 9 and depth upper limit as 20 then you will see the underwater information between 9 and 20 meters from the water surface. (Auto, 1-100)
NOTE: In manual operation, if the depth is greater than the depth limit settings, the bottom will not be visible on the display. Select AUTO to return to automatic operation
Shallow Alarm

Press the POWER-MENU key until Shallow Alarm appears. Select OFF for no depth alarm, or select 1 to 100 meters to set the alarm depth. An audible alarm sounds when the depth is equal to or less than the setting. (Off, 1-100)
Fish Icon

Make sure to press the POWER-MENU key until FISH ICON appears. Select either Off to view arches as the original sonar reflected signals or On to view the fish icons. Fish icons use advanced signal processing to interpret sonar reflected signals. The fish icon displayed on the screen also tells you what depth the fish is.
![]()
Fish Alarm

Press the POWER-MENU button until FISH ALARM appears. Select Off means you don't need a fish alarm, or choose the corresponding symbol as below to set a fish alarm. An alarm is issued when the FF918CS-WL detects a fish corresponding to the setting. Fish alarm will only sound when Fish icon is setted to On.
(OFF, large fish, medium fish / all fish).

Units

Make sure to press the POWER-MENU key until UNITS appears. UNITS is a unit of measure that can be personalized, press the up and down arrow keys to select from these unit combinations.
(M/°F M/°C, Ft /°C, Ft/°F)
Sonar Color

Make sure to press the POWER-MENU key until Sonar Color appears. Selects the color to display the bottom structure on the bottom of screen. (Red, Gray, Blue)
Battery Alarm

Make sure to press the POWER-MENU key until Battery Alarm appears. OFF means no battery alarm is setted or choose 8.6 to 13.5 Volts to set the alarm. Battery Alarm sounds when the input battery voltage is equal to or less than the setting. (Off, 8.6 to 13.5 Volts)
Brightness

Press the POWER-MENU key until Brightness appears. Use the backlight for night fishing. Select 1-9 to activate the backlight at your desired level.
Language

Press the POWER-MENU key until LANGUAGE appears. Choose your wanted language from 20 languages.
Chart Speed

Press the POWER-MENU key until CHART SPEED menu appears. Select from 1-9 to increase or decrease the chart speed, where 1 is the slowest and 9 is the fastest chart speed. (1 to 9)
Maintenance
Follow these simple procedures to ensure your FF918-CWLS continues to deliver top performance.
- If the unit comes into contact with salt spray, wipe the affected surfaces with a cloth dampened in fresh water.
- Do not use a chemical glass cleaner on the less - this may cause cracking in the lens.
- When cleaning the LCD protective lens, use a chamois and non-abrasive, mild cleaner. Do not wipe while dirt or grease is on the lens. Be careful to avoid scratching the lens.
- If your boat remains in the water for long period of time, marine growth can reduce the effectiveness of the transducer. Periodically clean the face of the transducer with liquid detergent.
- If your boat remains out of the water for a long period of time, it may take some time to wet the transducer when returned to the water. Small air bubbles can cling to the surface of the transducer and interfere with proper operation. These bubbles dissipate with time, or you can wipe the face of the transducer with your fingers after the transducer is in the water.
- Never leave the unit in a closed car or trunk - the extremely high temperatures generated in hot weather can damage the electronics.
Problem and Solution
The unit lost signal in wireless User Mode
If the FF918CS-WL work in Wireless mode, it is not able to get a RF signal from the Wireless sonar sensor, the display will stop updating and the NO SIGNAL will be showed after several seconds. When the reception is lost or the wireless sonar sensor pulled out from the water for more than a few seconds, the picture as below will be displayed until the wireless sonar sensor is cast into the water and the reception is regained.

- The wireless sonar sensor uses line -of-sight wireless technology. If objects are placed between the FF918 and the wireless sonar sensor, the reception may be lost.
- The wireless sonar sensor depth range is 3 to 300 feet (1 to 100 meters). Erratic readings may occur in water that is shallower than 3 feet. In addition, because of the nature of sonar, this product is not intended for use in swimming pools or small enclosed bodies of water.
- Reeling the Wireless sonar sensor too fast can cause loss of signal and the screen will freeze.
- The Wireless sonar sensor may not obtain its maximum RF distance of 980 feet unless the water is smooth. Waves or chop may reduce the RF range significantly.
- When in very shallow water, I get gaps in the bottom reading and inconsistent digital depth indication. The Wireless sonar sensor will work reliably in water 3 feet (1 meters) or deeper. The depth is measured from the Wireless sonar sensor. A Wireless sonar sensor to FF918 distance of greater than 100ft may cause intermittent screen display. Excessively rough water may cause the Wireless sonar sensor to submerge, again losing contact.
- The display shows fluctuating depth readings and excessive clutter, including vertical bars that may be drawn on top of fish icons.
- The screen jumps and the bottom has an abrupt change; sometimes a vertical line is missing or a black line from top to bottom is displayed.
- This screen image jump is due to an automatic change in depth. New returns graphed at a different scale will not match up with the historic data already graphed at a higher or lower scale. Vertical lines can also occur as the radio signal from the Wireless sonar sensor is lost and then regained in rough water conditions.
PRODUCT SPECIFICATIONS
- Display: 3.5inch TFT LCD
- Sonar operation frequency: 200KHz
- Back lighting: On/off White LED
- Power requirement: 11-13.5V DC
- Sensor coverage: 45 degrees
- Depth range max/min: 328ft (100m) / 3 ft (1m)
- Operational range: 980 ft (300 m)
- Operational wireless frequency: 433.92 MHz
MANUFACTURER: JINHUA LUCKY ET MANUFACTURER CO.,LTD.
Documents / ResourcesDownload manual
Here you can download full pdf version of manual, it may contain additional safety instructions, warranty information, FCC rules, etc.
Advertisement


Need help?
Do you have a question about the FF918CS-WL and is the answer not in the manual?
Questions and answers