Advertisement
Product Statement
The product is a high-tech device integrating sonar, compass and GPS positioning and other technologies. It is mainly used for remote control bait boats or other small boats. It needs to be installed correctly before it can be used. The performance of the product is greatly affected by environmental and human factors. Therefore, LUCKYSMART make the following statement:
- Sonar characteristics:
The characteristics of sonar are affected by many factors, such as the installation method of the probe, the current water area situation(the wave size ) etc. If the water depth and bottom contour displayed on the screen are big different from the actual situation, please check the installation of the probe carefully or contact with your local dealer. - GPS positioning characteristics
GPS (Global Positioning System) is a satellite positioning system controlled by the US government. Under normal circumstances, there will be a certain deviation in domestic use. This is due to the attributes of the GPS system itself and has nothing to do with this product. The GPS positioning accuracy of this product is normally about 2 meters (it can reaches to 1 meter in a good environment). However, GPS positioning accuracy is greatly affected by environmental factors. If it is used on cloudy days, foggy days, under large trees, or in non-open areas (with highrise buildings, mountains, etc.), GPS positioning accuracy will be greatly effected.
Product introduction
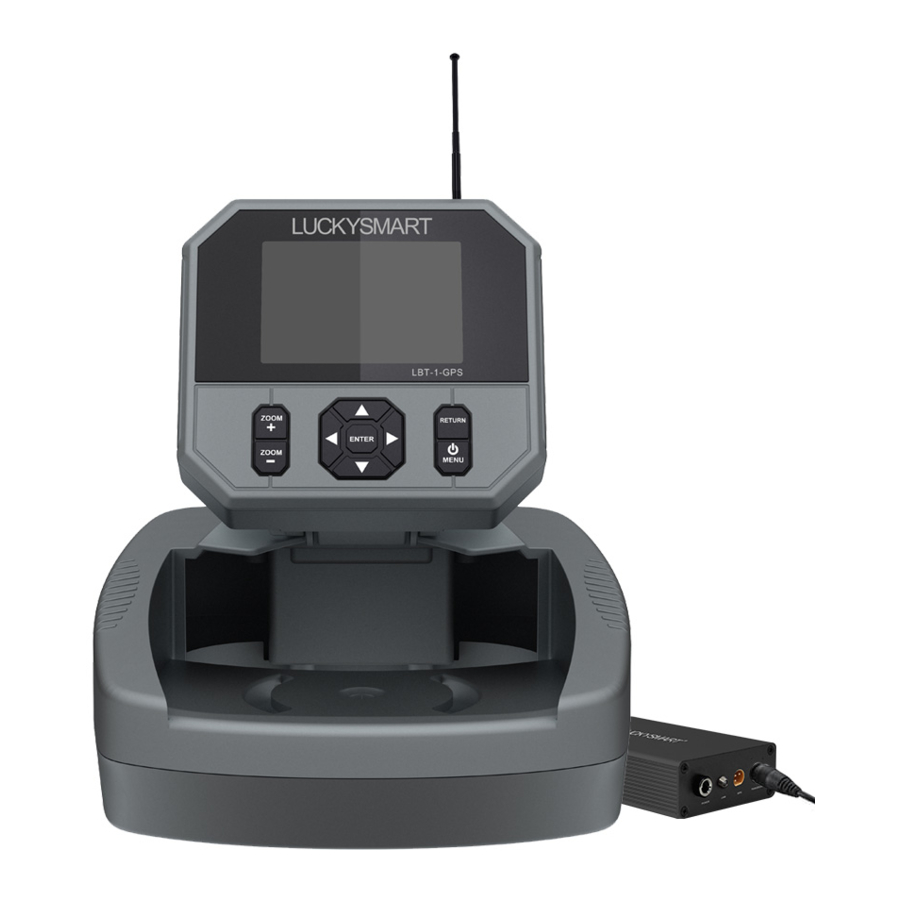
LBT-1-GPS is an electronic product that integrates GPS navigation and sonar systems that is specially used for various remote control bait boats and other small boats.
This product combines sonar, GPS navigation and electronic compass functions. No matter if you are a new hand or a professional angler, It is easy to use this product. This allows you to make precise nesting, navigation and fish detection.
What can this product do?
After installing this product on the bait boat, you can realize the following functions:
- Real-time observation of the bottom of the boat: including fish (position, depth information, fish group size). weeds, underwater contours, etc.
- Know the distance of the boat from the shore at any time.
- Even if you operate at night or in foggy weather, you can still know the direction of the bow of the boat through the screen.
- Store more than 500 points of interest and load any one of them as a target to navigate your boat to the point of interest precisely. Thus realize the fixed-point nesting function.
- View the longitude and latitude of the current position of the bait boat.
- Monitor the voltage of the boat's battery at any time.
Product packing list

- GPS receiver
- Double-side tap
Launcher

- Device power cable-(Dry battery)
- Device power cable-(Storage battery)
- Control box power cable
- Control box
- Antenna extension line
- Control box antenna
Probe

- Probe
- Lock knob
- Rubber sleeve
 Note: Different rubber sleeves are matched according to different boat types.
Installation to bait boat
Install the probe

Please do not install the probe near the motor of the boat. Otherwise, the electronic noise caused by the motor and the bubbles generated by the propeller will greatly degrade the sonar performance of the product. Generally recommended to install at a distance from the bow of boat that the position of 1/3 of the length of the bait boat. And ensure that the probe draft is not less than 10CM.
Note: For different bait boats, the installation method of the probe is also different. The following is the probe installation guide for different types of bait boats on the market:
- A bait boat without a probe mounting hole in the hull itself
There is no specific probe mounting groove at the bottom of these bait boats. So you need to use tools to punch holes to install the probe on the bottom of the boat. The following is the installation diagram:
probe installation Introduction
![]()

- Choose a flat installation location at the bottom of the boat. Drill a hole with a diameter of approximately 15 mm at the selected position.
![]()
- Assemble the probe and waterproof rubber pad. (Factory installed)
![]()
- Pass the assembled probe and rubber pad through the probe hole.
![]()
- Fix the probe with the lock knob inside the boat then the installation is completed.
![]()


- A bait boat with a groove for installing the probe in the hull (No. 2 rubber sleeve)
There is a groove at the bottom of the bait boat for installing probes. LBT-1-GPS comes with aappropriative No. 2 rubber sleeve. The installation steps are basically the same as in 1 above. The only difference is that the probe needs to be covered inside the rubber sleeve, so that it can be fully matched with the probe installation groove reserved on the boat.
probe installation Introduction
![]()

- Use a screwdriver to remove the probe decorative cover from the bottom of the ship.
![]()
- Assemble the probe and rubber pad, and pass the assembled probe through the probe hole.
![]()
- Tighten the probe with the lock knob inside the boat.
![]()
- The installation is completed.
![]()


- A bait boat with a groove for installing the probe in the hull (No. 3 rubber sleeve)
There is a groove at the bottom of the bait boat for installing probes. LBT-1-GPS comes with aappropriative No. 3 rubber sleeve. The installation steps are basically the same as in 1 above. The only difference is that the probe needs to be covered inside the rubber sleeve, so that it can be fully matched with the probe installation groove reserved on the boat.
probe installation Introduction
![]()

- Use a screwdriver to remove the probe decorative cover from the bottom of the ship.
![]()
- Assemble the probe and rubber pad, and pass the assembled probe through the probe hole.
![]()
- Tighten the probe with the lock knob inside the boat.
![]()
- The installation is completed.
![]()


Install GPS receiver
Precautions when installing GPS receiver:
- The GPS receiver should be installed far away from other antennas on the boat (including the ship's own antenna and the control box antenna of this product).
- In order to avoid interference with the compass, the GPS receiver should be kept away from any magnetic materials, such as magnets, iron and nickel, etc.
- The gray arrow on the GPS receiver should be consistent with the bow direction.
![]()

How to fixed GPS receiver
- Choose an appropriate location on the boat (the location is flat, normally fixed on the head of the boat)
- Fix the GPS receiver on the bow with double-sided tape
(![information]() Note: For LBT-1-GPS, the gray arrow must be consistent with the bow direction).
Note: For LBT-1-GPS, the gray arrow must be consistent with the bow direction).
Install the antenna of control box
- Find the hole reserved for installing the antenna extension cable at the stern of the bait boat.
- Remove the nut and washer on the antenna extension cable.
- Pass the screw part of the antenna extension cable through the reserved hole from the cabin.
- Put the washer and nut on the screw respectively, and then tighten the nut with a wrench.
- Tighten the control box antenna on the screw (Be sure to tighten it!)
Connect cable
After the above components are installed, please connect each part to the control box.

- TRANSDUCER: Connect the probe.
- GPS:Connect to GPS receiver.
- POWER:Connect the power cord.
- LINK:Shows whether the connection between the control box and the device is normal.
![information]() Note: The LINK light is on last 3 seconds after power on and LINK light will flash after connected with GPS correctly.
Note: The LINK light is on last 3 seconds after power on and LINK light will flash after connected with GPS correctly. - ANTENNA:Connect the antenna extension cable.
The bait boat part has been installed so far.
Power
| Device power | Control box power | |
| Recommended voltage | 10-13V | 9.5-13V |
| Maximum voltage | 16.8V | 14V |
- The device can use 8*AA batteries or the external power supply
- When using 8*AA batteries for ower supply, please discharge the batteries correctly according to the schematic diagram on the base of the device.
- When using an external power supply, you can use the standard power cord to connect it to an external power.


- The control box can be powered by the boat's battery or the external power
![]()
Excessive voltage may cause the internal electronic components of the product device or control box to burn out. Make sure to turn off the power of the control box after use.
The following are the voltage of commonly used batteries for your reference:
![]()


How to use
Precaution
Please use this product when the satellite status bar shows yellow or blue (meaning the GPS signal is strong enough)

Red: 0-3 satellites
Yellow: 4-6 satellites
Blue: more than 6 satellites
Note: If the number of satellites column all turn blue, it means that the product has received signals from 12 satellites. So from the change of the color bar, you can know how many satellites can be received. Generally speaking, more than 6 satellites (yellow) GPS can work normally.
Screen display description


Electronic compass
GPS receivers have a built-in electronic compass system. When you correctly install the GPS receiver on the boat, you can know the heading of the bow at any time by observing the pointer of the electronic compass on the screen. So even if the boat travels a long distance (200 meters away, it is out of your sight), or It can control the trajectory of the boat at any time in harsh environments such as night and fog, and accurately remotely control it to come back.
Note: When observing the compass direction, you can imagine that the device screen is parallel to the horizontal plane placed so that it is easy to understand the consistency of the bow direction and the compass needle direction on the screen.

Note: For electronic compass, ±15 degrees is the allowable error range. So while the boat is moving, If you find a small deviation between the compass needle direction and the bow direction, this is normal.
Key operation

Go to
Waypoint navigation
The waypoint refers to the location that the fisherman prefers personally in a certain fishing area. These points may be the usual make bait, may also be judged where there are more fish based on past experience. Or a place where big fish often haunt, etc. This product can save these points, and you can pick one of them as the navigation point at any time in the future, and then navigate the bait boat to t hat point. This product can store up to 500 waypoints.
How to create a waypoint
When the boat reaches a certain point, keep the boat still:

- Press the MENU button, the [Go to] menu appears.
- Then select [Quick Mark], press ENTER to display Waypoint details.
- After setting the waypoint, select [OK] and press ENTER then the current position of the boat is created as a waypoint.
How to set a waypoint as a target point
- Enter the [Go to] menu, press the MENU button to select [GO to], then press ENTER to enter [Waypoint List].
- In this list, select a waypoint and press ENTER key to confirm. This waypoint is set as the current goal point.
![]()
![information]() Note: When a waypoint is successfully set as the target point, a red "+" symbol will be displayed in the compass area on the screen to represent the current target point.
Note: When a waypoint is successfully set as the target point, a red "+" symbol will be displayed in the compass area on the screen to represent the current target point.

How to set the name and icon of the waypoint
- In the [Go To] menu, select [Waypoint ] and press ENTER key to enter [Waypoint List].
![]()
- Select the point you want to modify in the name position and press ENTER, Select [Details] and press ENTER to enter the waypoint [Details].
Select [Edit] and press ENTER to edit, In order to distinguish the waypoints. You can set different icons, Name etc.

How to know the distance of the boat from the shore and the target point
You can see an option [Home pos.] on the display.

This option represents the distance from the boat to the origin.
Note: This product defaults to the point of origin when the GPS receiver is powered on. Therefore, if you turn on the GPS receiver on the shore, the [Home pos.] represents the distance that the boat leaves the shore.
You can set any point as the origin.
The option [Dest Distance] represents the distance between the boat and the target point.
How to set a point as the origin
In the [Go to] menu, select [Set Homepos] and press ENTER key. Now theboat's location is successfully set.
So the option [Home pos.] displayed on the screen indicates the distance of the boat from the current position

Route navigation
List of all saved tracks
How to create a new route

- When the boat sails for a certain distance from the origin, you can observe the corresponding track on the screen. At this time, you can choose to save this track as a route:
- Press the MENU button to enter the [Go To] menu, select [Course] and press the ENTER button to enter the [Route List].
- Choose a name at will, press ENTER to select New, the new route is created successfully. The newly created routes are saved in the route list.
How to load the route as the target point

- Enter the [Go To] menu, select [Course] and press ENTER to enter the [Route List].
- In the list that appears, select a route, and then press the ENTER key, then select [Go home] or [Go target], press the ENTER key, and this route will be set as the current target point.
Clear Map

Used to clear the track map off the boat on the screen.
Stop navigation

When you choose to stop navigation, the Red Cross arrow disappears from the screen.
Menu operation
Sonar settings
Sensitivity

Sensitivity is the sonar intensity. The stronger the sensitivity, the more sonar signals will be returned and displayed on the screen, and the more sensitive feedback from the underwater situation will be. But if the water is very shallow, too high sensitivity will also increase the reflected sound wave signal too much, resulting in the wrong signal being displayed. If the sensitivity is set too low in a deep water environment, it will be difficult to detect the corresponding underwater signal. Operation suggestion: In the case of deep water, increase the sensitivity; In the case of shallow water, lower the sensitivity.
Depth range

For example: the current depth is 20 meters, and you only need the fish information from 10 meters to 18 meters, you only need to set the lower limit of depth to 18 meters and the upper limit of depth to 10 meters, then only 10 meters to 18 meters fish information will be displayed on the screen.
Fish icon

Press the menu key until the fish icon menu is displayed. The fish icon function is to use advanced signal processing methods to distinguish and process the returned sound waves, so the information of the detected fish will be accurate to displayed on the screen. You can choose to turn on or turn off the fish icon.
Surface clarity

When the sonar is just launched, the closer the distance, the stronger the energy. And the stronger the detection ability to small objects. This causes the interference of the water surface to affect the normal detection, and the surface clarity function reduces the water surface the impact of normal detection.
Sonar color

The sonar color is used to change the display color of the sonar image, which can better distinguish underwater, fish, etc. Sonar colors are available in red, blue and gray.
Chart speed

Set the frequency of sonar data sampling.
Note: The more frequently the sonar data is collected, the more accurate the underwater situation displayed on the screen. However, too much data will cause the system to respond slowly.
System
Language

Language setting is to switch the languages of different countries. Under this menu, you can choose your preferred language (Chinese and English 2 languages).
Backlight

The backlight is to adjust the screen brightness.
Alarm
Fish alarm

Fish alarm refers to the alarm set when different fish icons appear. You can choose to turn off the fish alarm, or select the large, medium and small fish alarm. When you only need to make an alarm for the large fish, just set the large fish alarm. However, the prerequisite for the function of the fish alarm is that the detected fish situation can be alarmed only after the fish icon is turned on.
Shallow alarm

Shallow alarm is generally set to prevent stranding. When the actually measured water depth is lower than the set value, the fish finder will make an alarm to remind you that the current water depth is too shallow.
Arrival alarm

Arrival alarm means that when the distance between the boat and the target point is less than or equal to the preset value, the device will make an alarm. At the same time, a prompt message will be displayed on the screen: "Approching the target position".

The default alarm radius is 5 meters. This means that when the boat is less than or equal to 5 meters from the target point, the fish finder will make an alarm.
In order to obtain a more precise positioning from the target point, you can set it to a smaller value, for example: 2 meters or even 1 meter.
Note: The smaller the value, the higher the navigation accuracy, and the boat will be closer to the target point. But if currently the GPS satellite signal strength is not enough and the value is too small (for example 1 meter), the boat cannot find the target point. Therefore the red target point on the screen will always "drift" in the compass display area.

Offcourse alarm

Offcourse means that when the boat deviates from the preset route, the device will make an alarm. At the same time, a prompt message will be displayed on the screen: "The route deviated".
Main voltage

When the main device power supply voltage is lower than the set value, the fish finder will make an alarm. For different batteries, we recommend the following settings:
| Battery | Suggest setting |
| 8*AA dry batteries | 7.5V |
| 14.8V (3S) lithium battery | 12.0V |
| 12V lead-acid battery | 10.5V |
Boat voltage
When the boat's battery is used to power the control box, the voltage value in the lower left corner of the display represents the voltage value of the boat's battery. When the voltage is lower than the set value, the fish finder will make an alarm. Once the alarm occurs, the battery needs to be charged in time, and overuse will affect the battery's service life.
Units
Measure unit

Set all measurement units related to distance.
Sonar unit

Set the unit of depth and temperature.
Timezone setting

Please choose a different time zone in different countries (regions),
For example:
China: 8
Germany, France, Netherlands, Italy, Poland: 1
Bulgaria, Romania, Ukraine, Greece: 2
Russia: 3
For more time zone, please refer to: http://www.worldtimezone.com
Format

Set the unit used to determine latitude and longitude.
Direction setting
Used to set to point north up or bow up
Factory set
Factory set is restored to the factory settings, such as backlight, sonar settings, etc., it will be restored to the original appearance of the device, and all setting parameters will be cleared.
About
Display the version information of the purchased product.
Common problems and solutions
| Problems | Solutions |
| Screen display: "Please turn on the sensor" |
|
| The device loses signal within 20 meters. Screen display:"No signal" |
|
| Inaccuracy of GPS positioning |
|
| The compass does not indicate the right direction |
|
| Sonar image is blurry and messy |
|
| No fish detected (Clear that there are fish in the water) | This equipment has 2 blind spots. A blind spot is 0.5 meters down from the surface of the water. Another blind spot is 0.3 meters from the bottom of the water. If the fish is in the blind spot, the fish finder is difficult to detect. Therefore, if the water is too shallow, most of the fish are in the blind spots. Therefore, in order to obtain a better fish detection effect, we recommend that you use this product in water not less than 1.5 meters. |
| There is no depth reading on the screen when the water depth exceeds 60 meters |
|
| Why need the compass function? Isn' t that enough with GPS navigation function? |
|
Product Specification
| GPS and wireless functions | GPS positioning accuracy | Circular error probability: 2.5m |
| Actual measurement accuracy: 1.0m | ||
| Waypoint | 500 | |
| Track | 30 | |
| Wireless frequency | 433MHz | |
| Wireless operating range | 300m | |
| Show boat speed | Yes | |
| Show latitude and longitude | Yes | |
| Satellite | 50 channels | |
| Update rate: 1 second | ||
| Hot start <1 second (in open environment) | ||
| Cold start <48 seconds (in open environment) | ||
| Digital Sonar Section | Sonar frequency | 125Khz |
| Detect capacity | 60m | |
| Sonar angle | 90° | |
| Electronic compass | Compass built-in GPS | Yes |
| Power | Device power | 10~13v |
| Control box power | Can be powered by the boat's own battery 9.5~13v | |
| Display part | Display size | 3.5-inch TFT high-definition color display; visible in sunligh |
| Resolution | 480*320 pixels; 65,536 colors | |
| Chinese menu | Yes | |
| Others | Sonar device size | 130X130X30mm |
| Portable base size | 230X195X100mm | |
| GPS receiver cable length | 0.7m | |
| Probe cable length | 0.6m | |
| Operating temperature range | -10°~ 50°C | |
| GPS and compass | GPS data display | The following data can be displayed: distance to the target point, distance to the origin, boat speed, time to reach the target, number of satellites, azimuth, angle, track memory, date, device voltage, etc. |
| The electronic compass visually displays the real-time course of the boat. | ||
| The red "+" displayed on the screen represents the target point of the current navigation. | ||
| Show the distance of the boat from the target point and the origin (shore). | ||
| Boat arrival alarm (you can set how far the boat from the target point to make alarm ). | ||
| No signal alarm. | ||
| Satellite status bar shows the number of satellites received. | ||
| Red (0~3); Yellow (4~6); Blue (more than 6). | ||
| Can display the latitude and longitude of the current point of the boat. | ||
| Various information of waypoints can be customized, including symbols, dates, names, depths, etc. | ||
| Track display zoom in/out function. | ||
| Digital Sonar Section | Adopt brand new digital wireless sonar technology. The detection accuracy is greatly improved than traditional sonar. Can accurate- | |
| ly detect underwater fish (including bottom fish), water plants, stones, potholes and other information. | ||
| Real-time sonar window displays the latest sonar information. | ||
| The fish shape recognition function can define the display level of the fish school size, so as to meet the purpose of fishing friends to catch only big fish or only small fish. | ||
| The detected fish-shaped symbol can visually display the depth position of the fish. This is helpful for anglers to judge the middle fish or bottom fish. | ||
| Alarm mode: fish alarm/shallow alarm/low voltage alarm. | ||
| Three background display colors. | ||
| Built-in water temperature sensor can display water temperature. | ||
| Others | Windows menu style, intuitive and easy to operate. | |
| 1 year warranty | ||
Precautions
- Safety precautions
Do not use this product in harsh environments such as wind, rain, lightning, and high-voltage lines.
Electronic equipment
- Do not use this device in places where the use of wireless devices is clearly prohibited otherwise. It may interfere with other electronic equipment or cause other dangers.
Impact on medical equipment
- In medical and health care establishments where the use of wireless devices is expressly prohibited, please comply with the rule and turn off the equipment.
- The radio waves generated by the equipment may affect implantable medical equipment or personal medical equipment, such as pacemakers, cochlear implants, hearing aids, etc. If you use these medical equipments, please do not use this product.
- Precautions before using the product
- Please check whether all parts of the product are installed correctly, including probes, GPS receivers, antennas, control box, etc. Please refer to the "Installation" part of this manual for the specific installation methods and precautions of each component.
- Please check whether the antennas on the boat are tightened. Antenna slack can affect wireless performance.
- Please check that all parts in the cabin (probe, GPS receiver, antenna extension cord, power cord) are correctly connected with control box (refer to the connection method).
- Please make sure that the control box is powered on. After power on, the led indicator at the "link" position will be on for 3s then off, indicating the control box enter the working state.
- Please check the GPS status bar on the device screen after the control box is powered on for 3-5 minutes. Please make sure when use this product, the status bar turn to yellow or blue.
Documents / Resources
References
Download manual
Here you can download full pdf version of manual, it may contain additional safety instructions, warranty information, FCC rules, etc.
Advertisement


Need help?
Do you have a question about the LUCKYSMART LBT-1-GPS and is the answer not in the manual?
Questions and answers