Advertisement
IMPORTANT SAFETY INFORMATION

This instruction manual contains important information necessary for the proper assembly and safe use of the appliance. Read and follow all warnings and instructions before assembling and using the appliance. Follow all warnings and instructions when using the appliance. Keep this manual for future reference.
Installer/Assembler: leave these instructions with the consumer.
SAFETY ALERT KEY

Indicates a hazardous situation that, if not avoided, will result in death or serious injury.

Indicates a hazardous situation that, if not avoided, could result in minor or moderate injury.

Indicates a hazardous situation that, if not avoided, could result in death or serious injury.
NOTICE
Indicates information considered important, but not hazardrelated (e.g. messages related to property damage).
IMPORTANT SAFEGUARDS
When using electrical appliances, basic safety precautions should always be followed including the following:
- DO NOT touch hot surfaces. Use handles or knobs.
- To protect against electrical shock DO NOT immerse cord, plugs, or appliance in water or other liquid.
- Close supervision is necessary when any appliance is used by or near children.
- Unplug from outlet when not in use and before cleaning. Allow to cool before putting on or taking off parts.
- DO NOT operate any appliance with a damaged cord or plug or after the appliance malfunctions or has been damaged in any manner. Return appliance to the nearest authorized service facility for examination, repair, or adjustment.
- The use of accessory attachments not recommended by the appliance manufacturer may cause injuries.
- DO NOT let cord hang over edge of table or counter, or touch hot surfaces.
- DO NOT place on or near a hot gas or electric burner, or in a heated oven.
- Extreme caution must be used when moving an appliance containing hot oil or other hot liquids.
- To disconnect, turn any control to "off', then remove plug from wall outlet.
- DO NOT use appliance for other than intended use.
- Fuel, such as charcoal briquettes, is not to be used with appliance.
- Use only on properly grounded outlet.
![]()
Risk of electric Shock. Keep extension cord connection dry and off the ground.- The appliance is not to be used by persons (including children) with reduced physical, sensory or mental capabilities, or lack of experience and knowledge, unless they have been given supervision or instruction concerning use of the appliance by a person responsible for their safety.
- Children should be supervised to ensure that they DO NOT play with the appliance.
- For outdoor use only, DO NOT expose to rain.
- Be sure that handles are assembled and fastened properly.

SAVE THESE INSTRUCTIONS
DO NOT operate this appliance unattended.
FOR EXTENSION CORDS:
- A short power-supply cord is provided to reduce the risk resulting from becoming entangled in or tripping over a longer cord.
- longer power-supply cords or extension cords are available and may be used if care is exercised in their use.
- If a longer power-supply cord or extension cord is used:
- The marked electrical rating of the cord set or extension cord should be at least as great as the electrical rating of the appliance.
- The cord should be arranged so that it will not drape over the countertop or tabletop where it can be pulled on by children or tripped over unintentionally.
- The cord set or extension cord should be a grounding-type 3-wire cord.
- Outdoor extension cords should be used with outdoor use appliances and are surface marked with the suffix letter "W" and with a tag stating "Suitable for use with outdoor appliances. "
- The connection to an extension cord should be kept dry and off the ground.
- Store appliance indoors when not in use - out of the reach of children.
- DO NOT clean this product with a water spray or the like.
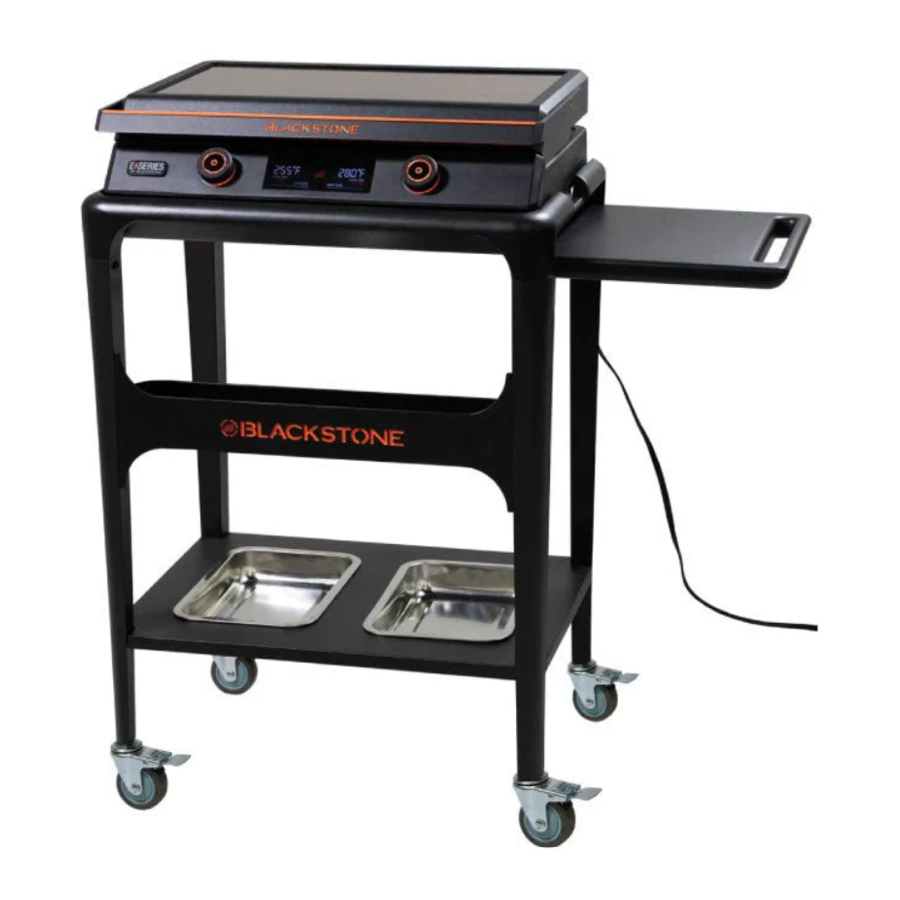
ASSEMBLY GUIDE
EXPLODED VIEW

PARTS LIST

ASSEMBLY INSTRUCTIONS
Find a large, clean area to assemble your appliance. Remove all packing material before assembling.
Sharp edges. Wear gloves while assembling.
ELECTRIC REQUIREMENTS: 120V 60Hz
TOOL NEEDED: #3 Phillips head screwdriver

- Slide one (1) spring washer onto one (1) caster wheel. Screw the caster wheel onto one (1) leg. Repeat with the other three (3) caster wheels, (3) spring washers, and three (3) legs. (Be sure the wheels are locked.)


- Use four (4) self tapping screws to attach the two (2) power cord brackets to the rear right leg.
- Slide the two (2) rear legs into place, and use (4) M6x12 screws to attach the legs and the rear leg brace to the tabel top.
- For the front right leg, set three (3) M6 nuts in the table top leg post, slide the leg into place, and use (2) M6x12 screws to secure.
- For the front left leg, set two (2) M6 nuts in the table top leg post, slide the leg into place, and use (2) M6x12 screws to secure.

- Use eight (8) M6x12 screws to attach the bottom shelf to the legs.
- Use two (2) step bolts to attach the side shelf to the left legs.
- Use four (4) M6x12 screws to attach the accessory shelf to the front legs. Set the cart on its feet.

- Before installing the griddle top on the griddle body, remove the warning label on the griddle body. Hang the grease cup in the slots on the back of the griddle body.

- Set the griddle top on the griddle body. Slide the griddle top front feet into the front brackets. The back feet should rest against the back brackets.

- Place the hood on the griddle top. Insert the hood hinges into the hood brackets.

- Set the cart on its feet. Set the griddle body on the cart.

- Proceed to USING YOUR BLACKSTONE.


NOTICE
DO NOT leave the hood closed for more than 10 minutes while cooking.
USING YOUR BLACKSTONE
FIRST TIME CLEANING
Wash griddle surface before initial use.
- DO NOT allow the electric components to come in contact with water.
- DO NOT leave water on the griddle surface for more than two hours.
- DO NOT wash the griddle top in the dishwasher.
- Avoid using anything that may scratch the surface, including metal scouring pads and abrasive cleaners.
COOKING ON YOUR BlACKSTONE
Flammable items can combust if placed near the appliance. DO NOT place flammable items such as aerosol containers, oily or greasy towels near the cooking surface.
This appliance will be hot during and after use. DO NOT handle hot parts with unprotected hands. Use long-handled, non-metal utensils and oven mitts/ protective gloves to protect against burns and splatters.
NOTICE
DO NOT store any items within 3 in (8 cm) of the cooking surface while in use.
PROTECTING THE NON-STICK SURFACE
- You DO NOT need to season the griddle top.
- DO NOT cut directly on the griddle surface.
- only use plastic, rubber, wood, and/or nylon cooking utensils on the cooking surface.
- Cooking spray containing lecithin will degrade the non-stick coating. We recommend using regular cooking oil in a spray bottle.
FOR DAILY CLEANING:
- Be sure that the grease cup is in place.
- Wipe off griddle surface with a moist, soapy cloth or paper towel.
- Wash off soap and dry.
FOR DEEP CLEANING:
- Be sure that the grease cup is in place.
- Turn heat to low.
- While wearing rubber gloves, use one (1) tablespoon of mild soap per one (1) cup of hot water, and wipe down the griddle surface with a cloth or non-metal cleaning pad.
- Turn off griddle, and once cool, wipe off surface with a moist, soapy cloth or paper towel.
- Wash off soap and dry.
IGNITION INSTRUCTIONS
TO TURN THE GRIDDLE ON:

![]() Press and hold the control knob button to bring up the temperature measurement preferences. Turn the knob to select Fahrenheit or Celsius. Press the control knob to select. Turn the control knob until the
Press and hold the control knob button to bring up the temperature measurement preferences. Turn the knob to select Fahrenheit or Celsius. Press the control knob to select. Turn the control knob until the ![]() SET TEMP displays the desired temperature.
SET TEMP displays the desired temperature.
Press the control knob to set the temperature.- When the
![]() ZONE TEMP dash indicators reach the orange area, the griddle has reached the set temperature.
ZONE TEMP dash indicators reach the orange area, the griddle has reached the set temperature.
For best results, allow griddle to heat up until all bars are illuminated. For best results, allow griddle to heat up until all bars are illuminated.


TO TURN THE GRIDDLE OFF:

![]() Press and hold the control knob button until the temperature image disappears.
Press and hold the control knob button until the temperature image disappears.- Unplug the appliance.
- DO NOT store the appliance until the
![]() HOT SURFACE indicator has turned off.
HOT SURFACE indicator has turned off.

TROUBLESHOOTING
CUSTOMER SUPPORT
Visit us online at BlackstoneProducts.com/support for assistance concerning appliance use, replacement parts, or your warranty.
CUSTOMER SUPPORT HOURS:
 Monday – Friday 7:00 am – 5:00 pm (Mountain Time)
Documents / Resources
References
Download manual
Here you can download full pdf version of manual, it may contain additional safety instructions, warranty information, FCC rules, etc.
Advertisement


Need help?
Do you have a question about the 8003 and is the answer not in the manual?
Questions and answers