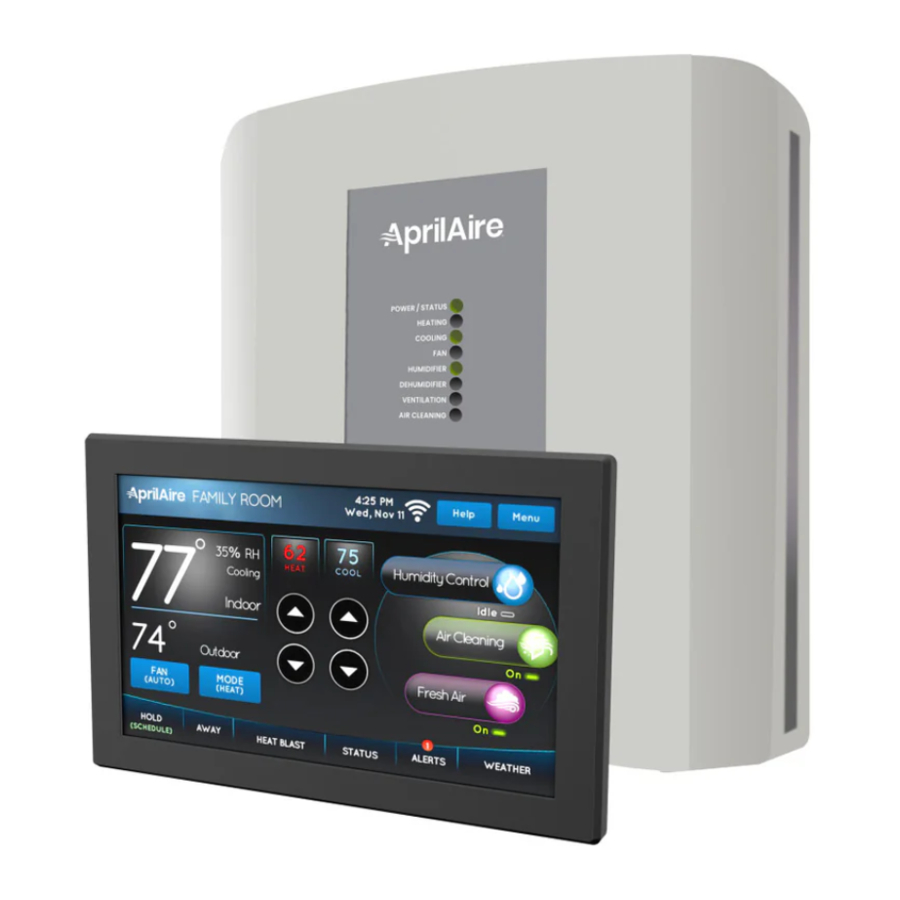
Aprilaire 8920W - Thermostat Manual
- Owner's manual (39 pages) ,
- Safety & installation instructions (11 pages) ,
- Safety & installation instructions (13 pages)
Advertisement
- 1 FEATURES
- 2 DISPLAY OVERVIEW
- 3 WI-FI SETUP – ACCOUNT CREATION
- 4 WI-FI SETUP – iOS
- 5 WI-FI SETUP – ANDROID DEVICES
- 6 THERMOSTAT OPERATION
- 7 SCHEDULE AND HOLDS
- 8 STATUS
- 9 ALERTS
- 10 WEATHER
- 11 INDOOR AIR QUALITY FUNCTIONS
- 12 USER PREFERENCES
- 13 CLEAN SCREEN
- 14 WI-FI MAINTENANCE AND TROUBLESHOOTING
- 15 Documents / Resources
FEATURES

Do not use sharp instruments to press touch screen. Only use your fingertips.
- Temperature control.
- Remote access and control over Wi-Fi.
- Indoor air quality control.
- Humidification automatic or manual control.
- Dehumidification.
- Event-Based™ air cleaning.
- Ventilation with temperature and humidity limits.
- Heat Blast® raises the room temperature 3°F to 5°F.
- One touch Away.
- Large touch screen with adjustable backlight.
- 7 day programmability.
- Displays room temperature, room humidity, temperature setting, and optional outdoor temperature.
- Air filter, humidifier, dehumidifier, fresh air and HVAC service reminders.
- Support for optional wireless outdoor temperature sensor.
- Programmable fan control with fan circulation mode.
- Easy to use temperature control can override program schedule at any time.
- Progressive recovery ensures proper temperature at the start of a program event.
DISPLAY OVERVIEW
HOME SCREEN
 NOTE: SCREEN BRIGHTENS AFTER FIRST TOUCH
Display may differ depending on equipment/options installed.
MAIN MENU
Touch Menu from the home screen to access the Menu screen. The Menu screen allows access to all the thermostat settings.

WI-FI SETUP – ACCOUNT CREATION
DOWNLOAD THE APP
- Search and install the AprilAire Wi-Fi Thermostat App from your smart device's app store.
![]()
![www.apple.com]()
![play.google.com]()


CREATE A NEW APRILAIRE ACCOUNT
- Open the app on your device.
- Tap Create Account.
![]()
- Enter a valid email address and choose a password for your AprilAire User Account and tap Create Account.
![]()
- Fill in your personal information and tap Continue.
![]()
- Enter your information and select a world time zone. This will ensure you have access to local weather data and that the time on your thermostat is correct. Tap Continue.
![]()


WI-FI SETUP – iOS
iOS
CONNECT YOUR WI-FI THERMOSTAT TO YOUR HOME NETWORK
- Select Add a Device.
![]()
- Select your thermostat model.
![]()
- Follow the prompt at the top of the screen and press Continue when ready. Instructions will vary depending on your model number.
![]()


- Select Open Network Settings to open your AprilAire settings screen.
![]()
- Select < Settings to access the main Settings menu.
![]()
- Scroll up to Wi-Fi and select it.
![]()
- A Wi-Fi network including "APRILAIRE" in the title should appear in your list of network options. Tap that network (thermostat) to proceed.
NOTE: This step may take up to one minute to complete.
![]()
- Return to the AprilAire app.
- Tap Continue.
![]()


SELECT YOUR HOME NETWORK
- Select your home network from the list.
![]()

CONNECTING TO YOUR HOME NETWORK
- We recommend that you select (show password). Enter the password to your home Wi-Fi network.
![]()
- Tap Continue.
- The app will show a progress bar showing the connection process.
![]()
- When finished, tap Select Location.
![]()
- Select Home as the default location or enter a custom location name.
![]()
- Assign your new device to a room, or enter a custom room name.
![]()
- Congratulations! You have successfully registered your thermostat. Tap on the tile to open the thermostat control screen.
![]()
- You can now access and control your thermostat from your mobile device.
![]()


For more information, visit the AprilAire Wi-Fi Thermostat App page on aprilaire.com

WI-FI SETUP – ANDROID DEVICES
ANDROID
CONNECT YOUR WI-FI THERMOSTAT TO YOUR HOME NETWORK
- Select Add a Device.
![]()
- Select your thermostat model.
![]()
- Follow the prompt at the top of the screen and press Continue when ready. Instructions will vary depending on your model number.
![]()
- Select Open Network Settings to open your AprilAire settings screen.
![]()
- A Wi-Fi network including "AprilAire" in the title should appear in your list of network options.* Tap that network (thermostat) to proceed. Note: This step may take up to one minute to complete.
![]()
- Return to the AprilAire app.
![]()
- Tap Continue.
![]()


* Representative Android screen. Your networking screen may vary depending on manufacturer.
SELECT YOUR HOME NETWORK
- Select your home network from the list.
![]()

CONNECTING TO YOUR HOME NETWORK
- We recommend that you select
![]() (show password). Enter the password to your home Wi-Fi network.
(show password). Enter the password to your home Wi-Fi network.
![]()
- Tap Continue.
- The app will show a progress bar showing the connection process.
![]()
- When finished, tap Select Location.
![]()
- Select Home as the default location or enter a custom location name.
![]()
- Assign your new device to a room, or enter a custom room name.
![]()
- Congratulations! You have successfully registered your thermostat. Tap on the tile to open the thermostat control screen.
![]()
- You can now access and control your thermostat from your mobile device.
![]()
 (show password). Enter the password to your home Wi-Fi network.


For more information, visit the AprilAire Wi-Fi Thermostat App page on aprilaire.com

THERMOSTAT OPERATION
SELECT SYSTEM MODE

- Touch MODE to open the Thermostat Mode screen.
![]()
- Select the desired mode.
- Touch Done to save any changes. Touch Back to discard your changes. The thermostat will automatically discard your changes if one minute elapses without touching Done.

NOTE: Em Heat (Emergency Heat) is only applicable to heat pump installations.
CHANGE TEMPERATURE SETPOINT

- Touch the
![]() or
or ![]() arrows to adjust the temperature setpoint. The Set Temporary Hold pop-up will appear.
arrows to adjust the temperature setpoint. The Set Temporary Hold pop-up will appear. - Touch Done to save your changes. See information on temporary and permanent holds.
 or
or  arrows to adjust the temperature setpoint. The Set Temporary Hold pop-up will appear.
SELECT FAN SETTING
When the fan mode is changed during a scheduled event, it remains in that mode until the next event starts.

- Touch FAN to open the Fan Mode screen.
![]()
- Select the desired mode.
- Touch Done to save any changes. Touch Back to discard your changes. The thermostat will automatically discard your changes if one minute elapses without touching Done.

SET TIME AND DATE
The thermostat will automatically retrieve Time and Date from the internet (if connected). If the thermostat is used without an internet connection the time can be manually adjusted.
To set the time:
- Touch Menu to open the Menu screen.
![]()
- Touch Clock And Date to open the Clock and Date screen.
![]()
- Touch the current time. The Set Time pop-up will appear.

- Touch the
![]() or
or ![]() arrows to set the correct hour, minutes and AM/PM.
arrows to set the correct hour, minutes and AM/PM.

- Touch Done to save any changes. Touch Back to discard your changes. The thermostat will automatically discard your changes if one minute elapses without touching Done.


To set the date:
- Touch the current date. The Set Date pop-up will appear.

- Touch the
![]() or
or ![]() arrows to set correct month, date and year.
arrows to set correct month, date and year.

- Touch Done to save any changes. Touch Back to discard your changes. The thermostat will automatically discard your changes if one minute elapses without touching Done.


SCHEDULE AND HOLDS
UNDERSTANDING SCHEDULES
The daily schedule is split into four events:
WAKE: Temperature when you wake up in the morning.
LEAVE: Temperature when you are away from the house.
RETURN: Temperature when you return home.
SLEEP: Temperature you would prefer while sleeping.
The times shown in the table below are the defaults. These are the recommended settings, since they can reduce your heating/ cooling expenses. The fan mode is pre-set to AUTO for all events.
The start time, temperature and fan mode of each event can be changed to fit your specific schedule. (See Changing Schedules section)
| SET TEMPERATURE | ||||
| EVENT DESIGNATOR | START TIME | HEAT | COOL | FAN |
| WAKE | 6:00 AM | 70°F (21°C) | 78°F (25.5°C) | AUTO |
| LEAVE | 8:00 AM | 62°F (16.5°C) | 85°F (29.5°C) | AUTO |
| RETURN | 5:00 PM | 70°F (21°C) | 78°F (25.5°C) | AUTO |
| SLEEP | 10:00 PM | 62°F (16.5°C) | 82°F (27.5°C) | AUTO |
CHANGING SCHEDULES
- Touch Menu to open the Menu screen.
![]()
- Touch Schedule to open the Set Schedule screen. The current day of the week will be displayed on the Set Schedule screen. From this screen you can change the start time, heat and cool setpoints, and fan mode for each event for this day of the week. See instructions on how you can copy this day's schedule to other days.
![]()


To set the start time:
- Touch the event start time. The Set Time pop-up will appear.

- Touch the
![]() or
or ![]() arrows to set the desired event start time.
arrows to set the desired event start time.

- Touch Done to save any changes. Touch Back to discard your changes.


To set the temperature:
- Touch the event heat or cool setpoint. The Set Temperature pop-up will appear.
![]()
- Touch the
![]() or
or ![]() arrows to set the desired event temperature.
arrows to set the desired event temperature.

- Touch Done to save any changes. Touch Back to discard your changes.


To set the fan mode:
- Touch the event fan mode. The Set Fan Mode pop-up will appear.
![]()
- Select the desired fan mode.

- Touch Done to save any changes. Touch Back to discard your changes.


To copy one day's schedule to other days:
- Touch Copy this Day to open the Schedule Menu screen.
![]()
- Select the day(s) you want to copy the schedule to.

- Touch Done when finished. You will then be prompted to confirm your selections.
- Touch Yes to copy the schedule to the desired days. Touch No to return to the Schedule Menu screen without performing the schedule copy.


SCHEDULE HOLDS
Temporary Hold

- Touch the
![]() or
or![]() arrows to set your desired temperature. The Set Temporary Hold pop-up will appear.
arrows to set your desired temperature. The Set Temporary Hold pop-up will appear. - The temporary hold will run until the current schedule event ends. You can select a different time by touching the
![]() or
or ![]() arrows on the Set Temporary Hold pop-up.
arrows on the Set Temporary Hold pop-up. - Touch Done to close the Set Temporary Hold pop-up.
- To cancel the hold, touch HOLD on the main screen then Cancel Hold on the Set Temporary Hold pop-up.
Permanent Hold

- Touch the
![]() or
or ![]() arrows to set your desired temperature. The Set Temporary Hold pop-up will appear.
arrows to set your desired temperature. The Set Temporary Hold pop-up will appear. - Touch Switch to Permanent Hold. The Set Temporary Hold pop-up will change to a Set Permanent Hold pop-up. The time and the
![]() and
and![]() arrows will be grayed-out.
arrows will be grayed-out. - Touch Done to close the Set Hold pop-up.
- To cancel the hold, touch HOLD on the main screen then Cancel Hold on the Set Permanent Hold pop-up.
Vacation Hold
This energy saving feature allows you to suspend the programmed schedule for extended periods of time. The temperature and dehumidification setpoint (optional) you select will be maintained continuously until the vacation hold end date and time. Once the end date and time have been surpassed, the previously programmed schedule will resume. If you return earlier than expected, touch Cancel Hold to resume the programmed schedule.
- Touch Menu to open the Menu screen.
![]()
- Touch Vacation Hold to open the Vacation Hold screen.
![]()
- Set the end date, end time, temperature, and fan mode for the vacation hold as desired.

- If a dehumidifier is installed, touch On to adjust the dehumidification level.

- Touch Done to save the vacation hold settings.


Heat Blast® (if installed)
Heat Blast will raise the current room temperature by 3°F to 5°F once, and then resume normal operation. This feature is only available if it was enabled by your installer and the thermostat is in Heat or Emergency Heat mode.
")
- Touch HEAT BLAST to activate Heat Blast.
- Touch HEAT BLAST again, or adjust the temperature with the
![]() or
or ![]() arrows to cancel Heat Blast.
arrows to cancel Heat Blast.
Away (if installed)
The Away feature allows the thermostat to switch to predefined setpoints simply by touching AWAY. The default cooling setpoint is 85°F (29.5°C), the default heating setpoint is 62°F (16.5°C) and the default fan mode is Auto. The default settings can be modified in the User Preferences screen.
- Touch AWAY to activate the Away mode. Touch AWAY again to deactivate the Away mode.
")
")
STATUS
The Operating Status screen shows you the current status of all equipment controlled by this thermostat. ON indicates that the equipment is currently active. OFF indicates that the equipment is not active and cannot become active without changing its corresponding mode. IDLE means that the equipment is not currently active but could become so if measured conditions change.
- Touch STATUS to open the Operating Status screen.

- Touch Back to return to the Home screen."


ALERTS
Alerts are used to communicate special information to you. Some of the alerts are controlled by your settings (i.e. High/Low Temperature, High/Low Relative Humidity [RH]), and others are system alerts that may require a specific action by you or your installer to resolve. If any alerts are active, a red badge with the number of alerts will be displayed on the home screen.


- Touch ALERTS to view the active Alerts screen. Any conditions that fall outside the parameters set for temperature and humidity will create an active alert and will appear here. The limits for these alerts can be configured in the Settings screen.

- Touch Settings to open the Alerts Settings screen. The current limits can be viewed or changed here.

- Touch RH Limits to open the RH Alert pop-up.


- Touch Off to disable the High RH or Low RH limit. Touch On to enable the High RH or Low RH limit.
- Touch the
![]() or
or ![]() arrows to adjust the corresponding limit.
arrows to adjust the corresponding limit. - Touch Done to save your changes. Touch Back to close the pop-up without saving any changes.
- Touch Temperature Limits to open the Temperature Alert pop-up.

- Touch Off to disable the High Temperature or Low Temperature limit. Touch On to enable the High Temperature or Low Temperature limit.
- Touch the
![]() or
or ![]() arrows to adjust the corresponding limit.
arrows to adjust the corresponding limit. - Touch Done to save your changes. Touch Back to close the pop-up without saving any changes.

MAINTENANCE REMINDERS
Maintenance reminders appear when it is time to service your equipment, based on the limits set by your installer. In some cases, you may need to service your installed equipment before the maintenance reminder has appeared on the thermostat. Any maintenance reminders that have been configured by your installer but have not expired can be viewed in the Settings screen.

- Touch ALERTS to open the Alerts screen.
![]()
- Maintenance reminders have two options: Remind Later will hide the reminder for two weeks and then redisplay the alert. Reset will restart the reminder interval, and should be used after the equipment has been serviced.
- Touch Settings to open the Alerts Settings screen.
- Touch the installed equipment corresponding to the maintenance reminder you want to reset. A confirmation dialog box will appear.

- Touch Yes to confirm your choice. Touch No to return to the Alerts Settings screen without resetting the maintenance reminder timer.


Contact your local dealer for service.
WEATHER
The Weather screen displays the current weather, two-day forecast and current pollen information, if available. The information displayed is based on your postal code.
- Touch WEATHER to open the Weather screen.

- Touch Settings to open the Weather Settings screen.

- Touch the postal code box, enter your local postal code and touch Done when finished.


NOTE: Pollen information is only displayed when available.
INDOOR AIR QUALITY FUNCTIONS
HUMIDITY CONTROL
This thermostat can control the relative humidity (RH) in your home when you have an additional humidifier and/or dehumidifier installed. Dehumidification can be achieved one of two ways, either with a whole-home dehumidifier or with your air conditioning equipment. If a humidifier is installed, it can be controlled in one of two modes, Automatic or Manual. These settings are configured by your installer.
Automatic Humidifier
In automatic mode, you will receive an optimal amount of humidity so that your home and its furnishings are protected from the damaging effects of excessively high or low humidity during the heating season. The thermostat automatically adjusts your home's RH based on the outdoor temperature. This temperature is measured by a sensor attached outside your home.
The humidity setting needs to be set initially to meet your home's conditions. Please follow these steps when adjusting your control.
- Touch Humidity Control to open the Humidity Control Select screen.

- Touch Humidifier to open the Humidifier Control screen.

- The normal humidity range is 3-5. Use setting 3 initially.


During the next 24-48 hours, it may be necessary to adjust the setting for more or less humidity, depending on your personal comfort and home's requirements.
During the coldest portion of your first heating season, minor adjustments may be necessary to prevent window condensation. This will depend on your home's construction.
The relative humidity in your home will then be accurately controlled to meet your needs and should not need further adjustment during future heating seasons.
Manual Humidifier
In manual mode, it is important to anticipate a drop in outdoor temperature and to reduce the setting accordingly to avoid excessive condensation. Use the table on the right side of the Humidifier Control screen to determine the proper RH setting.
- Touch the
![]() or
or ![]() arrows to adjust the RH accordingly, and then touch Done when finished.
arrows to adjust the RH accordingly, and then touch Done when finished.


Dehumidification
The thermostat will allow you to set the desired RH level in your home and can be used to turn dehumidification on or off.

- Touch the
![]() arrow to increase the amount of humidity the dehumidifier will allow. The air will be less dry and the dehumidifier will run less.
arrow to increase the amount of humidity the dehumidifier will allow. The air will be less dry and the dehumidifier will run less. - Touch the
![]() arrow to decrease the amount of humidity the dehumidifier will allow. The air will be less humid and the dehumidifier may run more.
arrow to decrease the amount of humidity the dehumidifier will allow. The air will be less humid and the dehumidifier may run more.
If dehumidification is done with the air conditioner, the thermostat will cool up to 3°F beyond the cooling setpoint for dehumidification.
NOTE: Overcooling may not be sufficient to meet the dehumidification setpoint. Use the dehumidification adjustment to set the dehumidification setpoint to 60% when first installed. Allow dehumidification to run until the initial setpoint is reached, before deciding if you want to change the humidity setting. Your comfort is the best measure of how to adjust your setting. When first installed, your dehumidifier has to remove all the moisture that is initially in your home. The home acts like a sponge so the moisture in the materials of your home is at the same level as the air. After drying the air, the materials of the home will release the moisture back into the air until they are again at the same level. As a result, it is not uncommon for dehumidification to operate for an extended period of time when it is first installed.
Energy Saving Tips
- Adjust the setting to be as high as is comfortable to reduce dehumidification run time – if it feels clammy or smells damp or moldy, lower the setting. Set the Dehumidifier Control to Off when you open your windows.
- If your home will be unoccupied for an extended period during the summer, set the Dehumidifier Control setpoint to 60% RH and your cooling setpoint as high as you feel comfortable. Consult appropriate professionals regarding the highest temperature that is safe for your pets or possessions. This will keep the humidity at a controlled level to help prevent mold while minimizing the amount of the cooling energy used. Vacation hold is a convenient way to adjust the dehumidification and cooling setpoint while you are away.
EVENT BASED™ AIR CLEANING
If an air cleaner is installed, the thermostat will activate the fan for the purpose of air cleaning.
- Touch Air Cleaning on the home screen to open the Air Cleaner Control screen.


TEMPORARY EVENTS
Event Clean (3 Hour): When you need the fan to run non-stop for a short while, such as while vacuuming, choose this option. When selected, the air cleaner will run continuously for 3 hours and then return to the previous Permanent Mode.
Allergies (24 Hour): When seasonal allergies spike and outside air quality is at its worst, choose this option. When selected, the air cleaner will run continuously for 24 hours and then return to the previous Permanent Mode.
PERMANENT MODES
Off: The thermostat will not call for the fan to run for the purpose of air cleaning. Air Cleaning will still occur during normal fan operation, during heating, cooling or other indoor air quality events.
Automatic: The air cleaner will run a minimum of 30 minutes every hour. The air cleaner will monitor the amount of time your heating and cooling system runs. If 30 minutes is not reached, the air cleaner will automatically turn on. This will provide the most-efficient balance between air cleaning and energy use.
Constant Clean: This option will provide the maximum amount of air cleaning available. The air cleaner will be active for 24 hours a day, 7 days a week.

FRESH AIR
If ventilation is installed, fresh air is periodically drawn into your home through your heating and cooling system. The schedule is based on installer-calculated requirements. Occasionally, you may need more fresh air than what is scheduled. This thermostat offers several options.
- Touch Fresh Air to open the Fresh Air Control screen.


TEMPORARY EVENTS
3 hour Event: When you need additional fresh air brought into the home for a short while, such as after cooking, choose this option. Ventilation will run continuously for 3 hours and then return to the previous Permanent Mode.
24 hour Event: When you want a large amount of fresh air to be brought into the home, such as on a day with desirable outdoor conditions, choose this option. Ventilation will run continuously for 24 hours and then return to the previous Permanent Mode.
PERMANENT MODES
Off: When you want to override the normal schedule and disable ventilation, such as when the home will not be used or when conditions outside are undesirable due to a high allergen presence or similar, choose this option. Ventilation will not run.
Automatic: Ventilation will cycle based on the time calculated by your installer to meet your home's minimum requirements.

USER PREFERENCES
This thermostat comes with a programmable schedule, a temperature scale set to Fahrenheit, default Away settings and with no screen lockout in place. These settings may not suit every homeowner's needs and can be adjusted in the User Preferences screen.
- Touch Menu to open the Menu screen.

- Touch User Preferences to open the User Preferences screen.


AWAY BUTTON
While this thermostat has heating and cooling setpoints pre-programmed for use with the Away feature, you may prefer other temperatures. The steps below do not activate or deactivate the Away mode, but they do tell the thermostat what setpoints to use when you choose to activate it.
- Touch Away Button to open the Away Settings screen. The current Heat and Cool setpoints and Fan modes are shown and can be changed by touching their respective settings. These are the settings that will be used while Away is active.

- Touch HEAT or COOL to open the temperature pop-up.

- Touch the
![]() or
or ![]() arrows to adjust the setpoints to be used while Away is active.
arrows to adjust the setpoints to be used while Away is active.

- Touch Done to save any changes. Touch Back to discard your changes.


- Touch FAN to open the Set Fan Mode pop-up.

- Select the fan mode to be used when Away is active.

- Touch Done to save any changes. Touch Back to discard your changes.
- Touch Done to save all changes. Touch Back to discard all changes.


LOCKOUTS
A lockout is used to prevent any changes to the thermostat from the Home screen.
- Touch Lockouts to open the Lockouts screen.

- Select Full to enable the thermostat lockout. Select None to disable the thermostat lockout.

- Touch Done to save the changes.
NOTE: To temporarily override the full lockout for 30 seconds, hold Menu on the home screen for 10 seconds.


TEMPERATURE SCALE
The temperature scale on the thermostat can be set to Fahrenheit or Celsius. This affects all settings in the thermostat.
- Touch Temperature Scale to open the Temperature Scale screen.

- Select Fahrenheit or Celsius.

- Touch Done to save any changes. Touch Back to discard any changes.


SCHEDULE SETTINGS
While the schedule settings can be user-adjusted, it may become necessary to reset the schedule to the factory defaults or to disable the schedule entirely.
- Touch Schedule Settings to open the Schedule Settings screen.

- Select Off to disable the schedule. The thermostat will maintain its current setpoints indefinitely or until you set a new temperature. Hold modes will not be available as long as the schedule remains off. Select On to re-enable the schedule. The thermostat will resume its schedule at the appropriate point for the current time and day.

- Touch Done to save any changes. Touch Back to discard any changes.


CLEAN SCREEN
The touch screen can be temporarily disabled in order to clean it. Use a damp cloth with water or household glass cleaner. Do not spray liquids directly on the screen.
- Touch Menu to open the Menu screen.

- Touch Clean Screen to disable the touch screen for 30 seconds. The thermostat will return to the Menu screen when the timer finishes.


WI-FI MAINTENANCE AND TROUBLESHOOTING
WI-FI STATUS INDICATOR
Connected, operating normally
You should have one to four bars.

Internet connection lost
Thermostat is connected to the access point/router, but not the internet.

Wi-Fi connection lost
Thermostat is not connected to the Wi-Fi access point/router.

Strobing icon
Thermostat has not been configured to be used with a Wi-Fi network or the settings have been cleared. If your viewer supports multimedia animation, click on the icon below. A plug-in may be required for some PDF viewers.


CLEARING ROUTER SETTINGS
If you purchase a new Wi-Fi router or change the security settings on your existing router, the router settings in the thermostat need to be cleared so the new Wi-Fi router settings can be entered. To clear router settings:
- Touch Menu to open the Menu screen.
![]()
- Touch Wi-Fi Settings to open the Wi-Fi Settings screen.
![]()
- Touch Wi-Fi Disconnect & Clear Settings to clear all Wi-Fi settings from the thermostat. This will not remove the thermostat from your User Account. Y ou will be prompted to confirm your choice.

- Touch Yes to continue. Touch No to return to the Wi-Fi Settings screen without clearing the Wi-Fi settings.


Refer to instructions on connecting the thermostat to your Wi-Fi network.
REMOVING THE THERMOSTAT FROM A USER ACCOUNT
This thermostat can only be registered to one User Account. If this thermostat has previously been registered to an account that is no longer active or no longer applicable to this home, it will need to be unregistered before it can be added to a new User Account. The thermostat must have internet access through your router in order to be unregistered.
- Touch Menu to open the Menu screen.
![]()
- Touch Wi-Fi Settings to open the Wi-Fi Setting screen.
![]()
- Touch Advanced to open the Wi-Fi Advanced screen.

- Touch Unregister to remove the thermostat from a User Account. Your Wi-Fi settings will not be changed.


This will remove the thermostat from any account to which it is currently registered. Refer to instructions on registering the thermostat to a new User Account.
DISABLING THE WI-FI RADIO
The Wi-Fi radio can be manually disabled while maintaining all other network settings. To disable the thermostat's Wi-Fi radio:
- Touch Menu to open the Menu screen.
![]()
- Touch Wi-Fi Settings to open the Wi-Fi Settings screen.
![]()
- Touch Advanced to open the Wi-Fi Advanced screen.

- Touch Off to disable the Wi-Fi radio. Touch On to re-enable the Wi-Fi radio.


Documents / Resources
References
Download manual
Here you can download full pdf version of manual, it may contain additional safety instructions, warranty information, FCC rules, etc.
Advertisement


Need help?
Do you have a question about the 8920W and is the answer not in the manual?
Questions and answers