Table of Contents
Advertisement
Quick Links
Advertisement
Table of Contents

Related Manuals for Draper 35891


Summary of Contents for Draper 35891
- Page 1 Original Instructions Version 1 VACUUM TESTING KIT 35891...
-
Page 2: Copyright © Notice
All photographs and drawings within this manual are document is part of the product; retain it for the life supplied by Draper Tools to help illustrate correct of the product, passing it on to subsequent holders. operation of the product. -
Page 3: Table Of Contents
2. Contents 1. Preface 1.1 Product Reference 1.2 Revisions 1.3 Understanding the Safety Content of This Manual 1.4 Copyright © Notice 2. Contents 3. Product Introduction 3.1 Intended Use 3.2 Specification 4. Health and Safety Information 4.1 General Health and Safety Precautions 4.2 Residual Risk 4.3 Explanation of symbols 5. -
Page 4: Product Introduction
& motorbikes. Suitable for fault finding common issues on air conditioning, fuel, transmission, turbo waste gates, valve stem oil seals, ignition and emissions. 3.2 Specification Stock No. 35891 Part No. CTEVG2 Piston Stroke: 1”³ Gauge Diameter: approx. 52mm... -
Page 5: Health And Safety Information
Read the instruction manual • DO NOT modify any parts and only use accessories and spare parts supplied by Draper Tools. • Keep children and unauthorised persons away from Warning! the work area. -
Page 6: Identification And Unpacking
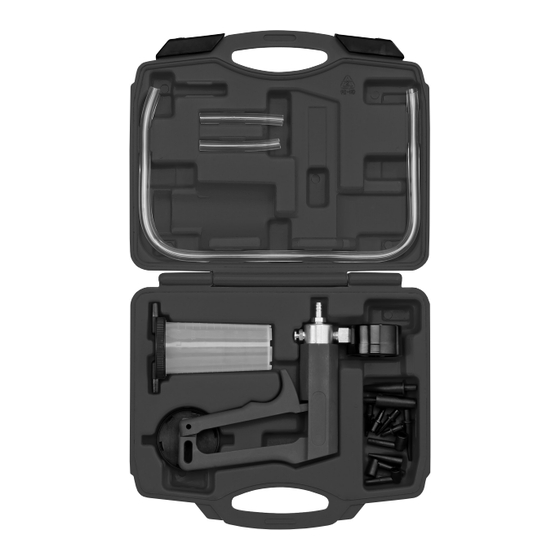
5. Identification and Unpacking 5.1 Product Overview Short Extension Tube X 2 Storage Case Long Extension Tube X 2 Transfer Cap Vacuum Gauge and Pump Reservoir Cap Hose and Nipple Adaptors 120ml Reservoir – 6 –... -
Page 7: What's In The Box
If any part is occurred during shipment. damaged or missing, do not attempt to use the product. Please contact the Draper Helpline; contact details can be found at the back of this manual. (E1) -
Page 8: Operations
6. Operations 6.2 Basic Diagnostic Test Important: Before preparing or adjusting this product, read and understand all the safety instructions listed in this manual. 1. Run the engine until the normal operating temperature is reached. Then switch off the engine. ALWAYS refer to the manufacturer’s service manual to ensure the correct testing procedures and specifications 2. -
Page 9: Ignition System Vacuum Advance
6. Operations 6.3 Ignition System Vacuum Advance On standard points and some electronic ignition systems there are two types of advance methods used, both of which must function correctly to obtain maximum performance and fuel economy. • Mechanical/Centrifugal (Weights located in the base of the distributor) - the weights move outwards advancing the ignition timing as the engine RPM increases. -
Page 10: Fuel Systems Testing
7. Fuel Systems Testing 7.2 Fuel Injection Pressure The vacuum tester can be used to evaluate the condition of a mechanical fuel pump by testing the vacuum that it Regulator Testing is able to create. Multi-point fuel injection rail pressure varies to suit • Locate and remove the suction line from the pump. -
Page 11: Electrically Operated Vacuum Solenoid Testing
7. Fuel Systems Testing 7.5 Electrically Operated Vacuum 7.7 Vacuum Operated Heater Tap Testing Solenoid Testing Climate control ventilation systems commonly use vacuum operated taps to control the heating modes and • Electrically operated vacuum solenoids are commonly to turn the heater tap ‘on’. used in control circuits for air conditioning/ventilation systems, emission control systems and idle step-up 1. -
Page 12: Braking Systems
8. Braking Systems 8.1 Brake Servo Diaphragm Testing 6. Tighten the bleed nipple and remove the adaptor from the brake nipple. 1. Remove the vacuum supply line from the brake servo 7. Repeat the process as necessary. fitting. − NOTE! Check the master brake fluid reservoir ... -
Page 13: Maintenance
11. Warranty Draper Tools products are guaranteed for 12months to be free from defective materials and workmanship. Full details of the warranty period can be found on the Draper Tools Website. Should the tool develop a fault within the warranty period, return the complete tool to the place of purchase or contact Draper Tools directly. - Page 14 Notes – 14 –...
- Page 15 Notes – 15 –...
- Page 16 Telephone Sales Desk: +44 (0) 23 8049 4333 General Enquiries: +44 (0) 23 8026 6355 General Fax: +44 (0) 23 8026 0784 Please contact the Draper Tools Product Helpline for repair and servicing enquiries. © Published by Draper Tools Limited © Published by Draper Tools Limited...
Need help?
Do you have a question about the 35891 and is the answer not in the manual?
Questions and answers