
Subscribe to Our Youtube Channel
Related Manuals for Dr.coffee CoffeeBreak S2 Series


Summary of Contents for Dr.coffee CoffeeBreak S2 Series
- Page 1 Exploring Coffee Secrets www.coffeebreak.co.za CoffeeBreak S2 Series Coffeezone machine instructions Please read the instructions carefully,and keep it well.
-
Page 2: Table Of Contents
Contents 1 Introductions..............4 Greetings..................4 About the manual................4 Machine description............... 4 Manufacturer information...............5 2 Security matters..............6 Application..............6 2. 2 Safety warning................6 2.1 User risks..............6 2. 2 Hazards to Machine............. 8 2. 2. 3 Dangers of cleaning agents............9 2.2.4 Health rules...............10 3 Machine description............12... - Page 3 6. 3 Powder drinks. 4 Installation and testing..........18 Placement Requirements............18 7 Cleaning and Maintenance...........33 4.1.1 Location................18 Cleaning schedule............... 33 1.2 Climate conditions............18 Daily clean..............34 4.1. 3 Power conditions..............19 7. 2.1 Brewing system rapid rinse..........34 4.1.4 Water conditions............... 20 7.
-
Page 4: Introductions
The performance of coffee machine depends on proper maintenance and use. Please read the instruction manual carefully before using the Suzhou Dr.Coffee System Technology Co.,Ltd coffee machine for the first time. Happy using! #55 Taishan Road, New District,Suzhou City, Jiangsu, China E-mail: info@coffeebreak.co.za... -
Page 5: Security Matters
• Children over 8 years of age and persons with physical, sensory or 2 Security matters intellectual impairments or lack of experience and cognition must learn how to operate the machine safely and understand the dangers Optimum Safety One of Dr. Coffee's most important product features. that result before using the machine under continuous supervision;... -
Page 6: Hazards To Machine
• The coffee machine must be cleaned and then restarted after a • In the self-service application, check for possible allergy-causing prolonged shutdown (such as a corporate vacation); add-on products listed on the prompt board on the coffee machine; • In self-service applications, look for allergy-causing add-on products •... -
Page 7: Health Rules
• Good ventilation and exhaust must be ensured when using cleaning Coffee: Incorrect use of coffee can be detrimental to your health! agents. Be sure to observe the following points: • Wear protective gloves when working with cleaning agents. • Check for damage before unpacking. •... -
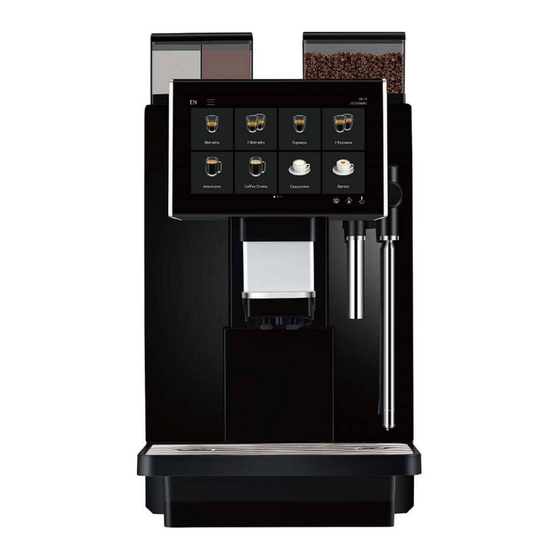
Page 8: Machine Description
3.1.2 CoffeeBreak S1 zone-H (Front) 3 Machine description Machine introductions CoffeeBreak S2 zone-T 3.1.1 Powder hopper (Front) Beans hopper Powder hopper Display Door of water tank Door of water tank Hot water spout Milk outlet Steam tube Powder drink outlet Milk outlet Coffee outlet Powder drink outlet... -
Page 9: Technical Parameters
3.2.2 Specification parameters 3. 2 Technical parameters 3.2.1 Output capacity CoffeeBreak S2 &S1 zone series Technical sheet ♦ Hourly output on DIN18873-2: Voltage 220V~ 50Hz CoffeeBreak S2 zone series Capacity Power 2700W ne -T ne -H Connection tube set G3/4’change into G1/2’length1.5M metal tube Advised daily output 200 cups Connection... -
Page 10: Accessories
3. 3 Accessories 3.3.2 Accessories and device options Optional component 3.3.1 Accessories supplied Picture Description name ♦ This model supply the spare parts as follows: Electronic refrigerator; Electronic Light, quiet; Coffee zone series refrigerator Store milk box or container directly. Name Picture Coffee zone-T... -
Page 11: Installation And Testing
4 Installation and testing Low temperature storage requirements: Professionally trained personnel can perform the following operations. • If the coffee machine in normal use needs to be stored or transported, when the ambient temperature is lower than 0°C, the waterway must be emptied first. -
Page 12: Water Conditions
4.1.4 Water conditions 4.3 Connection Poor quality raw materials and poor water quality can damage the 4.3.1 Connect the water inlet machine. Be sure to observe the following points: Step 1: Connect one end of the water inlet pipe to the water inlet of the •... -
Page 13: Power Source
Step 2: Place the outlet of the waste water pipe above the waste water Step3: Put back the drip tray and finish installation. tank (or waste water pool). V Waste water pipe installation completed. 4.4 Power source The supply voltage must correspond to the description on the nameplate 4.3.3 Reservoir check valve(only for the machine with the drain pipe) When connecting via the mains plug, it must be ensured that the socket... -
Page 14: First Run
5.1.2 Fill powder V The power connection of the coffee machine is completed. Step 1 :Use the adjusting wrench to turn the cover lock core clockwise, open the cover of the powder bin, add the powder into the powder bin, 5 First run and then install the cover, turn the cover lock core counterclockwise, and lock the cover. -
Page 15: Power On The Coffee Machine
5.2 Power on the coffee machine Step 3: The coffee machine is starting, please wait... Step 1: Push the button on the back of machine. V Power on the coffee machine complete Step 4: The boot is complete, the coffee machine is ready, waiting to make beverages. -
Page 16: Drink Making
Step 2: Click the "Power Off" option in the screen; Drink making 16:30 * 2023/08/09 The following operations can be directly operated by ordinary users. ® Brewer Rinse Milk Rinse One-8utton Maint Descaling Wipe Protect 6.1 Coffee drinks ® o For example: making a cup of "espresso". -
Page 17: Milk Drinks
Step 3: During the process of making the drink..., click "Cancel" to stop Step 3: During the process of making the drink..., click "Cancel" to stop the making immediately. the making immediately. 16:37 Cancel^ 6.3 Powder drinks 6.2 Milk drinks For example: making a cup of "Cappuccino PD"... -
Page 18: Cleaning And Maintenance
Step 3: During the process of making the drink..., click "Cancel" to stop 7 Cleaning and Maintenance the making immediately. Professionally trained personnel can perform the following operations. 7. 1 Cleaning schedule Dr.coffee commercial coffee machine cleaning schedule Daily Weekly Demand Required Mandatory Brewer rinse ©... -
Page 19: Daily Clean
7.2.2 Milk frother rapid rinse 7.2 Daily clean Step 1: Click the shortcut icon on the screen to enter the shortcut menu page. 7.2.1 Brewing system rapid rinse ..------------ 2023/08/07 Step 1: Click the shortcut icon on the screen to enter the shortcut menu page. 2023/08/07 Ristretto 2 Ristretto... -
Page 20: Mixer Unit Clean
7.2.3 Drink outlet unit clean Step 2: Put the rinsed and dried blender back into the machine and lock clockwise to turn off the water tank door. Step 1: Use your fingers to pinch the buckles on both sides of the beverage outlet, pull down firmly, and remove the beverage outlet component;... -
Page 21: Brewer Deep Clean
7.3.2 Brewer deep clean Step 1: Click on the shortcut menu icon at the top of the screen to enter the shortcut menu interface; CM ---------- 09:10 kN — 2023/08/07 Ristretto 2 Ristretto Espresso 2 Espresso > Step 2: Catch the rack,pull up the brewer to the right position.Re-install the Americano Coffee Crema Cappuccino... -
Page 22: Milk Deep Clean
7.3.4 Powder system deep clean 7.3.3 Milk deep clean Step 1: Click on the shortcut menu icon at the top of the screen to enter Step 1: Click on the shortcut menu icon at the top of the screen to enter the shortcut menu interface;... -
Page 23: Descaling
Step 2: Click "One-Button Maint" and follow the steps on the screen to 7.3.5 Descaling complete the maintenance of the coffee machine. Step 1: Click on the shortcut menu icon at the top of the screen to enter 16:30 1 ~ 2023/08/09 1 the shortcut menu interface;... -
Page 24: Liability And Warranty
Quality defects must be notified in writing to Dr. Coffee within 30 days. Dr.coffee's "General Terms of Business" apply. For hidden defects, this period is extended to 12 months after installation (work report, handover record). - Page 25 During the coffee making process,self-checking and resetting process, and automatic cleaning process, please do not cut off the power supply; According to the height of the coffee cup, adjust the height of the coffee outlet appropriately to avoid the splashing of beverages such as coffee and hot water;...
Need help?
Do you have a question about the CoffeeBreak S2 Series and is the answer not in the manual?
Questions and answers