
Related Manuals for LaserLiner VideoScope Micro


Summary of Contents for LaserLiner VideoScope Micro
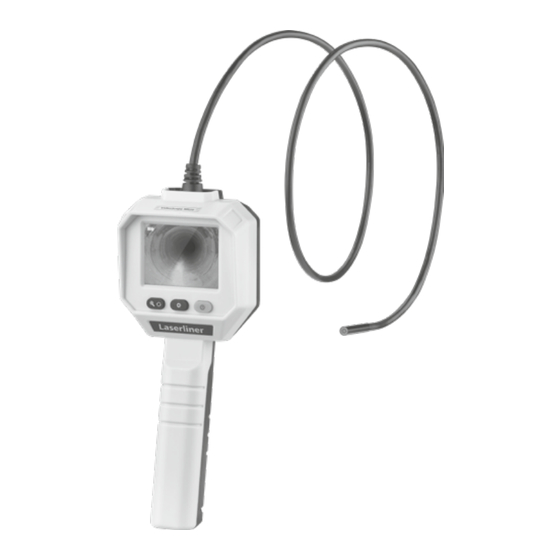
- Page 1 VideoScope Micro FLEXIBLE CAMERA TUBE Ø 5.5 MM...
-
Page 2: Bestimmungsgemäße Verwendung
Das Basisgerät darf nicht mit Flüssigkeit in Berührung kommen. – Der Kamerakopf ist nicht säurebeständig oder feuerfest. – Es ist unbedingt darauf zu achten, das die VideoScope Micro nicht in Kontakt mit Chemikalien, Spannung, beweglichen oder heißen Gegenständen kommt. Dies kann zur Beschädigung des Gerätes und auch zu schweren Verletzungen des Bedieners führen. - Page 3 VideoScope Micro – Bitte beachten Sie zur sachgemäßen Verwendung des Gerätes die Sicherheitshinweise von lokalen bzw. nationalen Behörden. Sicherheitshinweise Umgang mit künstlicher, optischer Strahlung OStrV Austrittsöffnung LED – Das Gerät arbeitet mit LEDs der Risikogruppe RG 0 (freie Gruppe, kein Risiko) gemäß den gültigen Normen für die photobiologische Sicherheit (EN 62471:2008-09ff / IEC/TR 62471:2006-07ff) in ihren aktuellen Fassungen.
- Page 4 Kamera Kamerakopf LED-Beleuchtung Optik Symbole Batteriestatus LED Beleuchtung Zoom-Stufe 2.0 X Werkzeuge Haken Magnet Spiegel Einsetzen und Entnehmen der Batterien Das Batteriefach öffnen und Batterien (4x Typ AA) gemäß den Installations symbolen einlegen. Dabei auf korrekte Polarität achten. Vor Entnahme der Batterien das Gerät ausschalten. 4x AA...
- Page 5 VideoScope Micro ON/OFF 3 sec Befestigung der Werkzeuge Spiegel Kamerakopf Haken Magnet Klick LED-Beleuchtung Taste drücken 1x = 20% 2x = 40% 3x = 60% 4x = 80% 5x = 100%...
-
Page 6: Hinweise Zur Wartung Und Pflege
Zoom Taste kurz drücken – = 100% 2.0 X 1x = 150% 2x = 200% Rotations-Taste Bildrotation 2 Sek. gedrückt halten. Vom Ausgangsbild 1x = horizontale Spiegelung 2x = Drehung 180° 3x = vertikale Spiegelung 4x = Ausgangsbild Hinweise zur Wartung und Pflege Reinigen Sie alle Komponenten mit einem leicht angefeuchteten Tuch und vermeiden Sie den Einsatz von Putz-, Scheuer- und Lösungsmitteln. - Page 7 VideoScope Micro Technische Daten (Technische Änderungen vorbehalten Rev23W49) Auflösung Display 320 x 240 Pixel Auflösung Kamera 640 x 480 Pixel Länge Sonde Durchmesser Sonde 4,5 mm Min. Biegeradius Sonde 30 mm Länge Kamerakopf 35 mm Durchmesser Kamerakopf ø 5,5 mm Sichtfeld (FOV) 45°...
-
Page 8: Intended Use
– The camera head is not acid-resistant or fireproof. – It is absolutely vital to ensure that the VideoScope Micro does not come into contact with chemicals, voltage, moving or hot objects. This can damage the device and put its user at risk of serious injury. -
Page 9: Safety Instructions
VideoScope Micro Safety instructions Using artificial, optical emission (OStrV) LED outlet – The device works with LEDs of risk group RG 0 (exempt, no risk) in accordance with the latest versions of applicable standards relating to photobiological safety (EN 62471:2008-09ff / IEC/ TR 62471:2006-07ff). -
Page 10: Inserting And Removing The Batteries
Camera Camera head LED lighting Optics Symbols Battery status LED lighting Zoom (2 steps) 2.0 X Tools Hook Magnet Mirror Inserting and removing the batteries Open the battery compartment and insert batteries (4 x typ AA) according to the symbols. Be sure to pay attention to polarity. Switch off the device before removing the battery. - Page 11 VideoScope Micro ON/OFF 3 sec Fixing for tools Mirror Camera head Hook Magnet Click LED lighting Press button 1x = 20% 2x = 40% 3x = 60% 4x = 80% 5x = 100%...
-
Page 12: Image Rotation
Zoom Press button briefly – = 100% 2.0 X 1x = 150% 2x = 200% Hold rotation button Image rotation down for 2 seconds. From the original image 1x = Horizontal mirroring 2x = Rotation 180° 3x = Vertical mirroring 4x = Original image Information on maintenance and care Clean all components with a damp cloth and do not use cleaning... - Page 13 Please do not hesitate to contact the UMAREX-LASERLINER service department if you have any queries regarding removing the battery. Look for information on local disposal facilities and note the relevant disposal and safety information at the collection points.
-
Page 14: Doelmatig Gebruik
Het basisapparaat mag niet in contact komen met vloeistoffen. – De camerakop is niet zuurbestendig en niet vuurvast. – Let absoluut op dat de VideoScope Micro niet in contact komt met chemicaliën, voltage, beweeglijke of hete voorwerpen. Hierdoor kan het apparaat beschadigd raken, hetgeen kaqn leiden tot ernstig persoonlijk letsel van de gebruiker. - Page 15 VideoScope Micro – Neem voor het correcte gebruik van het toestel de veiligheidsvoor- schriften van lokale resp. nationale instanties in acht. Veiligheidsinstructies Omgang met kunstmatige, optische straling OStrV (verordening inzake kunstmatige optische straling) Uittree-opening led – Het apparaat werkt met leds uit de risicogroep RG0 (vrij van...
- Page 16 Camera Camerakop LED-verlichting Optiek Symbolen Batterijstatus LED-verlichting Zoom (2 niveaus) 2.0 X Werkzeuge Haak Magneet Spiegel De batterijen plaatsen en verwijderen Open het batterijvakje en plaats de batterijen (4 x type AA) overeen- komstig de installatie symbolen. Let daarbij op de juiste polariteit. Schakel het apparaat uit, voordat u de batterijen verwijdert.
- Page 17 VideoScope Micro ON/OFF 3 sec Bevestiging van de gereedschappen Spiegel Camerakop Haak Magneet Klik LED-verlichting Toets indrukken 1x = 20% 2x = 40% 3x = 60% 4x = 80% 5x = 100%...
- Page 18 Zoom Toets kort indrukken – = 100% 2.0 X 1x = 150% 2x = 200% Toets Rotatie 2 sec. Beeldrotatie ingedrukt houden Van het uitgangsbeeld 1x = Horizontale spiegeling 2x = Draaiing 180° 3x = Verticale spiegeling 4x = Uitgangsbeeld Opmerkingen inzake onderhoud en reiniging Reinig alle componenten met een iets vochtige doek en vermijd het gebruik van reinigings-, schuur- en oplosmiddelen.
- Page 19 Als je vragen hebt over het verwijderen van de batterij, neem dan contact op met de serviceafdeling van UMAREX-LASERLINER. Informeer bij uw gemeente naar dienovereenkomstige inzamelpunten en neem de van toepassing zijnde afvoer- en veiligheidsinstructies op de inzamelpunten in acht.
-
Page 20: Tilsigtet Anvendelse
– Kamerahovedet er ikke syrebestandigt eller ildfast. – Det er vigtigt, at man sørger for, at VideoScope Micro ikke kommer i kontakt med kemikalier, spænding, bevægelige eller varme genstande. Dette kan ødelægge apparatet og desuden medføre alvorlige personskader på... - Page 21 VideoScope Micro Sikkerhedsanvisninger Omgang med kunstig, optisk stråling OStrV Udgangsåbnings-LED – Apparatet bruger LED‘er i risikogruppen RG 0 (fri gruppe, ingen risiko) i henhold til gældende standarder for fotobiologisk sikkerhed (EN 62471:2008-09ff / IEC/TR 62471:2006-07ff) i de nuværende udførelser. – Den tilgængelige stråling fra LED‘erne er ved tilsigtet anvendelse og under rimeligt forudsigelige forhold ufarlig for det menneskelige øje og den menneskelige hud.
- Page 22 Kamera Kamerahoved Diodelampe Optik Symboler Batteristatus Diodelampe Zoom (2 trin) 2.0 X Værktøjer Krog Magnet Spejl Isætning og udtagning af batterier Åbn batterihuset og læg batterierne (4 x Type AA) i. Vær opmærksom på de angivne poler. Før batterierne tages ud, skal apparatet slukkes. 4x AA...
- Page 23 VideoScope Micro ON/OFF 3 sec Fastgørelse af værktøjerne Spejl Kamerahoved Krog Magnet Klick Diodelampe Tryk knappen 1x = 20% 2x = 40% 3x = 60% 4x = 80% 5x = 100%...
- Page 24 Zoom Tryk knappen kort – = 100% 2.0 X 1x = 150% 2x = 200% Rotationsknappen Billedrotation holdes trykket i 2 sek. Fra udgangsbilledet 1x = Horisontal spejling 2x = Drejning 180° 3x = Vertikal spejling 4x = Udgangsbillede Anmærkninger vedr. vedligeholdelse og pleje Alle komponenter skal rengøres med en let fugtet klud, og man skal undlade brug af rengørings-, skure- og opløsningsmidler.
- Page 25 ødelægges og forbindes med en separat samling, før du giver apparatet tilbage til bortskaffelse. Hvis du har spørgsmål til udtagning af batteriet, kan du henvende dig til serviceafdelingen hos UMAREX-LASERLINER. Find informationer om tilsvarende bortskaffelsessteder hos din kommune og overhold de gældende bortskaffelses- og sikkerhedsoplysninger på modtagerstederne.
-
Page 26: Utilisation Conforme
– La tête de la caméra ne résiste pas aux acides ni au feu. – Il est indispensable de faire attention à ce que le VideoScope Micro n’entre pas en contact avec des produits chimiques, du tension électrique ou encore des pièces brûlantes ou en mouvement. - Page 27 VideoScope Micro – Veuillez respecter les consignes de sécurité des autorités locales et/ ou nationales pour une utilisation conforme de l’appareil. Consignes de sécurité Utilisation avec des rayonnements optiques artificiels (OStrV - décret de protection du travail relatif aux rayonnements optiques artificiels) Orifice de sortie de la DEL –...
- Page 28 Caméra Tête de la caméra Éclairage DEL Optique Symbole État de charge des piles Éclairage DEL Zoom 2 fois 2.0 X Werkzeuge Crochet Aimant Miroir Mise en place et retrait des batteries Ouvrir le compartiment à piles et introduire les piles (4 du type AA) en respectant les symboles de pose.
- Page 29 VideoScope Micro ON/OFF 3 sec Fixation des outils Miroir Tête de la caméra Crochet Aimant Clic Éclairage DEL Appuyer sur la touche 1x = 20% 2x = 40% 3x = 60% 4x = 80% 5x = 100%...
- Page 30 Appuyer brièvement Zoom sur la touche – = 100% 2.0 X 1x = 150% 2x = 200% Maintenir la touche Rotation de l‘image de rotation enfoncée pendant 2 secondes. À partir de l’image initiale 1x = Réflexion horizontale 2x = Rotation de 180° 3x = Réflexion verticale 4x = Image initiale Remarques concernant la maintenance et l‘entretien...
- Page 31 Pour toute question concernant le retrait de la pile, veuillez contacter le service après-vente de la société UMAREX-LASERLINER. Veuillez vous renseigner auprès de votre commune sur les points de collecte appropriés et tenez compte des consignes de sécurité...
-
Page 32: Uso Correcto
Conserve esta documentación y entréguela junto con el producto si cambia de manos. Uso correcto El sistema de inspección por vídeo VideoScope Micro es apto para el control visual de puntos de difícil acceso en tuberías, espacios huecos, pozos, muros o vehículos. -
Page 33: Instrucciones De Seguridad
VideoScope Micro Instrucciones de seguridad Modo de proceder con radiación óptica artificial según el OStrV (reglamento alemán de protección laboral contra la radiación óptica artificial) Orificio de salida del LED – El aparato trabaja con LED del grupo de riesgo RG 0 (grupo libre, sin riesgo) según las normas vigentes para la seguridad fotobiológica... - Page 34 Cámara Cabezal de la cámara Iluminación LED Óptica Simbolos Estado de las pilas Iluminación LED Zoom (2x) 2.0 X Instrumentos Gancho Imán Reflector Colocación y extracción de las pilas Abra la caja para pilas e inserte las pilas (4 x Tipo AA) según los símbolos de instalación.
-
Page 35: Iluminación Led
VideoScope Micro ON/OFF 3 sec Fijación de la herramienta Reflector Cabezal de la cámara Gancho Imán Clic Iluminación LED Pulse el botón 1x = 20% 2x = 40% 3x = 60% 4x = 80% 5x = 100%... - Page 36 Pulsar el botón Zoom brevemente – = 100% 2.0 X 1x = 150% 2x = 200% Mantenga pulsado Rotación de imágenes el botón Rotación durante 2 s. Desde la imagen inicial 1x = Simetría horizontal 2x = Giro 180° 3x = Simetría vertical 4x = Imagen inicial Indicaciones sobre el mantenimiento y el cuidado Limpie todos los componentes con un paño ligeramente humedecido...
- Page 37 Si tiene alguna pregunta sobre la extracción de las pilas, póngase en contacto con el departamento de servicio técnico de UMAREX-LASERLINER. Por favor, infórmese en su municipio sobre las instalaciones de recogida adecuadas y siga las correspondientes instrucciones de eliminación y seguridad en los puntos de recogida.
-
Page 38: Uso Previsto
– La testina di ripresa non resiste agli acidi o al fuoco. – Il VideoScope Micro non deve venire mai a contatto con sostanze chimiche, tensione e oggetti mobili o con temperatura elevata. -
Page 39: Indicazioni Di Sicurezza
VideoScope Micro – Per un uso corretto dell’apparecchio attenersi alle avvertenze di sicurezza emanate dagli enti locali o nazionali. Indicazioni di sicurezza Manipolazione con radiazioni ottiche artificiali secondo l’ordinanza tedesca OStrV. Apertura di uscita LED – L’apparecchio funziona con LED appartenenti al gruppo di rischio... - Page 40 Ripresa Testina di ripresa LED di illuminazione Ottica Simboli Stato delle pile LED di illuminazione Zoom (2 livelli) 2.0 X Utensili Gancio Magnete Specchio Inserimento e rimozione delle batterie Aprire il vano batterie e introdurre le batterie (4 di tipo AA) come indicato dai simboli di installazione, facendo attenzione alla corretta polarità.
- Page 41 VideoScope Micro ON/OFF 3 sec Fissaggio degli utensili Specchio Testina di ripresa Gancio Magnete Clic LED di illuminazione Premere il tasto 1x = 20% 2x = 40% 3x = 60% 4x = 80% 5x = 100%...
-
Page 42: Rotazione Immagine
Premere brevemente Zoom il tasto – = 100% 2.0 X 1x = 150% 2x = 200% Tenere premuto Rotazione immagine il tasto di rotazione per 2 secondi. Dall’immagine iniziale 1x = Immagine speculare orizzontale 2x = Rotazione a 180° 3x = Immagine speculare verticale 4x = Immagine iniziale Indicazioni per la manutenzione e la cura... - Page 43 Provvedere alla raccolta separata prima di restituire l’apparecchio per lo smaltimento. Per domande sulla rimozione della batteria potete rivolgervi al reparto assistenza di UMAREX-LASERLINER. Informatevi presso il vostro comune sui centri di raccolta autorizzati allo smaltimento e osservare le relative avvertenze per lo smaltimento e la sicurezza nei centri di recupero.
-
Page 44: Stosowanie Zgodne Z Przeznaczeniem
Niniejszą instrukcję należy zachować, a w przypadku przekazania produktu, wręczyć kolejnemu posiadaczowi. Stosowanie zgodne z przeznaczeniem System inspekcji wideo VideoScope Micro nadaje się do wizualnej kontroli trudno dostępnych miejsc w rurach, wnękach, szybach, murze i pojazdach silnikowych. Ogólne zasady bezpieczeństwa –... - Page 45 VideoScope Micro zanurzona tylko w odległości do 10 cm od obudowy. – W celu prawidłowego użytkowania urządzenia należy przestrzegać instrukcji bezpieczeństwa wydanych przez władze lokalne lub krajowe. Wskazówki odnośnie bezpieczeństwa Postępowanie ze sztucznym promieniowaniem optycznym (niem. rozporządzenie OStrV) Otwór wyjściowy LED –...
- Page 46 Kamery Głowica kamery Oświetlenie LED Optyka Symbolika Status baterii Oświetlenie LED Zoom (2 poziomy) 2.0 X Narzędzia Magnes Lustro Wkładanie i wyjmowanie baterii Otworzyć komorę baterii i włożyć baterie (4 x typ AA) zgodnie z symbolami instala cyjnymi. Zwrócić przy tym uwagę na prawidłową biegunowość.
- Page 47 VideoScope Micro ON/OFF 3 sec Mocowanie narzędzi Lustro Głowica kamery Magnes Kliknięcie Oświetlenie LED Nacisnąć przycisk 1x = 20% 2x = 40% 3x = 60% 4x = 80% 5x = 100%...
- Page 48 Nacisnąć krótko Zoom przycisk – = 100% 2.0 X 1x = 150% 2x = 200% Nacisnąć i przytrzymać Nacisnąć krótko przycisk przez 2 sek. przycisk rotacji. Z obrazu wyjściowego 1x = Poziome odbicie lustrzane 2x = Obrót o 180° 3x = Pionowe odbicie lustrzane 4x = obraz wyjściowy Wskazówki dotyczące konserwacji i pielęgnacji Oczyścić...
- Page 49 W przypadku jakichkolwiek pytań dotyczących wyjmowania baterii należy skontaktować się z działem serwisu UMAREX-LASERLINER. Należy skontaktować się z gminą w celu uzyskania informacji na temat odpowiednich zakładów utylizacji i przestrzegać odpowiednich instrukcji dotyczących utylizacji i bezpieczeństwa w punktach zbiórki.
- Page 51 VideoScope Micro...
- Page 52 VideoScope Micro Manuale RACCOLTA CARTA Verifica le PAP 22 disposizioni del CARTA tuo Cumune. À DÉPOSER À DÉPOSER Cet appareil, EN MAGASIN EN DÉCHÈTERIE ses accessoires et piles se recyclent Points de collecte sur www.quefairedemesdechets.fr Privilégiez la réparation ou le don de votre appareil ! Umarex GmbH &...
Need help?
Do you have a question about the VideoScope Micro and is the answer not in the manual?
Questions and answers