Advertisement
Available languages
Available languages
Quick Links
2/2
990399 - BI 1D NF 304 D W625C
INSTRUCTIONS FOR USE
CONSIGNES D'UTILISATION
GEBRUIKSAANWIJZINGEN
INSTRUCCIONES DE USO
Refrigerator
Réfrigérateur
Koelkast
Frigorífico
....................02
....................22
....................44
....................64
04/2024-V3
Advertisement

Related Manuals for VALBERG BI 1D NF 304 D W625C


Summary of Contents for VALBERG BI 1D NF 304 D W625C
- Page 1 04/2024-V3 Refrigerator Réfrigérateur Koelkast Frigorífico 990399 - BI 1D NF 304 D W625C INSTRUCTIONS FOR USE ....02 CONSIGNES D'UTILISATION ....22 GEBRUIKSAANWIJZINGEN ....44 INSTRUCCIONES DE USO ....64...
- Page 3 Thank you! T h a n k y o u f o r c h o o s i n g t h i s VA L B E R G p ro d u c t . V A L B E R G p r o d u c t s a r e c h o s e n , t e s t e d , a n d recommended by ELECTRO DEPOT, so you can be sure y o u a re g e t t i n g a t o p - q u a l i t y, e a s y - t o - u s e p ro d u c t t h a t w o n ’...
- Page 4 Table of Contents Parts Product overview Install instruction Product usage Operation instructions Cleaning and maintenance Cleaning and Troubleshooting maintenance...
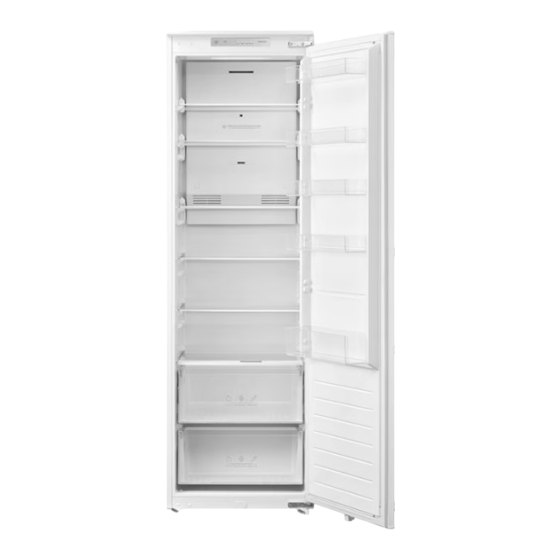
- Page 5 Product overview Parts Temperature control panel LED lighting Shelf Fruit and vegetable box cover Drawer Door tray For the most efficient use of energy, please keep the all internal items such as trays, drawers, shelves and ice cube box on the position supplied by manufacturer. ATTENTION Differences: Due to technical changes and different models, some of the illustrations in this manual may differ from your model.
- Page 6 Product usage Install instruction Before first use • Remove the exterior and interior packing, wipe the outside thoroughly with a soft dry cloth and the inside with a wet, lukewarm cloth. • Avoid placing the cabinet in a narrow recess or near any heat source, direct sunlight, or moisture.
- Page 7 Product usage ATTENTION The cooling performance and power consumption of the refrigerator may be affected by the ambient temperature, the door-opening frequency, and the location of the refrigerator. We recommend adjusting the temperature settings as appropriate. Door right-left change List of tools to be provided by the user Cross screwdriver Putty knife / Thin-blade screwdriver Masking tape...
- Page 8 Product usage Exchange the bottom hinge and upper hinge, then install them according to below steps, and install the top hole caps. 180° Remove the fixed blocks of refrigerator door and rotate them for 180°, and install them on other side of refrigerator door. ATTENTION Differences: Due to technical changes and different models, some of the illustrations in this manual may differ from your model.
- Page 9 Product usage Installation in cabinet Cabinet size requirement. (The skirting board and back of the cabinet shall be provided with a through heat dissipation channel) Cabinet vent ≥200cm A - Thinckness of cabinet plank Push the refrigerator into the cabinet and adjust it to make sure the edge fold of top baffle completel touch the top edge of the cabinet, and the limit hook of supporting leg completely touch the bottom edge of the cabinet.
- Page 10 Product usage Fix the top baffle to the top of the cabinet inner with screws, then install the screw caps. Fix the supporting leg with screws, then install the screw caps. Screw cap Screw Open the door of cabinet the maximum angle, and open the door of the refrigerator to the corresponding position.
- Page 11 Product usage Take out the sealing strip from accessory bag, and press it in the gap between the cabinet and the refrigerator. Installation is completed. sealing strip ATTENTION Precautions before installation: Information in the Instruction Manual is only for reference. The physical product may differ. Before installation and adjusting of accessories, it shall be ensured that the refrigerator is disconnected from power.
- Page 12 Product usage After connecting the power supply cord (or plug) to the outlet, wait 2 or 3 hours before you put food into the appliance. If you add food before the appliance has cooled completely, your food may spoil. Moving the appliance Remove all items from the appliance.
- Page 13 Product usage Operation instructions Use and functions Feature panel Button Standby button Temperature setting button Display screen Setting 1: the setting temperature Setting 3: the setting temperature is 8 °C is 2 °C Setting 2: the setting temperature Setting 4: Super cool is 4 °C Display •...
- Page 14 Product usage Lock and unlock • No lock or unlock function. • The setting takes effect 15 seconds after no operation. ATTENTION The actual control panel may differ from model to model. Gear setting Every time you press the button, the gear will change once. After setting the gear for 15 seconds, the refrigerator will run according to the set value.
- Page 15 Product usage Coldest zone in the refrigerator OPTIONAL: OK-temperature indicator • The OK-temperature indicator can be used to determine temperatures below +4°C. Gradually reduce the temperature if the sign does not indicate “OK”. • To ensure the temperature in this area, do not change the positioning of the shelf. Inforced air refrigerators (equipped with a fan or No Frost models), the symbol of the coldest zone is not represented because the temperature inside is homogeneous.
- Page 16 Cleaning and maintenance Cleaning and maintenance CAUTION! Do not rinse directly with water or other liquids during cleaning to avoid short circuits or affect electrical insulation after immersion. ATTENTION The appliance shall run continuously once it is started. Generally, the operation of the appliance shall not be interrupted;...
- Page 17 Cleaning and maintenance • Use a soft cloth or sponge to clean the inside of the product, with two tablespoons of baking soda and a quart of warm water. Then rinse with water and wipe clean. After cleaning, open the door and let it dry naturally before turning on the power.
- Page 18 Cleaning and maintenance • Adjust or clean the shelves according to your requirement. Cleaning the vegetable drawer • Remove the contents of the drawer. Hold the handle of the vegetable drawer and pull it out completely until it stops. • Lift the vegetable drawer up and remove it by pulling it out. ATTENTION Differences: Due to technical changes and different models, some of the illustrations in this manual may...
- Page 19 Cleaning and maintenance Troubleshooting The following simple issues can be handled by the user. Please call the after-sale service department if the issues are not solved. Problem Possible Causes Solution Not operate • The power supply • Insert the power cord plug firmly. is not turned on •...
- Page 20 Cleaning and maintenance Problem Possible Causes Solution Door does not • Door is stuck with • Do not put in too much food. close properly objects. • Place the appliance stably. • Too much food in. • Heat the door gasket, then cool it for •...
- Page 21 Cleaning and maintenance Problem Possible Causes Solution Condensation • The fridge • Wipe off the condensation using a dry forms inside the maintains a high cloth. fridge and drawers humidity to keep • Do not open doors as frequently or do vegetables and not keep them open too long.
- Page 22 Merci ! M e rc i d ’ a v o i r c h o i s i c e p ro d u i t VA L B E R G . Choisis, testés et recommandés par ELECTRO DEPOT, le s p ro d u i t s d e l a m a rq u e VA L B E R G v o u s a s s u re n t u n e u t i l i s a t i o n s i m p l e , u n e p e r f o r m a n c e f i a b l e e t u n e q u a l i t é...
- Page 23 Table des matières Pièces Aperçu de l’appareil Instructions d’installation Utilisation de Consignes d’utilisation l’appareil Nettoyage et entretien Nettoyage et Guide de dépannage entretien Les notices sont aussi disponibles sur le site http://www.electrodepot.fr/sav/notices/ http://www.electrodepot.be/fr/sav/notices...
- Page 24 Aperçu de l’appareil Pièces Panneau de réglage de la température Lampe LED Clayette Couvercle du bac à légumes Balconnet de porte Pour une utilisation de l’énergie la plus efficace possible, gardez tous les éléments internes, tels que les bacs, les tiroirs, les clayettes et le bac à glaçons, dans la même position qu’à la sortie de l’usine.
- Page 25 Utilisation de l’appareil Instructions d'installation Avant la première utilisation • Retirez l’emballage extérieur et intérieur, puis essuyez soigneusement l’extérieur à l’aide d’un chiffon doux sec et l’intérieur avec un chiffon humidifié avec de l’eau tiède. • Évitez de placer l’appareil dans une niche étroite, à proximité d’une source de chaleur, à la lumière directe du soleil ou dans un endroit humide.
- Page 26 Utilisation de l’appareil En cas de doute concernant l’installation, veuillez contacter votre revendeur, notre service clientèle ou le centre de réparation agréé le plus proche. ATTENTION Les performances de refroidissement et la consommation d’énergie du réfrigérateur peuvent être affectées par la température ambiante, la fréquence d’ouverture de la porte et l’emplacement du réfrigérateur.
- Page 27 Utilisation de l’appareil Changez la position de la charnière inférieure et de la charnière supérieure pour les placer du côté opposé, puis installez-les en suivant les étapes ci-dessous, avant d’installer les caches du haut. 180° Retirez les blocs fixes de la porte du réfrigérateur et faites-les pivoter de 180° avant de les installer de l’autre côté...
- Page 28 Utilisation de l’appareil Installation dans un meuble Taille requise pour le meuble. (La plinthe et la paroi arrière du meuble doivent disposer d’une voie de dissipation de la chaleur.) Aération du meuble ≥200 cm A - Épaisseur des parois du meuble Insérez le réfrigérateur dans le meuble et ajustez sa position pour vous assurer que le rebord de son panneau supérieur touche complètement la paroi supérieure interne du meuble et que le crochet d’espacement du pied de soutien touche la paroi inférieure du meuble.
- Page 29 Utilisation de l’appareil Fixez le panneau supérieur du réfrigérateur à la paroi supérieure interne du meuble à l’aide des vis, puis installez les cache-vis. Fixez le pied de soutien à l’aide des vis, puis installez les cache-vis. Cache-vis Ouvrez la porte du meuble en plein, puis ouvrez la porte du réfrigérateur pour la mettre dans la position correspondante.
- Page 30 Utilisation de l’appareil Retirez le joint d’étanchéité du sac d’accessoires et insérez-le dans l’espace entre le meuble et le réfrigérateur en appuyant dessus. L’installation est alors terminée. joint d’étanchéité ATTENTION Précautions à prendre avant l’installation : Les informations de cette notice d’utilisation ne sont fournies qu’à...
- Page 31 Utilisation de l’appareil • Il convient de retirer la source lumineuse à la fin de la vie utile du produit, le tri et le recyclage étant effectués séparément. Après avoir branché le cordon d’alimentation (ou la fiche) à la prise de courant, patientez 2 à...
- Page 32 Utilisation de l’appareil • Pour une utilisation optimale de l’énergie, ne réglez pas la température sur un niveau plus froid que nécessaire. Les joints de porte de l’appareil doivent être complètement intacts pour que les portes se ferment correctement et que la consommation d’énergie n’augmente pas de façon inutile.
- Page 33 Utilisation de l’appareil Indicateur LED « 2 » et indicateur LED Erreur de carte de communication « 4 » allumés Indicateur LED « 1 » et indicateur LED Capteur de température ambiante « 4 » allumés Verrouillage et déverrouillage • Fonction de verrouillage ou de déverrouillage. • La fonction de verrouillage s’active au bout de 15 secondes sans opération effectuée. ATTENTION Le panneau de commande réel peut varier selon le modèle.
- Page 34 Utilisation de l’appareil • Ne placez jamais d’aliments chauds dans le compartiment de réfrigération. Ces aliments doivent d’abord refroidir jusqu’à la température ambiante avant d’être placés dans le réfrigérateur de manière à garantir une circulation d’air adéquate dans le compartiment de réfrigération.
- Page 35 Utilisation de l’appareil Contrôle de la température dans la zone la plus froide • Grâce à l’indicateur de température, vous pouvez régulièrement vérifier que la température de la zone la plus froide est correcte. En effet, la température interne du réfrigérateur dépend de plusieurs facteurs, tels que la température ambiante de la pièce, la quantité...
- Page 36 Nettoyage et entretien Nettoyage et entretien ATTENTION ! Ne rincez pas directement l’appareil avec de l’eau ou d’autres liquides pendant le nettoyage, pour éviter un court-circuit ou nuire à l’isolation électrique en cas d’immersion. ATTENTION L’appareil doit fonctionner en continu une fois qu’il a démarré.
- Page 37 Nettoyage et entretien • L’intérieur du produit doit être nettoyé régulièrement pour éviter les odeurs. • Utilisez un chiffon doux ou une éponge avec une solution composée de deux cuillères à soupe de bicarbonate de soude et d’un litre d’eau chaude pour nettoyer l’intérieur du produit. Rincez ensuite à...
- Page 38 Nettoyage et entretien Nettoyage des clayettes • Comme les parois internes du réfrigérateur supportant les clayettes disposent d’un butoir, vous pouvez soulever les clayettes puis les retirer en les tirant vers vous. • Changez l’emplacement des clayettes et nettoyez-les quand cela s’avère nécessaire.
- Page 39 Nettoyage et entretien ATTENTION Différences : En raison de changements techniques et de modèles différents, certaines des illustrations de ce mode d’emploi peuvent différer de votre modèle. Guide de dépannage Les problèmes simples qui suivent peuvent être résolus par l’utilisateur. Veuillez contacter le service après-vente si un problème ne peut être résolu.
- Page 40 Nettoyage et entretien Problème Causes possibles Solution Le réfrigérateur/ • La température • Réglez la température sur un niveau congélateur n’est pas plus élevé. refroidit trop. correctement réglée. Le compresseur • Une température • Cela est normal. fonctionne sur une ambiante élevée •...
- Page 41 Nettoyage et entretien Problème Causes possibles Solution Les barres • Ces barres • Cela est normal. transversales ou contiennent des verticales sont tubes en métal et la chaudes. chaleur libérée par ces tubes empêche la condensation. Il y a des odeurs. •...
- Page 42 Nettoyage et entretien • Il y a des bruits de bouteilles qui s’entrechoquent - éloignez les bouteilles les unes des autres. Les bruits qui se font entendre pendant une utilisation normale sont principalement dus au compresseur en fonctionnement (mise en marche) et au système de refroidissement (en raison de l’expansion et de la contraction thermiques du radiateur entraînées par la circulation de l’agent de refroidissement).
- Page 43 Proficiat met uw keuze voor een product van VALBERG. De selectie en de testen van de toestellen van VALBERG g e b e u re n v o l le d i g o n d e r c o n t ro le e n s u p e r v i s i e v a n E L E C T R O D E P O T.
- Page 44 Inhoudstafel Onderdelen Overzicht van het toestel Installatie-instructies Gebruik van het Gebruiksinstructies toestel Reiniging en onderhoud Reiniging en Probleemoplossing onderhoud...
- Page 45 Overzicht van het toestel Onderdelen Temperatuurbedieningspaneel Ledverlichting Legplank Deksel voor fruit- en groentelade Lade Deurvak Voor een zo efficiënt mogelijk energieverbruik moet u alle interne onderdelen zoals bakjes, laden, planken en ijsblokjesdoos op de door de fabrikant geleverde positie houden. OPGELET Verschillen: Door technische wijzigingen en verschillende modellen kunnen sommige illustraties in deze handleiding afwijken van uw model.
- Page 46 Gebruik van het toestel Installatie-instructies Voor ingebruikname • Verwijder de buiten- en binnenverpakking, veeg de buitenkant grondig af met een zachte, droge doek en de binnenkant met een natte, lauwe doek. • Plaats de kast niet in een kleine uitsparing of in de buurt van een warmtebron, direct zonlicht of vocht.
- Page 47 Gebruik van het toestel OPGELET De koelprestaties en het energieverbruik van de koelkast kunnen worden beïnvloed door de omgevingstemperatuur, de frequentie waarmee de deur wordt geopend en de locatie van de koelkast. Wij raden aan de temperatuurinstellingen aan te passen wanneer nodig. Deur van rechts naar links verwisselen Lijst met gereedschap door de gebruiker te voorzien Kruiskopschroevendraaier...
- Page 48 Gebruik van het toestel Verwissel het onderste scharnier en het bovenste scharnier, monteer ze dan volgens onderstaande stappen en monteer de bovenste afdekkapjes. 180° Verwijder de vaste blokken van de koelkastdeur en draai ze 180° en installeer ze aan de andere kant van de koelkastdeur.
- Page 49 Gebruik van het toestel Installatie in kast Benodigde ruimte voor kast. (De plint en achterkant van de kast moeten worden voorzien van een doorgaand warmteafvoerkanaal) Ventilatieopening kast ≥ 200 cm A - Dikte van kastplank Duw de koelkast in de kast en stel hem zo af dat de rand van het bovenste tussenschot de bovenrand van de kast volledig raakt en de limiethaak van de steunpoot de onderrand van de kast volledig raakt.
- Page 50 Gebruik van het toestel Bevestig het bovenste tussenschot aan de binnenkant van de kast met schroeven en monteer vervolgens de schroefdoppen. Bevestig de steunpoot met schroeven en monteer vervolgens de schroefdoppen. Schroefdop Schroef Open de deur van de kast tot de maximale hoek en open de deur van de koelkast tot de overeenkomstige positie.
- Page 51 Gebruik van het toestel Haal de afdichtstrip uit het accessoirezakje en druk deze in de opening tussen de kast en de koelkast. De installatie is voltooid. afdichtstrip OPGELET Voorzorgsmaatregelen vóór installatie: De informatie in de handleiding is alleen bedoeld als referentie. Het fysieke product kan afwijken. Alvorens met de installatie van start te gaan en de accessoires af te stellen, dient u ervoor te zorgen dat de stekker van de koelkast niet in het stopcontact zit.
- Page 52 Gebruik van het toestel Nadat u het netsnoer (of de stekker) in het stopcontact hebt gestoken, wacht u 2 à 3 uur voordat u het apparaat met voedsel vult. Als u voedsel toevoegt voordat het apparaat volledig is afgekoeld, kan uw voedsel bederven. Het apparaat verplaatsen Haal alle onderdelen uit het apparaat.
- Page 53 Gebruik van het toestel Gebruiksinstructies Gebruik en functies Functiepaneel Knop Stand-by-knop Temperatuur instelknop Scherm Instelling 1: de ingestelde Instelling 3: de ingestelde temperatuur is 8 °C temperatuur is 2 °C Instelling 2: de ingestelde Instelling 4: Snel koelen (Super temperatuur is 4 °C Cool) Scherm •...
- Page 54 Gebruik van het toestel Vergrendelen en ontgrendelen • Geen vergrendelings- of ontgrendelingsfunctie • De instelling wordt na 15 seconden van inactiviteit geactiveerd. OPGELET Het werkelijk bedieningspaneel kan per model verschillen. De instelling wijzigen Telkens u op de knop drukt, gaat de instelling één waarde omhoog. De koelkast werkt na 15 seconden volgens de nieuwe instelling.
- Page 55 Gebruik van het toestel • Groente en fruit zonder verpakking kunnen in de zone worden bewaard dat specifiek bestemd is voor verse groente en fruit. Koudste zone in de koelkast OPTIONEEL: OK-temperatuurcontrolelampje • Het OK-temperatuurcontrolelampje kan worden gebruikt om temperaturen onder +4 °C te bepalen.
- Page 56 Reiniging en onderhoud Reiniging en onderhoud VOORZICHTIG! Spoel niet direct met water of een andere vloeistof tijdens het reinigen om kortsluiting te voorkomen of de elektrische isolatie na onderdompeling niet aan te tasten. OPGELET Het apparaat moet continu in werking zijn wanneer ingeschakeld.
- Page 57 Reiniging en onderhoud • Maak de binnenkant van het product regelmatig schoon om geurvorming te vermijden. • Gebruik een zachte doek of spons om de binnenkant van het product schoon te maken, met twee eetlepels zuiveringszout en één liter warm water. Spoel vervolgens met water en veeg schoon.
- Page 58 Reiniging en onderhoud De glazen legplanken reinigen • Aangezien het achterste gedeelte van de koelkast, waar de legplanken contact met de achterwand maken, van een stop is voorzien, breng de legplanken omhoog voordat u ze verwijdert. • Pas de legplanken aan of reinig ze zoals u het wilt. De groentelade schoonmaken •...
- Page 59 Reiniging en onderhoud Probleemoplossing De volgende problemen kunnen eenvoudig door de gebruiker opgelost worden. Neem telefonisch contact op met de klantenservice als het probleem niet opgelost raakt. Probleem Mogelijke oorzaken Oplossing Werkt niet • De voeding is niet • Steek de stekker van het netsnoer ingeschakeld en de stevig in het stopcontact.
- Page 60 Reiniging en onderhoud Probleem Mogelijke oorzaken Oplossing Deur sluit niet • Deur zit vast met • Steek er niet te veel voedsel in. goed voorwerpen. • Plaats het apparaat stabiel. • Er zit te veel voedsel in. • Verwarm de deurpakking en koel •...
- Page 61 Reiniging en onderhoud Geluiden, die gemakkelijk kunnen worden voorkomen: • Geluid veroorzaakt door het apparaat dat niet waterpas staat; pas de positie aan met de verstelbare indraaivoeten aan de voorkant. Plaats eventueel kussentjes van zacht materiaal onder de achterste rollers, vooral als het apparaat op tegels staat. •...
- Page 62 ¡Muchas gracias! M u c h a s g r a c i a s p o r h a b e r e le g i d o n u e s t ro p ro d u c t o VA L B E R G .
- Page 63 Índice Partes Descripción del aparato Instrucciones de instalación Utilización del Instrucciones de uso aparato Limpieza y mantenimiento Limpieza y Solución de problemas mantenimiento...
- Page 64 Descripción del aparato Partes Panel de control de la temperatura Luz LED Estante Tapa del cajón para frutas y verduras Cajón Bandeja de la puerta Para el uso más eficiente de la energía, mantenga todos los elementos interiores, como las bandejas, los cajones, los estantes y la cubitera, en la posición proporcionada por el fabricante.
- Page 65 Utilización del aparato Instrucciones de instalación Antes del primer uso • Retire el embalaje exterior e interior, limpie bien el exterior con un paño suave y seco, y el interior con un paño humedecido con agua tibia. • Evite colocar el armario en un hueco estrecho o cerca de una fuente de calor, la luz solar directa o la humedad.
- Page 66 Utilización del aparato Si tiene alguna duda sobre la instalación, consulte al proveedor, a nuestro servicio de atención al cliente o al centro de servicio técnico autorizado más cercano. ATENCIÓN La potencia frigorífica y el consumo de energía del frigorífico pueden verse afectados por la temperatura ambiente, la frecuencia con la que se abra la puerta y la ubicación del frigorífico.
- Page 67 Utilización del aparato Cambie la bisagra inferior y la bisagra superior, luego instálelas siguiendo los pasos que se describen a continuación e instale las tapas de los orificios superiores. 180° Retire los bloques fijos de la puerta del frigorífico y gírelos 180° e instálelos al otro lado de la puerta del frigorífico.
- Page 68 Utilización del aparato Instalación en un armario Requisitos de dimensiones del armario. (El zócalo y la parte trasera del armario deberán tener un canal de disipación del calor a través de ellos.) Ventilación del armario ≥200 cm A - Grosor de la tabla del armario Empuje el frigorífico dentro del armario y ajústelo para asegurarse de que el borde del deflector superior toque completamente el borde superior del armario, y el gancho límite de la pata de soporte toque completamente el borde inferior del armario.
- Page 69 Utilización del aparato Fije el deflector superior a la parte superior del interior del armario con tornillos y, después, coloque las tapas de los tornillos. Fije la pata de soporte con tornillos y, después, coloque las tapas de los tornillos. Tapa de los tornillo Tornillo Abra la puerta del armario hasta el ángulo máximo y abra la puerta del frigorífico hasta...
- Page 70 Utilización del aparato Saque la tira de sellado de la bolsa de accesorios y presiónela en el espacio entre el armario y el frigorífico. Ya ha completado la instalación. tira de sellado ATENCIÓN Precauciones antes de la instalación: La información incluida en el Manual de instrucciones se proporciona solamente como referencia.
- Page 71 Utilización del aparato Después de conectar el cable (o el enchufe) de alimentación a la toma de corriente, espere 2 ó 3 horas antes de introducir alimentos en el aparato. Si introduce alimentos antes de que el aparato se haya enfriado completamente, estos podrían estropearse.
- Page 72 Utilización del aparato Instrucciones de uso Uso y funciones Panel de funciones Botón Botón de modo de espera Botón de ajuste de la temperatura Pantalla de visualización Ajuste 1: la temperatura ajustada Ajuste 3: la temperatura ajustada es 8 °C es 2 °C Ajuste 2: la temperatura ajustada Ajuste 4: Superfrío...
- Page 73 Utilización del aparato Bloqueo y desbloqueo • Sin función de bloqueo o desbloqueo. • El ajuste surte efecto 15 segundos después de que no se realice ninguna operación. ATENCIÓN El panel de control real puede variar de un modelo a otro. Ajuste de funcionamiento Cada vez que pulse el botón, el ajuste cambiará...
- Page 74 Utilización del aparato • Las frutas y verduras sin envasar pueden colocarse en la parte destinada a las frutas y verduras frescas. Zona más fría del frigorífico. OPCIONAL: Indicador de temperatura OK • El indicador de temperatura OK se puede utilizar para determinar temperaturas por debajo de +4 °C.
- Page 75 Limpieza y mantenimiento Limpieza y mantenimiento ¡PRECAUCIÓN! No aclare directamente con agua u otros líquidos durante la limpieza para evitar cortocircuitos o afectar al aislamiento eléctrico tras la inmersión. ATENCIÓN El aparato deberá funcionar de forma continua una vez se haya puesto en marcha. Por lo general, no se deberá...
- Page 76 Limpieza y mantenimiento • El interior del producto deberá limpiarse con regularidad para evitar olores. • Utilice un paño suave o una esponja para limpiar el interior del producto, con dos cucharadas de bicarbonato y un litro de agua tibia. A continuación, aclárelo con agua y límpielo con un paño.
- Page 77 Limpieza y mantenimiento Limpieza de los estantes de cristal • Como la parte más interna del revestimiento del frigorífico, donde entran en contacto los estantes, tiene un tope trasero, deberá levantar los estantes hacia arriba para poder sacarlos. • Ajuste o limpie los estantes según sus necesidades. Limpieza del cajón para verduras •...
- Page 78 Limpieza y mantenimiento Solución de problemas El usuario puede ocuparse de los siguientes sencillos problemas. Si los problemas no se solucionan, llame al servicio de posventa. Problema Posibles causas Solución No funciona • No se ha encendido • Inserte el enchufe del cable de la alimentación alimentación firmemente.
- Page 79 Limpieza y mantenimiento Problema Posibles causas Solución El compresor • La alta temperatura • Esto es normal. funciona durante ambiente está • No introduzca demasiados alimentos mucho tiempo provocando que a la vez. funcione durante • Espere a que la comida se haya mucho tiempo.
- Page 80 Limpieza y mantenimiento Problema Posibles causas Solución Las barras • Hay tubos metálicos • Esto es normal. transversales o dentro de las verticales están barras, y el calor calientes liberado de los tubos evita la condensación. Olores • Comida estropeada •...
- Page 81 Limpieza y mantenimiento Los sonidos que se escuchan durante el uso normal se deben principalmente al funcionamiento del compresor (encendido) y del sistema de refrigeración (expansión y contracción térmicas del radiador causadas por el flujo del agente refrigerante).
- Page 82 WARRANTY CONDITIONS This product is guaranteed against faults caused by defects in manufacturing or the materials used for a period of two years, starting from the date of purchase.* This warranty does not cover defects or damage caused by failure to install the device correctly, incorrect use of the product, or excessive wear and tear.
Need help?
Do you have a question about the BI 1D NF 304 D W625C and is the answer not in the manual?
Questions and answers