Table of Contents
Advertisement
Available languages
Available languages
Quick Links
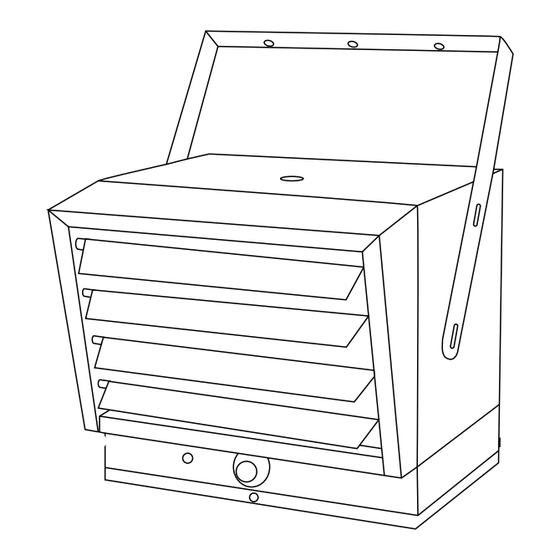
H-6517, H-6518
ELECTRIC UNIT HEATERS
TOOLS NEEDED
Phillips
Needle Nose Pliers
Screwdriver
Adjustable Wrench
HARDWARE NEEDED
• Enough 10 gauge (or thicker) insulated copper
conductor wire (with ground) to run power from the
breaker/fuse to the heater
NOTE: Only use copper wire rated at least 167°F.
Do not use aluminum wire.
• Proper size fuses and circuit breakers in accordance
with the National Electrical Code. See Heat Output
Adjustments, page 5.
• 3/8 x 2" Wood Screw Lag Bolt x 2
• 3/8" Washer x 2
• Wire connectors sized to application
HEATER RATING
AND VOLTAGE
* 5000 W @ 240 V
4165 W @ 240 V
3332 W @ 240 V
2500 W @ 240 V
H-6517
* 3750 W @ 208 V
3123 W @ 208 V
2500 W @ 208 V
1874 W @ 208 V
* 7500 W @ 240 V
6250 W @ 240 V
5000 W @ 240 V
3750 W @ 240 V
H-6518
* 5625 W @ 208 V
4685 W @ 208 V
3750 W @ 208 V
2812 W @ 208 V
* Heater is shipped from factory wired for these wattages. Heater can be field adjusted to the other wattages.
(See Heat Output Adjustments, page 5)
**48" when heater air flow is between 45° downward and vertical.
PAGE 1 OF 21
1-800-295-5510
uline.com
Pliers
SPECIFICATIONS
BTU PER
CONTACTOR
PHASE
HR.
BUILT-IN
17,065
14,215
1
No
11,365
8,533
12,799
10,659
1
No
8,533
6,396
25,598
21,331
1
Yes
17,065
12,799
19,198
15,990
1
Yes
12,799
9,598
Electric Drill
and 1/4" Bit
NOTE: Conduit may be required. (See Figure 1)
Check local electrical codes. If wiring is run in
conduit, ensure there is enough flexible conduit
to allow heater to be turned, if necessary.
Conduit
Conduit
Connector
Flexible
Flexible
Conduit
Conduit
Connector
1
2
MOUNTING HEIGHT
VERTICAL
HORIZONTAL
INSTALLATION
INSTALLATION
MIN.
MAX.
MIN.
MAX.
6'
11'
6'
6'
11'
6'
6'
11'
6'
6'
11'
6'
Para Español, vea páginas 8-14.
Pour le français, consulter les pages 15-21.
Flexible
Flexible NM
NM Cable
Cable Connector
3
4
MIN. DISTANCE
FROM HORIZONTAL
AIR THROW
8'
18'
8'
18'
8'
18'
8'
18'
Figure 1
MOUNTING
HOLE
TO WALL
**13"
**13"
**13"
**13"
0624 IH-6517
Advertisement
Table of Contents

Related Manuals for U-Line H-6517


Summary of Contents for U-Line H-6517
- Page 1 Para Español, vea páginas 8-14. Pour le français, consulter les pages 15-21. H-6517, H-6518 1-800-295-5510 uline.com ELECTRIC UNIT HEATERS TOOLS NEEDED Phillips Needle Nose Pliers Pliers Electric Drill Screwdriver and 1/4" Bit Adjustable Wrench HARDWARE NEEDED • Enough 10 gauge (or thicker) insulated copper NOTE: Conduit may be required.
- Page 2 WARNING When using electric appliances, basic precautions • A heater has hot and arcing or sparking parts inside. should always be followed to reduce the risk of fire, Do not use it in areas where gasoline, paint or electric shock and injury to persons, including the flammable liquids are used or stored.
- Page 3 SAFETY WARNING! To prevent a possible fire, injury to • To reduce the risk of fire, do not store or use persons or damage to the heater, adhere to gasoline or other flammable vapors and liquids in the following safety precautions: the vicinity of the heater.
-
Page 4: Installation
INSTALLATION PREPARATION MOUNTING Remove the heater from the box and inspect it for Remove the mounting bracket from the heating unit any damage. If it appears to be damaged, call by loosening the bracket screws with a wrench and Uline Customer Service at 1-800-295-5510. slipping the handle off over the screw heads. - Page 5 WATTAGE CHANGE TERMINAL BOARD Heat output can be increased or decreased by switching wires at the wattage change terminal board. The H-6517 is factory wired to deliver a heat output of 17,065 BTU per THERMOSTAT hour. The H-6518 is factory wired to deliver a heat output of 25,598 BTU per hour.
-
Page 6: Operation
OPERATION Heater must be properly installed before operation. WARNING! Do not tamper with or bypass any safety limits inside heater. 2. After heater is completely assembled, rotate thermostat knob counterclockwise until control stops. CAUTION! Do not continue to attempt to use the This is the minimum heat setting. -
Page 7: Cleaning The Heater
OPERATION CONTINUED CLEANING THE HEATER 1. After the heater has cooled, a vacuum cleaner with brush attachment may be used to remove dust and It is important to keep the heater clean. The heater will lint from exterior surfaces of the heater including the give years of service and comfort with only minimum grille openings. -
Page 8: Herramientas Necesarias
H-6517, H-6518 800-295-5510 uline.mx CALENTADORES ELÉCTRICOS HERRAMIENTAS NECESARIAS Desarmador Pinzas de Punta Pinzas Taladro Eléctrico de Cruz y Broca de 1/4" Llave Ajustable TORNILLERÍA NECESARIA • Suficiente alambre conductor aislado de cobre de NOTA: Se puede requerir de un conductor. - Page 9 ADVERTENCIA Cuando utilice aparatos eléctricos, deberá tomar • Un calentador contiene partes calientes y chispas o las precauciones básicas para reducir el riesgo de arcos de electricidad. No lo utilice en áreas donde incendio, choque eléctrico y lesiones a personas, se usa o almacena gasolina, pintura o líquidos incluyendo las siguientes: inflamables.
- Page 10 SEGURIDAD ¡ADVERTENCIA! Para prevenir un posible • Para minimizar el riesgo de incendio, no almacene incendio, lesión a personas o daño o utilice gasolina u otros vapores inflamables y al calentador, respete las siguientes líquidos en los alrededores del calentador. precauciones de seguridad: •...
-
Page 11: Instalación
INSTALACIÓN PREPARACIÓN INSTALACIÓN Saque el calentador de la caja y revíselo para Quite el soporte de instalación de la unidad aflojando detectar cualquier daño. Si aparece con daño, llame los tornillos del soporte con una llave y deslizando el a Servicio a Clientes de Uline al 800-295-5510. mango sobre las cabezas de los tornillos. - Page 12 La salida del calor se puede incrementar o disminuir cambiando los cables en el tablero terminal de cambio TERMOSTATO de potencia. El H-6517 está preparado de fábrica para llevar una salida de calor de 17,065 BTU por hora. El TIERRA LUZ DE ALARMA H-6518 está...
- Page 13 FUNCIONAMIENTO El calentador debe ser instalado apropiadamente sobrecalienta y se activa el límite térmico, se debe antes de su operación. determinar la causa del sobrecalentamiento antes de cualquier operación posterior. 2. Después de que el calentador esté completamente ensamblado, rote la perilla del termostato en contra ¡ADVERTENCIA! No altere o evite ninguno de los de las manecillas del reloj hasta el el control se límites de seguridad dentro del calentador.
- Page 14 CONTINUACIÓN DE FUNCIONAMIENTO LIMPIEZA DEL CALENTADOR Después de que el calentador se ha enfriado, puede utilizar una aspiradora con accesorio de Es importante mantener el calentador limpio. El cepillo para remover el polvo y pelusa de las calentador proporcionará años de servicio y superficies exteriores del calentador incluyendo las comodidad con solo un mínimo de cuidado.
-
Page 15: Outils Requis
H-6517, H-6518 1 800 295-5510 uline.ca RADIATEURS ÉLECTRIQUES OUTILS REQUIS Tournevis Pince à becs pointus Pince Perceuse électrique avec une mèche de 1/4 po cruciforme Clé ajustable MATÉRIEL REQUIS • Une longueur suffisante de fil de cuivre conducteur REMARQUE : Un conduit peut s'avérer nécessaire. - Page 16 AVERTISSEMENT Afin de réduire les risques d'incendie et de chocs • Le radiateur contient des éléments extrêmement électriques ainsi que les blessures personnelles lors chauds susceptibles de produire des étincelles de l'utilisation d'appareils électriques, il est impératif ou des arcs électriques. Ne pas opérer dans des de toujours suivre certaines précautions de base, zones d'utilisation et d'entreposage d'essence et de notamment :...
- Page 17 SÉCURITÉ AVERTISSEMENT! Afin d'éviter tout risque • Pour réduire le risque d'incendie, ne pas utiliser ou ARRÊT d'incendie, de blessure ou de dommage au entreposer d'essence ou d'autres liquides ou radiateur, respectez scrupuleusement les vapeurs inflammables à proximité du radiateur. précautions de sécurité...
-
Page 18: Montage
INSTALLATION PRÉPARATION MONTAGE Déballez le radiateur de la boîte d'emballage Retirez le support de montage du radiateur en et vérifiez avec soin la présence de dommages desserrant les vis avec une clé et en faisant glisser éventuels. Le cas échéant, contactez le service à la poignée sur les têtes de vis. - Page 19 PUISSANCE calorifique en inversant les câbles au bornier de CÂBLAGE changement de puissance. Le H-6517 est réglé en usine D'EXCITATION pour produire une puissance calorifique de 17 065 BTU par heure. Le H-6518 est réglé en usine pour produire une puissance calorifique de 25 598 BTU par heure.
- Page 20 FONCTIONNEMENT Le radiateur doit être correctement installé avant AVERTISSEMENT! Ne pas altérer ou ignorer les ARRÊT toute utilisation. limites de sécurité à l'intérieur du radiateur. 2. Après avoir effectué le montage, tournez le bouton MISE EN GARDE! Ne pas poursuivre l'utilisation de thermostat dans le sens antihoraire jusqu'à...
-
Page 21: Nettoyage Du Radiateur
FONCTIONNEMENT SUITE NETTOYAGE DU RADIATEUR 1. Après le refroidissement du radiateur, utilisez un aspirateur avec une brosse pour ôter la poussière Il est important de garder le radiateur propre. Cet et les peluches sur les surfaces extérieures de appareil ne nécessite qu'un entretien minimum pour des l'appareil, y compris les ouvertures de la grille.
Need help?
Do you have a question about the H-6517 and is the answer not in the manual?
Questions and answers
Won't shut off when it reaches temp
If the U-Line H-6517 heater does not shut off when it reaches temperature, possible reasons include:
1. Incorrect Wiring – The heater should not operate immediately when power is turned on. If it does, wiring should be checked for errors.
2. Faulty Thermostat – The thermostat should be rotated counterclockwise to the stop position for the minimum heat setting. If the heater continues running, the thermostat may be malfunctioning.
3. Temperature Below 50°F – If the room temperature is below 50°F, the fan may cycle on and off until the room warms up.
4. Bypassed or Damaged Safety Limits – The manual warns against tampering with safety limits inside the heater. If these have been bypassed or are faulty, the heater may not shut off properly.
Checking wiring, thermostat function, and ensuring safety limits are intact can help diagnose and resolve the issue.
This answer is automatically generated