Table of Contents
Advertisement
Advertisement
Table of Contents

Related Manuals for AVer AVerVision M17-13M


Summary of Contents for AVer AVerVision M17-13M
- Page 1 AVerVision M17-13M User Manual...
- Page 2 In no event will AVer be liable for direct, indirect, special, incidental, or consequential damages arising out of the use or inability to use this product or documentation, even if advised of the possibility of such damages.
- Page 3 All rights of this object belong to AVer Information Inc. Reproduced or transmitted in any form or by any means without the prior written permission of AVer Information Inc. is prohibited. All information or specifications are subject to change without prior notice.
- Page 4 Do not mix and use different types of batteries: alkaline, standard (carbon - zinc) or rechargeable (nickel-cadmium). Do not dispose batteries in a fire. Do not attempt to short-circuit the battery terminals. Contact Information Global AVer Information Inc. AVer Information Inc. www.averusa.com www.aver.com 668 Mission Ct 8F, No.157, Da-An Rd., Tucheng Dist.,...
-
Page 5: Table Of Contents
Table of Contents Package Contents ....................1 Optional Accessories ..................1 Get Familiar with the AVerVision M17-13M ............. 2 Right Panel ......................3 Left Panel ........................ 3 Rear Panel ......................4 Control Panel ......................5 Remote Controller ....................7 Making the Connections ................. 10 Connecting the Power ................... - Page 6 Image ........................23 Brightness ......................23 Contrast ......................23 Mode ......................... 24 Effect......................... 24 Mirror ........................ 24 Advanced ......................24 Auto Image ....................... 24 Exposure ......................25 White Balance ....................25 Focus ........................ 25 Presentation ......................26 Rotation ......................26 Spotlight ......................
- Page 7 Backup ......................31 Save Setting ..................... 31 Recall Setting ....................31 Information ......................31 Default ......................31 Playback ........................ 32 Slide Show ......................32 Interval ......................32 Effect......................... 32 Storage ......................32 Delete All ......................32 Annotation ......................33 Connecting a USB mouse ..................34 Using the Annotation .....................
-
Page 8: Package Contents
Make sure the following items are included in the package. RGB Cable USB Cable Power Adapter (12V, 2A) * The power adapter will vary depending on the standard power outlet of the country AVerVision M17-13M Remote Control where it is sold. (batteries included) Optional Accessories Microscope Adapter Software CD... -
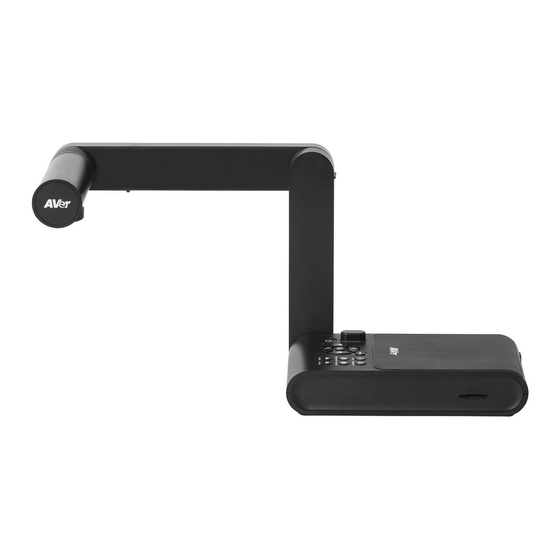
Page 9: Get Familiar With The Avervision M17-13M
Get Familiar with the AVerVision M17-13M (fig. 1.1) Name Function Camera head Contain the camera sensor. Camera lens Focus the image in the camera. LED light Provide light to enhance the lighting condition. Mechanical arm Provide adjustable viewing coverage. Connections for computer, RGB external display device, and USB to... -
Page 10: Right Panel
Connect to a USB port of a computer with a USB cable and use USB mini port AVerVision M17-13M as a USB camera or transfer the captured images/videos from the memory source to the computer. Connect to an amplified speaker to playback recorded audio & video Audio Out port clip. -
Page 11: Rear Panel
Rear Panel Name Function Connect an external HDMI source as an input via this port. Connect (1) HDMI IN port this port to the RGB/HDMI output port of a computer. Output the video signal from the main system on an interactive flat (2) HDMI OUT port panel, an LCD monitor or LCD/DLP projector with HDMI interface using HDMI cable. -
Page 12: Control Panel
C ontr ol Panel (10) (11) (12) (13) (14) (16) (15) Name Function (1) POWER Turn the unit on/standby mode. Adjust the brightness. - Make a selection in Playback mode and OSD menu. - Start/Pause video playback. - Adjust the focus automatically. Increase the image magnification in the camera and picture playback mode. - Page 13 Name Function (12) FREEZE/STOP - Pause or resume image display in Camera mode. - Stop audio & video playback in Playback mode. - Press it to switch to annotation mode (The image is still.). To exit annotation mode, press Freeze/Stop button again. - Press it for 3 seconds to switch to annotation mode (The image is live).
-
Page 14: Remote Controller
Remot e Cont r ol l er The remote control requires two (2) “AAA” size batteries (provided), make sure batteries are installed properly before use. You can access all the features of AVerVision M17-13M with the remote. Name Function POWER Turn the unit on/standby. - Page 15 Name Function ▲,▼,◄, & ► - Pan and zoom-in image (above digital zoom level) in both live and playback (12 ) mode. (13 ) (14 ) - Select options in OSD menu. (15 ) - Use ▲&▼ to increase and decrease (16 ) the video playback volume.
- Page 16 Name Function Divide the screen into two. One side (16) SPLIT displays the live image from the built-in (12 ) SCREEN camera and the other side displays 8- (13 ) thumbnail size picture/video from the (14 ) memory. (15 ) (16 ) Select from 3 type of modes: (17) MODE...
-
Page 17: Making The Connections
Before making the connection, make sure the power of all devices are turned off. If you are not sure on where to connect, simply follow the illustrated connections below and also refer to the user manual of the device you are connecting the AVerVision M17-13M with. Connecting the Power Connect the power adapter to a standard 100V~240V AC power outlet. -
Page 18: Connect To A Monitor Or Lcd/Dlp Projector With Hdmi Output
Connect to a Computer Locate the RGB (VGA) output port of the computer or laptop and connect it to RGB IN port of AVerVision M17-13M. The video signal from the RGB IN port is streamed to RGB OUT. [Note] - To display computer image, press Camera/PC button on the control panel or remote control to switch AVerVision M17-13M to computer mode. -
Page 19: Connect To A Computer Via Usb
[Note] - To display computer image, press Camera/PC button on the control panel or remote control to switch AVerVision M17-13M to computer mode. - For laptop to output display image, use the keyboard command (FN+F5) to switch between the display modes. For different command, please refer to your laptop manual. -
Page 20: Connect To An Interactive Flat Panel Via Usb
Connect to an Interactive Flat Panel via USB There are 2 ways to connect with interactive flat panel: Connect an Amplified Speaker Plug a 3.5mm plug amplified speaker to Audio Out ( port. Only the audio from the video playback is supported. [Note] We recommend connecting an amplified speaker to the Audio output port. - Page 21 Connect to a Mouse Connect a USB mouse to the USB of M17-13M. Using mouse can operate the annotation function.
-
Page 22: Connect To A Microscope
Connect to a Microscope Connect the AVerVision M17-13M to a microscope enables you to examine microscopic objects on a big screen. Change the image display mode to Microscope. Press MENU > select IMAGE tab > select MODE > select (microscope) and press Aim the camera head at the farthest point and press AUTO FOCUS. -
Page 23: Setting Up Avervision M17-13M
Setting Up AVerV ision M17-13M This section provides useful tips on how to adjust the AVerVision M17-13M to meet your needs. Storing the Document Camera Please follow the below figure to store the document camera. -
Page 24: Shooting Area
Shooting Ar ea The shooting area can view an area of 450 x 340mm at maximum (at1024x768). When camera position is 346mm high, the shooting area will be A3 size. - Page 25 Also, the camera shooting positon can be face to front and back side as below figure shown. Press ROTATE on the remote control twice to rotate the image in 180°. , and select “On”. To mirror the image, press MENU > select Mirror, press...
-
Page 26: Overhead Light
Overhead Light Press LAMP button on the control panel or remote control to turn on and off light. Infr ar ed Sensor Aim the remote control at the infrared sensor to operate the unit. -
Page 27: Mounting The M17-13M On A Flat Surface
Mounting the M17-13M on a Flat Surface Measure and mark the horizontal of 75 mm from the center line distance between the holes on the flat surface as describe in the illustration below. Use 2 or 4 pieces of M4.0 screws for 6 mm holes and secure the M17-13M on the flat surface. -
Page 28: External Memory Storage
(FAT32). We recommend using SDHC card with class-6 or above for high quality recording. Insert a USB Flash Drive Connect the USB flash drive in the USB slot. AVerVision M17-13M can support USB flash drive from 2GB to 64GB (FAT32). U B est to format the USB flash drive using AVerVision... -
Page 29: Osd Menu
OSD MENU There are 4 tabs on the OSD menu: IMAGE, PRESENTATION, SETTING and SYSTEM. In Playback mode, you can access PLAYBACK OSD menu to enable the Slide Show feature and modify Slide Show interval and transition setting if desire. IMAGE PRESENTATION SETTING... -
Page 30: Navigate The Menu And Submenu
Navigate the Menu and Submenu 1. Press MENU button on the remote or control panel. 2. Press ► and ◄ to toggle between tabs 3. Press ▼ and ▲ to choose a selection in the menu list. 4. Press to make a selection. 5. -
Page 31: Mode
Menu Screen Function Mode Select from the various image display settings. Normal - adjust the gradient of image. High Frame Rate mode - increase frame rate. Sufficient lighting is required when using this mode. Microscope - automatically adjust optical zoom for microscopic viewing. -
Page 32: Exposure
Menu Screen Function Exposure Select the exposure setting. AUTO - automatically adjust the camera exposure and the amount of light required. MANUAL - manually adjust the exposure level. The exposure can be adjusted up to 100. White Balance Select the White Balance setting for various light conditions or color temperature. -
Page 33: Presentation
Pr esentation Menu Screen Function Rotation Rotate the image by 0°/180°. Spotlight Spotlight overlays a frame on the presentation screen. You can move the Spotlight around the presentation screen using the ▲,▼,◄, & ► buttons. Select Execute to call the Spotlight submenu. In the Spotlight submenu, select ON or OFF to enable/disable spotlight function. -
Page 34: Split Screen
Split Screen Divide the screen into two parts. Half of the screen displays the 8-thumbnail images and the other half display the image from the AVerVision M17-13M camera. Select the display location of the 8- thumbnail playback images. Select OFF to cancel Split Screen. -
Page 35: Annotation
USB mouse connection. Also, user can use it with AVer interactive flat panel series via USB port to annotate and more. More detail, please refer to “Annotation” section in this manual. -
Page 36: Type
Format to delete all the data in the selected memory. USB to PC Select the status of the AVerVision M17-13M when it is connected to the computer via USB. Camera - can be used as a computer webcam or with our bundled software to record video and capture still image. -
Page 37: Flicker
Menu Screen Function Flicker Select between 50Hz or 60Hz. Some display devices cannot handle high refresh rates. The image will flicker a couple of times as the output is switched to another refresh rate. Saturation Adjust the value of saturation. MIC Volume Adjust volume input of recording or USB audio input. -
Page 38: Backup
Menu Screen Function Backup Copy the image from the built-in memory to SD card or USB flash drive. Save Setting Save current setting in the selected profile number. Only effect, mode, brightness and contrast settings can be saved. Recall Setting Restore the setting back to the selected profile number. -
Page 39: Playback
Playback Menu Screen Function Slide Show Display all captured still pictures in an automated slide show. The video file will be skipped. Interval Set the interval before displaying the next picture. The length can be set up to 100 sec. Effect Select the slide show transition effect. -
Page 40: Annotation
USB mouse connected to the USB port of AVerVision M17-13M. Also, you can use it with AVer interactive flat panel series via USB port to annotate and more. -
Page 41: Connecting A Usb Mouse
Connecting a USB mouse Connect the USB cable to the USB slot of AVerVision M17-13M. Using the Annotation 1. In camera mode, press (Freeze/Stop) button to call out annotation menu. on the remote. Then, use the ▲,▼,◄, & ► In playback back mode, Press buttons and select the image you want to annotate in the 16-thumbnail preview. - Page 42 Name Function Select to erase any part of the annotation that it comes in Eraser contact with or delete all annotation. Delete Clear all annotation on the screen. Save up to 3 images temporarily for users to review / modify. Users can click on the rolling index to save up to 3 temporary images in the index.
-
Page 43: Transfer Captured Images/Videos To A Computer
Tr ansfer Captured Images/Videos to a computer This enables you to transfer the captured image from the built-in memory or SD to a computer. The instruction below MUST be read and followed BEFORE connecting the USB cable. 1. MUST set the USB to PC as STORAGE before connecting the USB cable. 2. -
Page 44: Technical Specifications
Technical Specification s Image Sensor 1/3.06" VCM Pixel Count 13 megapixels Frame Rate 60 fps (max.) White Balance Auto / Manual Exposure Auto / Manual Image mode Normal / Microscope / High Frame Effect Color / B/W / Negative 1920x1080, 1280x1024, 1280x720, 1024x768, 1280 x 800, RGB output 1366x768 HDMI Output... -
Page 45: External Storage
External Storage Secure Digital 1GB ~ 32GB (FAT32) (SDHC) USB Flash Drive 2GB ~ 64GB (FAT32) -
Page 46: Troubleshooting
1. Check all the cable connections among the display device, AVerVision M17-13M and your PC. 2. Connect your PC to the AVerVision M17-13M first before you power on your computer. 3. For notebook, repeatedly press FN+F5 to toggles between display modes and display the computer image on the presentation screen. -
Page 47: Limited Warranty
You as the original purchaser. Except for the foregoing, the Product is provided “AS IS.” In no event does AVer warrant that You will be able to operate the Product without problems or interruptions, or that the Product is suitable for your purposes. Your exclusive remedy and the entire liability of AVer under this paragraph shall be, at AVer’s option, the repair or replacement... - Page 48 Governing Law and Your Rights This warranty gives you specific legal rights; You may also have other rights granted under state law. These rights vary from state to state. For warranty period, please refer to the warranty card.
Need help?
Do you have a question about the AVerVision M17-13M and is the answer not in the manual?
Questions and answers