
Related Manuals for PicoQuant MultiHarp 150


Summary of Contents for PicoQuant MultiHarp 150
- Page 1 MultiHarp 150 MultiHarp 160 Multichannel Time–Correlated Single Photon Counting Systems and Time Taggers with USB Interface User's Manual and Technical Data Version 3.1.0.0...
- Page 2 PicoQuant GmbH MultiHarp Software V. 3.1.0.0 Disclaimer PicoQuant GmbH disclaims all warranties with regard to the supplied software and documentation including all implied warranties of merchantability and fitness for a particular purpose. In no case shall PicoQuant GmbH be liable for any direct, indirect or consequential damages or any material or immaterial damages whatsoever re- sulting from loss of data, time or profits; arising from use, inability to use, or performance of this software and associated documentation. License and Copyright Notice With the MultiHarp hardware product you have purchased a license to use the MultiHarp software. You have not purchased any other rights to the software itself. The software is protected by copyright and intellectual property laws. You may not distribute the software to third parties or reverse engineer, decompile or disassemble the software or part thereof. You may use and modify demo code to create your own software. Original or modified demo code may be re–distributed, provided that the original disclaimer and copyright notes are not removed from it. Copyright of this manual and on–line documentation belongs to PicoQuant GmbH. No parts of it may be reproduced, translated or transferred to third parties without written permission of PicoQuant GmbH. Products and corporate names appearing in this manual may or may not be registered trademarks or subject to copyrights of their respective owners. PicoQuant GmbH claims no rights to any such trademarks. They are used here only for identification or explanation and to the owner’s benefit, without intent to infringe. Acknowledgments The MultiHarp hardware in its current version as of March 2022 uses the White Rabbit PTP core v. 4.0 (https://www.ohwr.org/projects/wr-cores/wiki/wrpc-release-v40) licensed under the CERN Open Hardware Li- cense v1.1 and its embedded WRPC software (https://www.ohwr.org/projects/wrpc-sw/wiki...
-
Page 3: Table Of Contents
PicoQuant GmbH MultiHarp Software V. 3.1.0.0 Table of Contents 1. Introduction..............................6 2. Primer on Time–Correlated Single Photon Counting..................8 2.1. Count Rates and Single Photon Statistics..................... 9 2.2. Timing Resolution..........................10 2.3. Photon Counting Detectors......................... 11 2.3.1. Photomultiplier Tube (PMT)......................11 2.3.2. Micro Channel Plate PMT (MCP)....................11 2.3.3. Single Photon Avalanche Photo Diode (SPAD)................11 2.3.4. Other and Novel Photon Detectors.....................12 2.4. Principles Behind the TCSPC Electronics...................12 2.5. Further Reading..........................17 3. Hardware and Software Installation......................18 3.1. Scope..............................18 3.2. What's New in this Version........................18 3.3. General Installation Notes........................18 3.4. Software Installation..........................19 3.5. Hardware Installation........................... 20 3.5.1. Installation of Extension Units (MultiHarp 160 only)..............20 3.5.2. Electrical Connection (all MultiHarp Models)................20 3.6. Installation Troubleshooting......................... 22 ... - Page 4 PicoQuant GmbH MultiHarp Software V. 3.1.0.0 5.3.7. TTTR Mode Measurements with Real–Time Correlation.............40 5.3.8. TTTR Mode Measurements with Event Filtering.................42 5.4. Time–Resolved Excitation and Emission Spectra................53 5.5. Multi-Channel Scaling......................... 57 6. Controls and Commands Reference......................58 6.1. Main Window............................58 6.2. Menus..............................60 6.2.1. File Menu............................ 60 6.2.2. Edit Menu............................ 62 6.2.3. View Menu..........................63 6.2.4. Help Menu........................... 64 6.3. Toolbar..............................66 6.4. Control Panel............................68 6.4.1. Sync–Input / Trigger Out......................68 6.4.2. Inputs 1..8, 9..16, ........................69 6.4.3. Acquisition........................... 70 6.5. Axis Panel............................72 6.5.1. Time Axis Group.......................... 72 6.5.2. Count Axis Group........................72 6.6. Trace Mapping Dialog......................... 73 ...
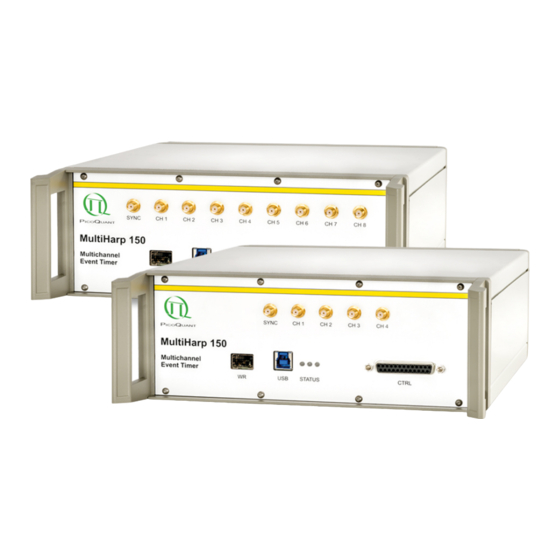
- Page 5 PicoQuant GmbH MultiHarp Software V. 3.1.0.0 8.3.2. Connectors..........................88 8.3.3. MultiHarp 160 - Connectors for the Extension Units..............91 8.3.4. MultiHarp 160 - Connector for the External FPGA Interface............92 8.3.5. Indicators............................ 92 8.4. Using the Software under Linux......................93 Page 5...
-
Page 6: Introduction
PicoQuant GmbH MultiHarp Software V. 3.1.0.0 1. Introduction While intensity based fluorescence spectroscopic investigations have been fairly common for a long time, ex- tracting additional temporal information from quantum systems via pulsed excitation and time-resolved detection is a relatively new and powerful technique. The temporal analysis can reveal information about the emitter that is not available from spectral data alone. This is why time-resolved analysis of (typically laser induced) fluores- cence by means of Time–Correlated Single Photon Counting (TCSPC) has gained in importance over the recent years. For instance, in life sciences the difference in the fluorescence decay times of fluorophores provides a powerful discrimination feature to distinguish molecules of interest from background or other species. This has made the technique very interesting for sensitive analysis, even down to the single molecule level. The same mechanisms are applicable in quantum optics, e.g., when quantum dots or defect centers in diamond are ob- served. The acquisition of fluorescence decay curves by means of TCSPC provides resolution and sensitivity that can- not be achieved with other methods. In practice it is done by histogramming arrival times of individual photons over many excitation and fluorescence cycles. The arrival times recorded in the histogram are relative times be- tween excitation and corresponding fluorescence photon arrival (start / stop times) ideally resolved down to a few picoseconds. The resulting histogram represents the fluorescence decay. Although fluorescence lifetime analysis is a great field of application for the MultiHarp, it is in no way restricted to this task. Other important ap- plications are e.g. quantum optics, Quantum Cryptography (QC) Time–Of–Flight (TOF) and Optical Time Do- main Reflectometry (OTDR) as well as any kind of coincidence correlation. The MultiHarp is a cutting edge TCSPC and time tagging system with USB interface. Its new integrated design provides a flexible number of input channels at reasonable cost and allows innovative measurement ap- proaches. The timing circuits allow high measurement rates up to 78 million counts per second (Mcps) each,... - Page 7 PicoQuant GmbH MultiHarp Software V. 3.1.0.0 For details on the Time–Correlated Single Photon Counting method, please read the next section as well as our TechNote on TCSPC and consult the literature referenced at the end of section 2.4. Experienced users of the method should be able to work with the MultiHarp straight away. Nevertheless, we recommend carefully reading sections 3.4 and 3.5 on hardware and software installation to avoid damage. Later, the comprehensive online– help function of the MultiHarp software will probably let the manual gather dust on the shelf. Page 7...
-
Page 8: Primer On Time-Correlated Single Photon Counting
PicoQuant GmbH MultiHarp Software V. 3.1.0.0 2. Primer on Time–Correlated Single Photon Counting In order to make use of a powerful analysis tool such as time–resolved fluorescence spectroscopy, one must record the time dependent intensity of the emitted light. While in principle, one could attempt to record the inten- sity decay of the signal from a single excitation / emission cycle, there are practical problems that prevent such a simple solution in most cases. First of all, the decay to be recorded is very fast. Typical fluorescence from or- ganic fluorophores lasts only a few hundred picoseconds to some hundred nanoseconds. In order to recover flu- orescence lifetimes as short as e.g., 500 ps, one must be able to resolve the recorded signal at least to such an extent, that the exponential decay is represented by enough sample points in time. This means that the required transient recorder would have to sample at very high rates. This is hard to achieve with ordinary electronic tran- sient recorders of reasonable dynamic range. Secondly, the light available may simply be too weak to sample an analog intensity decay. Indeed the signal may consist of just single photons per excitation / emission. This is typically the case for single molecule experiments or work with minute sample volumes / concentrations. Then the discrete nature of the signal itself prohibits analog sampling. Even if one has more than just a single mole- cule and some reserve to increase the excitation power to obtain more fluorescence light, there will be limits, e.g. due to collection optic losses, spectral limits of detector sensitivity or photo–bleaching at higher excitation power. The solution is Time–Correlated Single Photon Counting (TCSPC). By using periodic excitation (typically from a laser) it is possible to extend the data collection over multiple excitation/emission cycles and one can then reconstruct the single cycle decay profile from single photon events collected over many cycles. The TCSPC method is based on the repetitive, precisely timed registration of single photons of e.g., a fluores- cence signal. The reference for the timing is the corresponding excitation pulse. A single photon detector such as a Photo Multiplier Tube (PMT) or a Single Photon Avalanche Photodiode (SPAD) is used to capture the fluo- rescence photons. Provided that the probability of registering more than one photon per cycle is low, the his- togram of photon arrivals per time bin represents the time decay one would have obtained from a single shot time–resolved analog recording. The precondition of single photon probability can (and must) be met by attenu- ating the light level reaching the sample if necessary. If the single photon probability condition is met, there will actually be no photons registered in many of the excitation cycles. The diagrams below illustrate how the his- togram is formed over multiple cycles. laser pulse many cycles do not produce a photon... -
Page 9: Count Rates And Single Photon Statistics
PicoQuant GmbH MultiHarp Software V. 3.1.0.0 registration of one photon involves the following steps: first, the time difference between the photon event and the corresponding excitation pulse must be measured. For this purpose both optical signals are converted to electrical signals. For the fluorescence photon this is done via the single photon detector mentioned previously. For the excitation pulse it may be done via another detector if there is no electrical sync signal supplied by the laser directly. Obviously, all conversion to electrical pulses must preserve the precise timing of the signals as accurately as possible. The actual time difference measurement is done by means of fast electronics which provide a digital timing result. This digital timing result is then used to address the histogram memory so that each possible timing value corresponds to one memory cell or histogram channel. Finally the addressed histogram cell is incremented. All steps are carried out by fast electronics so that the processing time required for ... -
Page 10: Timing Resolution
PicoQuant GmbH MultiHarp Software V. 3.1.0.0 2.2. Timing Resolution The most critical component for the timing resolution in TCSPC measurements is usually the detector. However, in contrast to analog transient recording, the time resolution of TCSPC is not limited by the impulse response of the detector. Only the timing accuracy of registering a photon determines the resolution. This is limited by the timing uncertainty that the detector introduces in the conversion from a photon to an electrical pulse. This timing error or uncertainty can be as much as ten times smaller than the detector's pulse response. The timing uncer- tainties are usually quantified by specifying the rms error (standard deviation) or the Full Width at Half Maximum (FWHM) of the timing distribution or instrument response function (IRF). Note that these two notations are re- lated but not identical . Micro channel plate PMTs, can achieve timing uncertainties as small as 25 ps FWHM. Lower cost PMTs or SPADs may introduce uncertainties of 50 to 500 ps FWHM, HPDs lie in between with typi- cal uncertainties of 50..150 ps FWHM. Superconducting nanowire detectors have timing uncertainties of typi- cally 20 to 100 ps FWHM, some optimized designs can even reach below 10 ps. The second most critical source of IRF broadening in fluorescence lifetime measurements with TCSPC is usu- ally the excitation source. While many lasers can provide sufficiently short pulses, it is also necessary to obtain an electrical timing reference signal (sync) for comparison with the fluorescence photon signal. The type of sync signal that is available depends on the excitation source. With gain switched diode lasers (e.g., PDL 800–D) a low jitter electrical sync signal is readily available. The sync signal used here is typically a narrow negative pulse of −800 mV into 50 Ω (NIM standard). The sharp falling edge is synchronous with the laser pulse (< 3 ps rms jit- ter for the PDL 800–D). With other lasers (e.g., Ti:Sa) a second detector must be used to derive a sync signal from the optical pulse train. This is commonly done with a fast photo diode (APD or PIN diode). The light for this reference detector must be derived from the excitation laser beam e.g., by means of a semi–transparent mirror. The reference detector must be chosen and set up carefully as it contributes to the overall timing error. Another source of timing error is the timing jitter of the electronic components used for TCSPC. This is caused by the finite rise / fall–time of the electrical signals used for the time measurement. At the trigger point of com- parators, logic gates etc., the amplitude noise (thermal noise, interference etc.) always present in these signals is transformed to a corresponding timing error (phase noise). However, the contribution of the electronics to the total timing error is usually small. For the high end variants of the MultiHarp random jitter of a time difference measurement is less than 45 ps rms. Generally, it is always a good idea to keep electrical noise pick-up low in all system components. Uncorrelated electrical noise will cause just random jitter and IRF broadening but correlated noise can cause even more dis- turbing artifacts. This is why signal leads should be properly shielded coax cables, and strong sources of elec- tromagnetic interference should be kept away from the TCSPC detector and electronics. The contribution of the time spread introduced by the individual components of a TCSPC system to the total IRF strongly depends on their relative magnitude. Strictly speaking, the overall IRF is the convolution of all compo- nent IRFs. An estimate of the overall IRF width, assuming independent noise sources, can be obtained from the... -
Page 11: Photon Counting Detectors
PicoQuant GmbH MultiHarp Software V. 3.1.0.0 2.3. Photon Counting Detectors 2.3.1. Photomultiplier Tube (PMT) A PMT consists of a light–sensitive photo cathode that generates electrons when exposed to light. These elec- trons are directed onto a charged electrode called dynode. The collision of the electrons with the dynode pro- duces additional electrons. Since each electron that strikes the dynode causes several electrons to be emitted, there is a multiplication effect. After further amplification by multiple dynodes, the electrons are collected at the anode of the PMT and output as a current. The current is directly proportional to the light intensity striking the photo cathode. Because of the multiplicative effect of the dynode chain, the PMT is a photo electron amplifier with high sensitivity and remarkably low noise. The high voltage driving the tube may be varied to change the sensitivity of the PMT. Current PMTs have a wide dynamic range, i.e. they can also measure relatively high lev- els of light. Furthermore, they are very fast, so that rapid successive events can be reliably monitored. One pho- ton on the photo cathode can produce a short output pulse containing millions of photoelectrons. PMTs can therefore be used as single photon detectors. In photon counting mode, individual photons that strike the photo cathode of the PMT are registered. Each photon event gives rise to an electrical pulse at the output. The num- ber of pulses, or counts per second, is proportional to the light impinging upon the PMT. As the number of pho- ton events increase at higher light levels, it will become difficult to differentiate between individual pulses and the photon counting detector’s behavior will become non–linear. This usually occurs between 1 and 20 Mcps, de- pending on the detector design. Similarly, in TCSPC applications, individual photon pulses may merge into one as the count rate increases. This leads to pulse pile–up and distortions of the collected histograms. The timing uncertainty between photon arrival and electrical output (transit time spread) is usually small enough to permit time–resolved photon counting at a sub–nanosecond scale. In single photon counting mode the tube is typically operated at a constant high voltage where the PMT is most sensitive. PMTs usually operate within the blue to red regions of the visible spectrum, with greatest quantum efficiency in the blue–green region, depending upon photo–cathode materials. Typical quantum efficiencies are about 25 %. For spectroscopy experiments in the ultraviolet / visible / near infrared region of the spectrum, a PMT is very well suited. Because of noise from various sources in the tube, the output of the PMT may contain pulses that are not re- lated to the light input. These are referred to as dark counts. The detection system can to some extent reject these spurious pulses by means of electronic discriminator circuitry. This discrimination is based on the proba- bility that some of the noise generated pulses (those from the dynodes) exhibit lower signal levels than pulses from a true photon event. Thermal emission from the cathode that undergoes the full amplification process can... -
Page 12: Other And Novel Photon Detectors
PicoQuant GmbH MultiHarp Software V. 3.1.0.0 accuracy of ~400 ps. Commercial modules are thermoelectrically cooled for low dark count rate and deliver pre– shaped TTL pulses. They are the most common detectors for applications where NIR sensitivity is important, e.g., single molecule detection. To achieve the specified timing accuracy, exact focusing into the center of the active area is necessary. Other SPAD designs such as the PDM family from Micro Photon Devices have the benefit of much better timing resolution and robustness, however, at the expense of a lower sensitivity at the red end of the spectrum. 2.3.4. Other and Novel Photon Detectors The field of photon detectors is still evolving. Recent developments include so called silicon PMTs, Hybrid Photo Detectors (HPDs), superconducting nanowire detectors and APDs with sufficient gain for single photon detec- tion in analog mode. Each of these detectors have their specific benefits and shortcomings. Only a very brief overview will be given here. Silicon PMTs are essentially arrays of SPADs, all coupled to a common output. This has the benefit of creating a large area detector that can even resolve photon numbers. The drawback is increased dark count rate and re- duced timing accuracy. HPDs make use of a combination of a PMT-like front end followed by an APD structure. The benefits are good timing performance and virtually zero afterpulsing while the need for very high voltage is a disadvantage. Pico- Quant's PMA Hybrid series include the high voltage in an easy-to-use package. Superconducting nanowires single photon detectors (SNSPDs or SSPDs) routinely achieve excellent timing per- formance (<30 ps jitter) and high sensitivity from the visible to the near infrared with overall system detection ef- ficiencies in excess of 90%. They operate at cryogenic temperatures, typically between 0.8 K and 4 K, which in- curs cost, large footprint and power consumption and makes them less practical for applications where these parameters are of concern. Another class of potentially interesting detectors which have recently emerged, are APDs with very high gain. In combination with an electronic amplifier they have been shown to detect single photons. As opposed to Geiger mode, this avoids afterpulsing and allows for very fast counting rates. The disadvantage is a high dark count rate, currently too high for any practical TCSPC application. 2.4. Principles Behind the TCSPC Electronics For introductory purposes it is worth to look first at the design of historical TCSPC systems. They consist of the... - Page 13 PicoQuant GmbH MultiHarp Software V. 3.1.0.0 Compared to this, the MultiHarp is different in that it does not use a CFD. The reason behind this is that be- cause of its delay element a CFD requires time to make its “decision” and this time is larger than the MultiHarp‘s dead time. Since the short dead time is a precious feature when using high speed detectors, the use of a CFD would spoil the benefit. Indeed many modern detectors have very steep signal edges that do not require a CFD. A simple settable comparator (level trigger) is actually beneficial here. In similarity to the detector signal, the sync signal must be made available to the timing circuitry. Since the sync pulses are usually of well defined am- plitude and shape, a level trigger is sufficient to accommodate different sync sources. The MultiHarp therefore uses a level trigger here too. In historical TCSPC systems the signals from the two input discriminators / triggers are fed to a Time to Ampli- tude Converter (TAC). This circuit is essentially a highly linear ramp generator that is started by one signal and stopped by the other. The result is a voltage proportional to the time difference between the two signals. In such conventional systems the voltage obtained from the TAC is then fed to an Analog to Digital Converter (ADC) which provides the digital timing value used to address the histogrammer. The ADC must be very fast in order to keep the dead time of the system short. Furthermore it must guarantee a very good linearity (both over the full range as well as differentially). These are criteria difficult to meet simultaneously, particularly with ADCs of high resolution (e.g. 12 bits) as is desirable for TCSPC over many time bins. The histogrammer has to increment each histogram memory cell, whose digital address in the histogram mem- ory it receives from the ADC. This is commonly done by fast digital logic e.g., in the form of Field Programmable Gate Arrays (FPGA) or a microprocessor. While this section so far outlined the typical structure of conventional TCSPC systems, it is important to note that the design of the MultiHarp is different. Today, it is state–of–the–art that the tasks conventionally performed by TAC and ADC are carried out by a so called Time to Digital Converter (TDC). These circuits allow not only pi- cosecond timing but can also extend the measurable time span to virtually any length by means of digital coun- ters. The MultiHarp uses one such circuit in each input channel and one for the sync input. They independently work on each input signal and provide picosecond arrival times that then can be processed further, with a lot more options than in conventional TCSPC systems. In the case of classic TCSPC, this processing consists of a subtraction of the two time figures and histogramming of the differences. This is identical to the classic start– stop measurements of the conventional TAC approach. The following figure exemplifies this for one detector channel (Start). The full strength of the MultiHarp design is exploited by collecting the unprocessed independent arrival times as a continuous data stream for more advanced analysis. Details on such advanced analysis can be found in the literature (see section 2.5). In this case the on–board memory is reconfigured as a large data buffer (First In, First Out; FIFO) so that count rate bursts and irregular data transfer are decoupled. This permits uninterrupted continuous data collection with high throughput. This mode of operation is called Time–Tagged Time–Resolved (TTTR) mode or just “time tagging”. Details can be found in section 5.3.
- Page 14 PicoQuant GmbH MultiHarp Software V. 3.1.0.0 tween photon event and the next laser pulse (unless a long cable delay is inserted). This still works (by software data reversing) but is inconvenient in two ways: 1) Having to reverse the data leads to unpleasant relocation of the data displayed on a true time axis when the time resolution is changed. 2) Changing between slow and fast excitation sources requires reconnecting to different inputs. The MultiHarp is very different in this respect, as it allows to work in forward start stop mode, even with fast lasers. This is facilitated by two design features: 1) Independent operation of the TDCs of all channels, and 2) a programmable divider in front of the sync input. The divider allows to reduce the input rate so that the period is at least as long as the dead time. Internal logic determines the sync period and re-calculates the sync signals that were divided out. It should be noted that this only works with stable sync sources that provide a constant pulse-to-pulse period. Virtually all currently avail- able fast laser sources meet this requirement within an error band of a few picoseconds. Note: for slow sync sources (< 1 MHz) the sync divider should not be used (set to None). Similarly, the divider must not be used in coincidence correlation measurements (or similar applications) when the sync input receives non-periodic (ran- dom) pulses from a photon detector. In summary: The MultiHarp is designed to always work in forward start- stop mode. Experimental Setup for Fluorescence Decay Measurements with TCSPC The figure below shows a typical setup for fluorescence lifetime measurements using one input channel of the MultiHarp. The picosecond diode laser (PDL 800–B driver with attached laser head) is triggered by its internal oscillator (settable at 2.5, 5, 10, 20 and 40 MHz). The light pulses of typically <70 ps FWHM, are directed toward the sam- ple cuvette via appropriate optics. A neutral density filter can be used to attenuate the light levels if necessary.
- Page 15 PicoQuant GmbH MultiHarp Software V. 3.1.0.0 The following figure shows TCSPC histograms obtained with this kind of setup. Excitation source was a PDL 800–B (PicoQuant) with a 375 nm laser head running at 20 MHz repetition rate. Detector was a PMA Hy- brid 06 from PicoQuant with internal amplifier. The cut-off filter was a longpass for >430nm. The narrower peak (blue curve) represents the system IRF, here dominated by laser and detector. The other curve (red) is the fluo- rescence decay from a solution of ATTO 425 in water, a fluorescent dye with fairly short fluorescence lifetime (~3.7 ns). The count rate was adjusted to <3% of the laser rate to safely prevent pile-up. The plot in logarithmic scale shows the perfect mono-exponential nature of the decay curve, as one would expect. Note that this is ob-...
- Page 16 PicoQuant GmbH MultiHarp Software V. 3.1.0.0 The approximate mono–exponential fluorescence lifetime can be obtained from a simple comparison of two points in the curve with counts in the ratio of 1 : (e.g. 100 000 : 36 788). For a precise measurement one would perform a numerical exponential fit with IRF deconvolution (typically implemented as an iterative reconvo- lution). This would result in slightly shorter lifetimes since the IRF broadens the decay. Indeed one can measure lifetimes significantly smaller than the IRF with this method. Additionally, the residues of the fit can then be used to assess the quality of the fit and thereby the reliability of the lifetime measurement. The “EasyTau 2” software package from PicoQuant provides this functionality. Page 16...
-
Page 17: Further Reading
Recent advances in photon coincidence measurements for photon antibunching and full correlation analysis. Proceedings of SPIE, Vol.7185, 71850Q (2009) 9. O’Connor, D.V.O., Ware, W.R., Andre, J.C.: Deconvolution of fluorescence decay curves. A critical comparison of techniques. J. Phys. Chem. 83, 1333–1343, 1979 10. Patting M., Wahl M., Kapusta P., Erdmann R.: Dead-time effects in TCSPC data analysis. Proceedings of SPIE, Vol.6583, 658307 (2007) 11. Patting M., Reisch, P., Sackrow, M., Dowler, R., Koenig, M., Wahl M.: Fluorescence decay data analysis correcting for detector pulse pile-up at very high count rates. Optical Engineering, 57(3), 031305 (2018). doi: 10.1117/1.OE.57.3.031305 12. Isbaner S., Karedla N., Ruhlandt D., Stein S.C., Chizhik A., Gregor I., Enderlein J.: Dead-time correction of fluorescence lifetime measurements and fluorescence lifetime imaging. Opt. Express 24(9):9429-45 (2016) doi: 10.1364/OE.24.009429 13. Bibliography listing all publications with work based on PicoQuant instruments http://www.picoquant.com/scientific/references 14. Web page of the PicoQuant TCSPC and time tagging devices https://www.picoquant.com/products/category/tcspc-and-time-tagging-modules 15. PicoQuant technical and application notes http://www.picoquant.com/scientific/technical-and-application-notes Page 17... -
Page 18: Hardware And Software Installation
PicoQuant GmbH MultiHarp Software V. 3.1.0.0 3. Hardware and Software Installation 3.1. Scope This chapter covers the hardware installation of MultiHarp 150 and MultiHarp 160. Regarding software this man- ual describes solely the standard MultiHarp software providing users of the instruments with an easy to use graphical interface. The MultiHarp software runs on current Windows PC platforms and also under Linux with Wine (see section 8.4). It provides functions for setting measurement parameters, displaying measurement re- sults, loading and saving of measurement parameters and decay curves, etc. In addition to the standard MultiHarp software there are a variety of other software items that are not covered by this manual: MHLib is a programming library enabling users to write custom data acquisition programs for the MultiHarp in virtually all popular programming environments for Microsoft Windows. There is also a version for Linux (Intel processor architecture only) which is fully compatible with that for Windows so that applications can easily be ported across the two operating systems. The programming library is not covered here in this manual. Please see the separate installation and documentation files (separate for Windows and Linux) provided on the distribu- tion media and via download from the MultiHarp product pages on the Web. The external FPGA interface (EFI) is a novel feature exclusive to the MultiHarp 160. It permits retrieving TTTR mode data at substantially higher bandwidth than via USB. This enables custom data processing in real-time, way beyond the capabilities of a PC in terms of speed and latency. However, since the EFI is an expert tool re- quiring knowledge of FPGA programming and writing suitable custom software, it is not supported by the stan- dard MultiHarp software described here in this manual. In order to enable and use the EFI from the software side there are a set of dedicated routines provided in the programming library mentioned above. Since using the EFI is an advanced topic in its own, also involving a fair amount of FPGA programming details, there is a sepa-... -
Page 19: Software Installation
To perform the software installation from CD/DVD, insert the installation disk in your CD/DVD drive. Open the CD/DVD drive either from the Windows desktop or with the Windows Explorer. If you down- loaded and unpacked the setup files to a hard disk location, open that location. The installer program file containing the complete distribution is named setup.exe . Run setup.exe. The setup pro- gram will guide you through the installation process step by step. When asked for a destination folder for the new software, please accept the default path or select another ac- cording to your program storage policies. This is where the MultiHarp application files will be installed. To avoid confusion, make sure not to specify the path of an older MultiHarp version that you have not uninstalled or that of any other program on your PC. The default location is: \Program Files\PicoQuant\MultiHarpv31. Setup will also create a dedicated "program folder" for the new MultiHarp software that will later appear in the Start Menu. You can accept the default folder name or select another according to your own naming policies. However, you should make sure not to specify the folder name of an older MultiHarp version that you have not uninstalled nor the dedicated folder of any other program. In the chosen destination folder the installer will also create a subdirectory \filedemo which contains demo source code for access to MultiHarp data files in various programming languages. Furthermore, another folder \ sampledata will be created with samples of MultiHarp data files. Other necessary files such as setup informa- tion and the device driver will be installed in the standard places in your Windows directory tree. The setup program will also optionally install the device driver and a File Info shell extension that you can use to inspect individual header items of a *.ptu or *.phu file. This includes the measurement mode. Just right-click on the file in Windows explorer and select Properties. Then look at the tab PQ File Info and the tab PQ File Comment. After the installation the MultiHarp software should be available in the Windows Start Menu under the custom folder name you chose during setup. If you accepted the default then it will appear under Programs | PicoQuant – MultiHarp v3.1. Page 19... -
Page 20: Hardware Installation
PicoQuant GmbH MultiHarp Software V. 3.1.0.0 3.5. Hardware Installation 3.5.1. Installation of Extension Units (MultiHarp 160 only) The MultiHarp 160 is modular by design. Up to three extension units can be added on top of the base unit in or- der to provide up to 64 input channels. The extension units must be stacked on the main unit in ascending or- der, i.e. first X1, then X2 and finally X3. If you ordered your MultiHarp 160 with more than 16 channels then it will be shipped with the suitable number of extension units readily mounted. Otherwise, if you ordered one or more extension units to upgrade your existing system, then the extension unit(s) must be mounted on top of the exist- ing unit(s). In order to make the stack rugged and safe to handle, each extension unit must be mechanically se- cured by means of four dedicated connection pins (stainless steel with rubber rings). In order to do this, please proceed as follows: On the topmost unit of your existing stack - remove the plastic screw covers from the top four corners of the housing - remove the four horizontal screws (hex key) - remove the four dummy pins (stainless steel) from the top holes in each corner and replace them with the provided connection pins (stainless steel with rubber rings) - replace the four horizontal screws and cover them with the plastic screw covers For the extension unit to be added - remove the horizontal screws from the four bottom corners of the housing - place the expansion unit on top of the existing stack you prepared before (try to avoid any tilt so that the four connection pins can slide in straight) - replace the horizontal screws and re-install the plastic covers When the mechanical installation is complete you can connect the units at the rear using the provided ground and data cables. The data connectors are labeled E1, E2, and E3 on the base unit and just E on the extension units (See section 8.3.2.) Each extension unit ships with a dedicated data cable (Samtec EPLSP) for its connec- tion to the base unit. The data cables (orange) must be plugged in starting at connector E1 for the first extension unit (shortest cable), continuing up to E3 for the last extension unit (longest cable). Other (cross-) connections are not allowed. See section 8.3.2. for a picture of the correct cabling. If the maximum of 3 extension units is not exhausted then the corresponding sockets remain unconnected. The ground cables must be screwed on to the grounding terminals forming a chain across the entire stack of units. This is mandatory. Optionally you can use... - Page 21 experiments between two (or more) detector signals are to be carried out, you need to decide whether you will be using histogramming or TTTR modes T2/T3. In the case of histogramming and T3 mode connect one detector to the sync input and one or more to the detector inputs. Histogramming and T3 timing will always be with respect to the sync input. In T2 mode it is possible to determine the relative timing between all in- puts but this requires off–line data analysis (see section 5.3). Connect the other signal cable ends to the appropriate signal sources (50 Ω) in your experimental setup. The in- puts of the MultiHarp accept positive or negative pulses with peak values of up to +1.2 V or -1.2 V, respectively. The software allows selecting the trigger edge (rising=1 or falling=0) and the trigger level. All inputs should be operated with similar pulse amplitudes to minimize cross-talk. The optimum amplitude range is 100 to 200 mV. Below this range you may pick up noise, above there may be cross-talk. Most PMT and MCP detectors will re- quire a pre–amplifier to reach enough signal level. TTL–SPAD–detectors must be connected through an attenu- ator or an attenuating inverter (PicoQuant SIA 400). Never connect TTL signals directly, as this may cause damage. Weak PMT detectors should be connected through a 20 dB high speed pre–amplifier. MCP–PMT de- tectors should be connected through an amplifier with slightly higher gain. When detectors with small signals are being used in combination with laser drivers from PicoQuant's PDL Series, the sync pulses from the laser driver should be attenuated by 10 to 15 dB to fall into the optimum range for smallest cross-talk. Similar attenuation is recommended on the detector signals when detectors with NIM output are used. Suitable attenuator and ampli- fier devices are available from PicoQuant. IMPORTANT: switch the high voltage supply of PMTs off and allow their electrodes to discharge before connect- ing them. Their high voltage charge may damage the pre–amplifier. Observe the allowed maximum ratings for the input signal levels. Above these levels hardware damage will occur. If you are not sure what signals your setup delivers, use a fast oscilloscope to check the signal level and shape before connecting them to the Multi- Harp. All signals should have fast rise times of no more than a few ns. Slower signals may degrade timing accu-...
-
Page 22: Installation Troubleshooting
PicoQuant GmbH MultiHarp Software V. 3.1.0.0 3.6. Installation Troubleshooting After completion of the software setup and connecting the MultiHarp the device should be listed in the Windows Device Manager. Right click on the windows start button and select Device Manager to check if the device is free of conflicts and / or if the device driver is installed correctly. Under PicoQuant TCSPC Devices look for a device named MultiHarp and inspect its Properties. A common source of problems is the shutdown behavior of Windows 10. It does not fully shut down by default but goes only into a state similar to hibernation in order to re-start more quickly. When new hardware is installed this can cause problems. If you missed this during hardware installation, do it at least when problems arise. In order to fully shut down Windows hold the shift key while clicking the shutdown button or run the command shutdown /s /t 0 from the command prompt. It is also possible to permanently configure Windows for proper shutdown via the “power options” dialog. If the MultiHarp driver is not installed or needs updating you can install it manually. When prompted to search for the driver, direct the driver wizard to search the CD/DVD or, if you downloaded and unpacked the setup files to a hard disk location, direct it to that location. Note that Windows 7 must have the most recent Windows updates applied in order to install the driver successfully. If things are not working as expected you can also use the Windows system information facilities (Start > Run > msinfo32). In the System Information utility inspect Software environment > System Drivers to check if the Multi- Harp device driver PQCYUSB.SYS is correctly installed. You can also repeat the software installation if necessary. To do so, first uninstall the software and repeat the setup procedure. Make sure the software is not installed in multiple places. If this does not resolve the problem,... -
Page 23: Software Overview
PicoQuant GmbH MultiHarp Software V. 3.1.0.0 4. Software Overview 4.1. Starting the MultiHarp Software After correct installation the Windows Start Menu or the tiled Windows Start Screen contains a shortcut to the MultiHarp software. To start the MultiHarp software select PicoQuant – MultiHarp vX.X – MultiHarp. Note that after switching the device on, you need to allow a warm–up period of about 20 minutes before using the instru- ment for serious measurements. You can use this time for set–up and preliminary measurements. If the MultiHarp software cannot find a MultiHarp device (or if there are driver problems) it will display a notifica- tion message, but it will still start. However, device dependent toolbar buttons and functions of the program will then be disabled. This allows you to use the software without the MultiHarp hardware, e.g., to view or print files on another computer. It is possible to use up to eight MultiHarp devices on one PC. If multiple devices are installed then the first in- stance of the software will connect to the first device, the second to the second device and so on. Each of the MultiHarp software instances displays the serial number of the device it uses. An instance that does not find an unused device will open as a file viewer only. Note, that the various instances of the MultiHarp software will be running completely independent of each other. If your application requires some kind of joint action of multiple MultiHarp devices then you must design your own software based on the MultiHarp programming library MHLib (see separate manual). If your objective is to combine multiple devices to obtain more detector channels you may need to synchronize the clocks of the de- vices. You also need to consider that it is not possible to prevent Windows from introducing unpredictable delays in communication with the hardware. The latter makes it impossible to, e.g., start measurements on multiple de- vices at the exact same time. See the MHLib manual and demos for partial solutions. - Page 24 PicoQuant GmbH MultiHarp Software V. 3.1.0.0 Note that the position and size of the main window on the screen will be stored in the Windows registry and re- trieved upon the next program start. The registry settings are kept separately for each user, provided he / she is logged on with a personal user account. Consult section 6.1 for further main window command descriptions. Toolbar, Menus, panel meters etc. will be explained in the next sections. At the very bottom of the main window there is a status bar. The leftmost area of the status bar describes ac- tions of menu items as you navigate through menus. Similarly it shows messages that describe the actions of toolbar buttons. The second status bar area from the left shows the current measurement status of the Multi- Harp. The rightmost area of the status bar indicates if the <Caps> and <NumLock> keys are latched down. When the MultiHarp software is running with functional hardware it continuously collects information about the input signals and the current acquisition settings. If these settings together with the input rates indicate possible errors, the software will display a warning icon in the status bar. The warning icon can be clicked to review the list of current warnings together with a brief explanation (see also section 8.1). Page 24...
-
Page 25: The Toolbar
PicoQuant GmbH MultiHarp Software V. 3.1.0.0 4.3. The Toolbar The toolbar is displayed across the top of the MultiHarp main window, below the menu bar. The toolbar provides quick mouse access to frequently used commands and tools. Note that some buttons may be grayed out (dis- abled) depending on the installed software components and / or the state of the hardware. To hide or display the toolbar, choose Toolbar from the View menu (<Alt>+V T). The following table explains the individual buttons. Click… to… open a blank histogram with default control panel settings open an existing histogram file. Displays the Open dialog box, in which you can locate and open the desired file. save the current histogram data with its current name. If you have not named the file, the Save As… dialog box is displayed. copy the currently displayed curves to the clipboard (ASCII export). print the currently displayed histogram curves. display the About… window. This is where you can determine the version of your MultiHarp software and hardware. Also provides links for updates etc. activate context sensitive help. launch the axis panel. launch the data cursor dialog. start measurement based on current MultiHarp control panel settings stop measurement and histogram accumulation. launch the MultiHarp control panel. launch the trace mapping dialog. launch the TTTR mode dialog. launch the filtered TTTR mode dialog. Launch the TTTR mode real–time correlator dialog. launch the dialog for monochromator control and TRES setup. launch the general settings dialog. Launch the White Rabbit dialog Page 25... -
Page 26: The Control Panel
PicoQuant GmbH MultiHarp Software V. 3.1.0.0 4.4. The Control Panel The MultiHarp control panel is a dialog box for setting the parameters for hardware adjustment and data acquisi- tion. It is implemented as a ‘non–modal’ dialog box, i.e. it does not have to be closed before the main window can continue to operate. This way you can make changes to your settings in the control panel and watch their effect on a running measurement in the main window immediately. Nevertheless, you may close the control panel and restore it at any time by clicking the control panel button on the toolbar or pressing <Alt>+C. The control panel consists of several pages (tabbed sheets) containing groups of edit boxes and other controls for related parameters. These pages and their respective controls are: Sync–Input and Trigger Output Trigger Edge edit box and spin control Trigger Level edit box and spin control Offset edit box and spin control Tdead edit box and spin control Sync Divider edit box and spin control Trigger Outp. Period edit box and spin control Trigger Op. Force On tick box Trigger Op. Auto On tick box Inputs 1..8 Zero Cross edit box and spin control Discriminator Level edit box and spin control Offset edit box and spin control... - Page 27 PicoQuant GmbH MultiHarp Software V. 3.1.0.0 Inputs 9..16, 17..24, and so on These tab pages only appear when the device has more than 8 input channels. They have the same controls as the page for inputs 1..8 and follow the same logic of operation. Acquisition Resolution edit box and spin control Time edit box and spin control Offset edit box and spin control Trc/Block trace color indicator, edit box and spin control Restart check box Stop on Overflow check box Mode drop down selection box Stop At edit box and spin control Edit boxes are for keyboard entry. The values must be confirmed with either the <Enter> key or the Apply but- ton. The spin controls can be used to increment or decrement the value in the edit box. In this case the changes take effect immediately without need for hitting <Enter> or clicking Apply. Check boxes have their denoted ef- fect when the tick is shown. They can be toggled with a mouse click. Groups of radio buttons are like check boxes but mutually exclusive. Note that the settings of the control panel as well as the positions of control panel and main window on the screen will be stored in the Windows registry and retrieved during the next program start. The registry settings are stored separately per user. When a MultiHarp data file is loaded, the control panel settings will change to re- flect the settings stored in that file. ...
-
Page 28: The Axis Panel
PicoQuant GmbH MultiHarp Software V. 3.1.0.0 4.5. The Axis Panel The axis settings panel is a dialog box for setting the axis range for the histogram display in the main window. It is implemented as a ‘non–modal’ dialog box, i.e. it does not have to be closed before the main window can con- tinue its operation. This way you can make changes in the axis panel and watch their effect in the main window immediately. Nevertheless, you may close the axis panel and restore it at any time by clicking the axis panel button on the toolbar or pressing <Alt>+A. The panel will also open if you double–click the axes in the main window. The axis panel consists of two groups containing edit boxes and other controls for related parameters. These groups and their respective controls are: Time Axis Minimum edit box and spin control Maximum edit box and spin control Count Axis Minimum edit box and spin control Maximum edit box and spin control Linear radio button Logarithmic radio button The edit boxes are for keyboard entry. The values must be confirmed with either the <Enter>–key or the Ap- ply–button. The spin controls can be used to increment or decrement the values in the edit box. In this case the changes take effect immediately without need for hitting <Enter> or clicking Apply. The mouse wheel can be used for fast spins as long as the cursor is in the corresponding edit box. Check boxes have their denoted effect when the tick is shown. They can be toggled with a mouse click. Groups of radio buttons are like check boxes but mutually exclusive. Note that the settings of the axis panel as well as the positions of the panel on the screen will be stored in the Windows registry and retrieved during the next program start. The registry settings are stored on a per user ba- sis. ... -
Page 29: The Trace Mapping Dialog
PicoQuant GmbH MultiHarp Software V. 3.1.0.0 4.6. The Trace Mapping Dialog The MultiHarp software can record and store histograms in up to 512 data blocks in memory and files. Out of these, up to 16 curves can be displayed at the same time. It may seem odd that when the hardware has e.g. 64 channels that only 16 traces can be displayed. However, it is simply getting too cluttered when so many traces are drawn on the same screen. The limitation to 16 is still allowing reasonably distinguishable colors and keep- ing the view reasonably tidy. The Trace Mapping dialog is used to select the curves to display. It also allows to view curve details and to clean up. You can use the Trace Map button on the Toolbar or click the curve color in- dicator in the control panel to launch the dialog. In the Trace Mapping dialog you can tick the individual boxes ‘Show’ to display a curve. You can also select the index of the memory block you wish to map the individual display curves to. The dialog also provides some statistics on each curve (central matrix of figures). Resolution is the bin width of the histogram in picoseconds. Next is the Max. Count, the count in the highest point of the curve. The column at Time shows the time corresponding to the Max. Count bin. Leftmost there is the Full Width Half Maximum (FWHM) of the curve peak (usually meaningful only for IRF traces). There are also some buttons for frequently required actions: The button 'view' can be clicked to see more de- tailed curve information such as time of recording, acquisition settings and count rates. The button All can be clicked to tick all traces as shown, the button None does the opposite. The button 0..15 can be clicked to set the default mapping of trace 0..15 to block 0..15. Similarly, the buttons below allow mapping to the subsequent groups of 16 blocks. This allows quick access to the upper traces when the device has more than 16 channels. The Clear buttons (trash cans) can be clicked to delete the contents of individual blocks. Note that the Trace Mapping dialog is non–modal. This means the dialog can remain open while a measurement is in progress, so that adjustments can be made under immediate visual control, similar to the operation of the control panel. Note also that a measurement can be running in a block that is not mapped or shown. -
Page 30: Other Dialogs
PicoQuant GmbH MultiHarp Software V. 3.1.0.0 4.7. Other Dialogs In order to keep this manual readable, the dialogs described here in the overview chapter are limited to the most important ones the reader should know about before starting practical work with the software. Additional dialogs will be described implicitly in the following sections in the context of specific measurement tasks. For information on all other dialogs the user is kindly referred to the controls and commands reference (section 6) or consult the on–line help facility of the software. Pressing F1 in an active dialog will open a corresponding help page. Page 30... -
Page 31: Specific Measurement Tasks
PicoQuant GmbH MultiHarp Software V. 3.1.0.0 5. Specific Measurement Tasks 5.1. Setting Up the Input Channels This section provides help and instructions for the first basic steps of setting up the instrument. However, if you are running TCSPC measurements for the first time we strongly recommend you read the primer on TCSPC in section 2 first. Also consider the literature listed there. In order to acquire any data, the input channels and the sync input of the MultiHarp must be set to match their electrical input signals. The MultiHarp input channels are designed identically. All inputs have a programmable level trigger (comparator) allowing the selection of the trigger edge (rising=1, falling=0) and the trigger level in mV. For specification details see section 8.3.1 and take note of the maximum ratings. In case of coincidence correlation experiments using two or more detectors, the input channels are typically used for one detector each and data is collected in T2 mode. In that case the sync input can (but need not) be used for a detector as well. If a quick visualization of coincidence counts is required, it is also possible to use histogramming mode. In that case, one detector is connected to the sync input. Coincidence histograms will be collected for each input channel with respect to the sync input. In time–resolved fluorescence measurements with a pulsed excitation source (typically a laser) the sync input receives a sync signal from the laser. Here we focus on the latter, more common case. Perform the following steps to set up the input discriminators. Using the Panel Meters At the bottom of the main window you find a set of panel meters. These are very important during set–up. The meters showing units of cps (counts per second) in their title are rate meters. The leftmost rate meter shows the sync input rate. The next meter shows the channel input rate. Note the selector at the far right of the panel me- ters. This selects the channel the rate meters (except sync) are referring to. Select the channel you are currently setting up. Note that the rate meters use a fixed gate time of 100 ms. Their accuracy at low rates is therefore limited. They really only serve as a quick means of diagnostics and should not be used to obtain definitive mea- surement results. The other meters show the histogramming rate, the total count in the histogram, the maximum (peak) count and the position of the maximum. All of these values depend on the input selector. - Page 32 matching the specifications and the trigger edge should be set to the leading edge (rising=1, falling=0). For example, a NIM type signal is appropriate. This is a steep negative pulse (0.5 to10 ns wide, active edge falling) of typically −800 mV into 50 Ω. The MultiHarp can actually handle ±1.2 V but large amplitudes may cause excess interference and cross-talk. between the inputs. Amplitudes around 100 to 200 mV (on all inputs) are best in terms of timing accuracy and lowest histogram ripple. It may therefore be advantageous to attenuate NIM pulses by 10 or 15 dB. Lowest cross-talk. is typically achieved by using signals of similar amplitude on all inputs. SMA in-line attenuators of suitable bandwidth can be used to adjust this. Note that popular TTL–SPAD– detectors (e.g., Perkin–Elmer/Excelitas SPCM–AQR) deliver positive pulses of ~3 V and must be connected through an attenuator or a pulse inverter with attenuation (PicoQuant SIA 400). Connecting TTL signals di- rectly will cause damage to the MultiHarp! PMTs should be connected through a preamplifier (10 to 20 dB). MCP–PMT detectors should be connected through an amplifier with slightly higher gain. All accessories are available from PicoQuant. Be sure to switch the high voltage supply of PMTs off and allow their electrodes to discharge before connecting / disconnecting them. Their high voltage charge may damage the preamplifier. Observe the allowed input signal levels including those of the pre–amplifier. Again, in a new experimental setup, to be absolutely sure, please check your detector pulses as well as the preamp output with a fast oscilloscope. Start timing is on the leading edge, so it should be steep. Ringing and overshoot should be as small as possible. Do not over–illuminate the detector to avoid dam-...
- Page 33 PicoQuant GmbH MultiHarp Software V. 3.1.0.0 tector may be at risk at such high count rates. You can then also try out responsivity to illumination changes. For SPAD detectors that typically deliver pre–shaped pulses of constant amplitude the setting of the trigger level is very simple. Just set the trigger level to approximately half of the pulse amplitude. To actually collect histograms, select a measurement range large enough (determined by the chosen resolution) and a display range to cover your sync interval (i.e. 1 / f ) if possible. Set Offset = 0 and StopAt = sync 4,294,967,295. Start a measurement in oscilloscope mode with e.g., 1 second acquisition time (see the next...
- Page 34 PicoQuant GmbH MultiHarp Software V. 3.1.0.0 setting is the safest way to see even small histograms. If your measurements stop earlier than expected, make sure the Stop At level is not set to less than 4,294,967,295 unless you have experimental reason to limit the counts. During the set-up process you should pay attention to the warning icon that may appear at the bottom right of the main window. When the MultiHarp software is running with functional hardware it continu- ously collects information about the input signals and the current acquisition settings. If these settings in combination with the input rates indicate possible errors, the software will activate the warning icon. The warning icon can be clicked to display a list of current warnings together with a brief explanation of each warning (see also section 8.1). Note that the software can detect only a subset of possible error conditions. It is therefore not safe to assume “all is right” just by seeing no warning. On the other hand, if any of the warnings turns out to be an unnecessary nuisance, e.g., because your specific measurement conditions will expectedly cause it, you can disable that warning via the general settings dialog (see section 6.7). Starting with MultiHarp software version 3.0 and the MultiHarp 160 it is possible to set a hysteresis of the input comparators larger than the default value. This setting can be made though the general settings dialog (see section 6.7). It applies to all inputs simultaneously, including the sync input. There are only two choices: the de- fault value of about 3 mV and the large hysteresis value of about 35 mV. The larger hysteresis may in some cases help to suppress noise artefacts on the input signals. Consider this only a last rescue when it is impossi- ble to eliminate the noise at its origin. The MultiHarp 150 models out in the field at the time of this software re- lease do not have the programmable hysteresis feature. However, it is planned to make it available by way of a firmware update. Please contact PicoQuant if you need it. Page 34...
-
Page 35: Setting Up And Running Interactive Measurements
PicoQuant GmbH MultiHarp Software V. 3.1.0.0 5.2. Setting Up and Running Interactive Measurements The primary mode of operation of the MultiHarp software is interactive histogramming. This is what the main window of the software is dedicated to. The user can set up measurement parameters, start measurements and immediately see histogram data on the screen. In further sections, e.g., on TTTR mode, you will learn about other modes of operation with less user interaction that will collect data straight to disk without immediate visual- ization. Here, we focus on the interactive histogramming mode of operation. To set up measurement parameters use the MultiHarp control panel. The control panel can be opened by clicking the control panel button on the toolbar or by pressing <Alt>+C. In the control panel section 'Acquisition - Settings' you can set the resolu- tion (time per bin), the offset, the measurement time, and the block of memory to use for this measurement. To begin, use a measurement time... -
Page 36: Time Tagged Mode Measurements
PicoQuant GmbH MultiHarp Software V. 3.1.0.0 5.3. Time Tagged Mode Measurements Time–Tagged Time–Resolved (TTTR) mode allows the recording of individual count events directly to hard disk without immediately forming histograms. In classic TTTR mode, in addition to the start–stop timing with picosecond resolution, the timing of the events with respect to the beginning of the whole measurement is recorded in the event records. This is particularly in- teresting where the dynamics in a fluorescence process are to be investigated. The availability of the time–tags permits photon burst identification, which is of great value e.g., for Single Molecule Detection (SMD) in a liquid flow. Other typical applications are Fluorescence Correlation Spectroscopy (FCS) and Burst Integrated Fluores- cence Lifetime (BIFL) measurements. Together with an appropriate scan controller, TTTR mode is also suitable for ultra fast Fluorescence Lifetime Imaging (FLIM). Another great application area of time tagging is quantum optics with coincidence counting and correlation. The MultiHarp actually supports two different Time–Tagging modes, T2 and T3 mode, which will be explained further below. When referring to both modes together we use the general term TTTR. 5.3.1. System Requirements In cases where the Time–Tagging modes are to be used with high continuous count rates (say > 5 Mcps) the PC system must meet some special performance criteria. The reason for this is the relatively large amount of data being generated in TTTR mode. In order to prevent an overflow in the recording, the data must be trans- ferred to the computer in real–time. This requires a modern PC with a fast I ⁄ O subsystem. A recent, at least dual core CPU running at 2 GHz or more is required. For the best possible performance in TTTR mode a mod- ern solid state disk with high throughput is recommended. If it is intended to make use of the full TTTR through- put of a MultiHarp (up to 90 Mcps via USB 3) then the hard disk must be able to handle sustained write rates of 360 MBytes/s. This can be achieved with RAID arrays or modern solid state disks. Network storage is usually too slow. 5.3.2. T2 Mode In T2 mode all timing inputs of the MultiHarp including the sync input are functionally identical. There is no dedi- cation of the sync input channel to a sync signal from a laser. It may be left unconnected or can be used for an additional detector signal. In this case the sync divider must be set to “None”. Usually the regular inputs CH1..N are used to connect photon detectors. The events from all channels are recorded independently and treated... -
Page 37: T3 Mode
PicoQuant GmbH MultiHarp Software V. 3.1.0.0 transfer rate must be shared by the inputs used. For all practically relevant photon detection applications the ef- fective rate per channel is more than sufficient. If there are very intense bursts at the input of the front-end FIFO it may happen that events are lost. This is indicated to the software by means of a hardware flag so that the user can be informed of such losses. The user must then decide if the losses can be tolerated for the given ex- periment (see also section 8.1 on warnings). For maximum throughput, T2 mode data streams are normally written directly to disk, without preview other than count rate and progress display. However, it is also possible to analyze incoming data ”on the fly”. The Multi- Harp software provides a real-time correlator for preview during a T2 mode measurement (see section 5.3.7). Other types of real-time processing must be implemented by custom software. The MultiHarp software installa- tion provides demo programs to show how T2 mode files can be read by custom software (see the folder filedemo under the chosen software installation folder). The implementation of custom measurement pro- grams requires the MultiHarp programming library, which is provided as a separate software package on the distribution media or as download. Alternatives for advanced T2 data collection and analysis are the SymPho- Time and QuCoa software suites offered by PicoQuant. SymPhoTime is focused on typical life science applica- tions while QuCoa is oriented towards typical quantum optics applications. 5.3.3. T3 Mode In T3 mode the sync input is dedicated to a periodic sync signal, typically from a laser. As far as the experimen- tal setup is concerned, this is similar to classic TCSPC histogramming. The main objective is to allow for high sync rates which could not be handled in T2 mode. Accommodating the high sync rates in T3 mode is achieved as follows: First, the sync divider is employed as in histogramming mode. This reduces the sync rate so that the channel dead time is no longer a problem. The remaining problem is now that even with the divider, the sync... -
Page 38: Running A Basic Tttr Mode Measurement
PicoQuant GmbH MultiHarp Software V. 3.1.0.0 5.3.4. Running a basic TTTR Mode Measurement A TTTR mode measurement (T2 or T3 mode) will typically be started after all control panel settings have been tested in normal interactive histogramming mode (oscilloscope or integration). The acquisition time (measure- ment time) and the file for saving the data are the only parameters that can be set separately. A typical approach to set up a TTTR mode measurement would be by first starting oscilloscope mode with an acquisition time of e.g., 1 second. Then all control panel settings should be optimized to reliably obtain the ex- pected data. Once all settings are satisfactory, click the “TTTR Mode“ button on the toolbar. This will bring up the “TTTR Mode“ dialog. The dialog section Acquisition Settings allows selecting the measurement mode (T2 / T3), overall acquisition time, and file name. Note that switching between T2 and T3 mode takes some time because the hardware must be reconfigured. Normally such a switching should not occur often because the two modes usually require a dif- ferent experiment setup. The section Acquisition Settings also has two tick boxes for the handling of existing files. You can turn on a warning and / or automatically have numbers appended to the file names, so that you can conveniently perform series of measurements. The file name is shown in red if the file already exists. The button with the file icon will open a standard Windows file dialog. You can select an existing file or choose a new name. The MultiHarp TTTR mode files have the extension ".ptu". For maximum count rate throughput you should choose a file des- tination on a fast local hard disk as outlined above. Network drives are often too slow. The dialog section Status shows elapsed time, the count rates and the number of collected records. The num- ber of shown input rates depends on how many channels your MultiHarp has. Below these figures is a status line showing what is currently happening. Further below there are buttons for Start, Stop and Exit. Start and Stop control the actual TTTR measurement run. Exit is for leaving the TTTR mode dialog. ... -
Page 39: External Markers
PicoQuant GmbH MultiHarp Software V. 3.1.0.0 A measurement can be stopped at any time by clicking the Stop button. The data recorded up to this point will be stored in the file. When the measurement has completed, the Stop button will be grayed out (disabled). Use the Exit button to return to the normal interactive mode. Again, this will take some time for hardware reconfigura- tion. As outlined above, TTTR data collection at high rates is a demanding real-time streaming process. The hard- ware and software must ensure not to lose any data. In order to implement this efficiently the MultiHarp software employs multiple threads (concurrent CPU processes). A first thread continuously reads the MultiHarp‘s hard- ware FIFO and puts the retrieved data in a software queue. A second thread concurrently reads this software queue and writes the data to disk. If real-time correlation is being performed then this is done in further separate threads. User interface and interaction are handled in yet another thread. Multi-core CPUs are particularly useful here as they can run the threads in parallel rather than switching between them. There are two typical error sce- narios that you may encounter in this process. The first is a situation where the first thread does not empty the hardware FIFO quickly enough and the FIFO runs full. The software then reports the error FIFO_OVERRUN. In order to avoid this you may have to reduce the input data rate. Another error situation may result when the sec- ond thread cannot write to disk quickly enough and the software queue runs full. The software then reports the error STORAGE_QUEUE_OVERRUN. In order to avoid this you may want to check the write speed of your hard disk and see how it can be improved. 5.3.5. External Markers Often it is desirable to synchronize TCSPC measurements with other information or processes of complex mea- surement tasks. In order to perform e.g., Fluorescence Lifetime Imaging, the spatial origin of the photons must be recorded as well as their timing. For this purpose one needs a mechanism to assign external synchronization information to the TCSPC data. In the special case of Fluorescence Lifetime Imaging, conventional systems use on–board memory and switch to new blocks of memory upon arrival of e.g., a pixel clock pulse. Accommodating the large amount of data generated by the 3–dimensional matrix of pixel co–ordinates and lifetime histogram bins is a serious challenge. Even with modern memory chips, this approach is limited in image size and / or number. In addition, it is expensive, and implies loss of information about the individual photon arrival times. To solve the problem in a much more elegant manner, the TTTR data stream generated by the MultiHarp can con- tain markers for synchronization information derived from an imaging device, e.g., a scan controller. For this purpose the control port of the MultiHarp provides four TTL inputs for synchronization signals M1..M4 (see sec- tion 8.3.2 for the connector specification). The figure below illustrates how the external marker signals are recorded in the data stream. Bullets denote a photon, blue pulses denote a marker signal. The external markers are treated almost as if they were regular photon event records. A special channel code allows to distinguish true photon records from marker records. Software reading the TTTR file can thereby filter out the markers e.g., for line and frame clock... -
Page 40: Using Tttr Mode Data Files
PicoQuant GmbH MultiHarp Software V. 3.1.0.0 subdividing the scan lines in time. The accuracy of marker timing is on the order of 50 ns. Note, however, that in T3 mode it can never be resolved better than one sync period. A programmable marker hold-off time can be used to suppress glitches on the marker signals that some poorly designed scan hardware or cable reflections might create. The idea is that when a marker signal was detected the next (spurious) marker will be suppressed if it occurs within the hold-off time after the first detection. The hold-off time can be chosen in the software settings dialog available through the Toolbar. 5.3.6. Using TTTR Mode Data Files For diagnostic purposes you may reload a T3 mode file into the MultiHarp software. The limitation is that you will only be able to form a histogram over the start-stop times in your T3 mode data. The time-tag information will not be used here. The MultiHarp software will recognize that you are loading a T3 mode file and how many records are contained in it. It will then prompt you for a range to use for histogramming. The histogram will go to blocks 0..N-1 of the histogram memory where N is the number of channels that were used in the T3 mode mea- surement. A TTTR mode file also contains all control panel settings that were active at the time of the measure- ment run. After loading a TTTR mode file, you will find the document title reading “Histogram from...”. If you choose to save such data you will have to give it a new file name (*.phu). This is because now a histogram has been formed, and saving it with the same file name would destroy the original TTTR mode file. However, you may save the previously formed histogram as if it were obtained in normal interactive mode, to a standard MultiHarp histogram data file (*.phu). Reloading T3 mode files serves as a quick diagnostic tool only. For T2 mode files such a feature is currently not available. Further processing or analysis of TTTR mode data must therefore be performed through external data analysis software. Such software is available from PicoQuant for a wide range of analysis tasks (under the prod- uct names SymPhoTime and QuCoa). Further specialized analysis can be performed by dedicated custom soft- ware. If you wish to save the cost for the commercial TTTR analysis software or if you require special analysis algorithms you may want to program your own analysis software. For development of your own custom pro- grams, please refer to the demo code for loading .phu and .ptu files. Demo source code is included on your MultiHarp installation media and will be installed by the software setup into the subfolder filedemo. Also see section 8.2 for the file format specifications. The paragraph below gives only an outline. The first part of a TTTR mode file is a header with the basic setup information, similar to that of the other modes. What follows after the header is a sequence of 32 bit TTTR records. The TTTR records in the file con-... - Page 41 PicoQuant GmbH MultiHarp Software V. 3.1.0.0 The correlator always calculates the autocorrelations of the two virtual channels (AA and BB) as well as the cross-correlation (AB). There are three tick boxes that select which of these are shown. The dialog section Accumul. allows selecting an update time for the correlation display. Furthermore it allows to select between repetitive updates (Osc.) and cumulative collection (Int.). If the latter is chosen one can manually reset the correlator by clicking the Reset button. Note that all these settings affect only the real-time correlator. The raw TTTR mode data will be collected continuously and completely independent from the correlator settings. The Save button under the Accumul. section allows to save the correlator results as they were last shown. The saved result is an ASCII file with some header information. The format is self-explanatory.
-
Page 42: Tttr Mode Measurements With Event Filtering
PicoQuant GmbH MultiHarp Software V. 3.1.0.0 On the right hand side there are controls for the axis ranges of the correlator display. Note that they affect only the display. Collected data is always complete, independent from the axis settings. In contrast, the selection box subsmpl. has an effect on the correlator results. It determines how many tau points are calculated. The correla- tor works in a logarithmic multiple tau scheme and subsmpl. specifies the number of linear subsamples in each log stage. A higher number of subsamples increases the resolution of the correlation curve. Calculating more points is more time consuming and therefore may lead to lower count rate limits that can be handled. In this case you may get FIFO overruns. The default of subsmpl.=8 is a reasonable trade–off between speed and reso- lution. On faster computers the setting of subsmpl.=16 is a good choice. Note that the starting point and spacing of the tau sampling points also depends on the time tag resolution. In T3 mode this corresponds to the sync period. In T2 mode the native resolution of the board is binned down to a time tag resolution of 25 ns in order to make the data manageable for the real-time correlation algorithm. The correlation curve display can be shown with a grid (see general settings dialog, accessible from the toolbar of the main window). It also shows two useful figures obtained from the collected data (top right of curve win- dow). The first figure is an approximation of G(0). In classic FCS experiments this corresponds to the inverse of the number of particles in the focal volume. It is continuously updated together with the curve display, which can be useful for system adjustments, notably when using the repetitive accumulation mode (Osc.). Note that the approximation is a simple averaging over the first ten tau points. The figure B is an indicator for molecular brightness. It is also updated continuously. Note that it is also only an approximation obtained by multiplying the G(0) approximation with the average count rate on both virtual correlation channels A and B. Depending on the chosen channels in A and B this may lead to figures that do not truly reflect molecular brightnesses. However, they should be useful as an adjustment aid in any case. All other aspects of TTTR data collection with correlator preview are the same as in plain TTTR mode as de- scribed in the previous subsections. Topics such as using external markers or how to use the data files should be looked up there. 5.3.8. TTTR Mode Measurements with Event Filtering Introduction and Application Context In many quantum optical application scenarios, information is encoded in the correlation of two or more photons. Traditionally, coincidence measurements are used to evaluate these correlations experimentally. These range from relatively simple experiments like bipartite entanglement measurements to more complex setups as used... - Page 43 PicoQuant GmbH MultiHarp Software V. 3.1.0.0 lier pair in CH1 (i – no green loop ) would falsely be aligned with a photon from a later pair in CH2 (ii). Counting this event as a coincidence would not allow to reveal the true correlations. This examples illustrates the advan- tage of modern TCSPC systems: when using a hardware coincidence logic analyzer the whole dataset of the measurement would be lost in the case of a wrong delay alignment. With modern time tagging TCSPC systems the correct correlations can be easily recovered by adjusting Δt during data analysis. However, coincidence logic analyzers also have their unique advantage. In the sketched quantum optics appli- cation scenario, the correlations of interest only exist between pairs or higher numbers of photons. Often lower- order events, e.g., single events in the case of two-fold coincidences contain little information for these experi- ments. Coincidence logic analyzers already discard these lower-order events and hence reduce the recorded data size, often drastically. This does not only make data analysis less cumbersome and file size smaller, but also allows for higher data rates for the signals of interest, as the bus interface to the host PC is not burdened with unnecessary data. Hence, data can be processed and displayed on a host PC in real time. The event filter provided by the most recent MultiHarp gateware combines the advantages of TCPSC devices with the advantages of traditional coincidence logic analyzers. In order to make the filter beneficial for a wide range of quantum optical application scenarios it is designed to operate on all input channels of the MultiHarp in use and hence the full set of their possible combinations. Traditional coincidence logic analyzers often predefine logical combinations between channels (coincidence patterns) to be recorded, while all other events are dis- carded. This may limit applications as the set of predefined patterns is usually hardware limited. The MultiHarp event filter strives to resolve this by defining discardable orders of events (e.g. single events) and keeping what may be of interest. This reduces the data load sufficiently for lossless bus transfer and reasonable file size. Computing logical combinations between channels in the remaining data can then be easily done on the host PC at virtually unlimited complexity. In the simplest setting, the filter discards all events that do not have partners (in any channel) within the coinci- dence window of programmable width. This already permits a significant data reduction without loss of general- ity for any subsequent software analysis. For further reduction the order of filtering (the number of partners) can be set to higher number by way of a parameter “match count”, so that only 2-fold, 3-fold,…, up to 6-fold coinci- dences are recorded. In contrast to many traditional coincidence logic analyzers and most of the current time tagging systems, all raw events of the contributing channels passing the filter are fully recorded with their time tag. Their complete infor- mation content is therefore available for refined analyis in subsequent software processing. Setting the time win- dow (set by the filter parameter ‘range’) can therefore not only act as an immediate coincidence time window, but initially can also be set broader for a first mild data reduction. As all events are precisely time tagged, a nar- rower coincidence time window (or multiple such windows) can always be applied in post-processing. The “range” setting up to a certain degree tunes how close the system will behave to a plain TCSPC or time tagger...
- Page 44 PicoQuant GmbH MultiHarp Software V. 3.1.0.0 Event Filter Usage Walk-Through In the following we discuss a simple experiment showing how the filter works and how it can be programmed. The experimental setup we will be using throughout this section is shown in the figure below. For the sake of clarity and repeatability we use signal generators of fixed frequency rather than the mostly non-deterministic sig- nals found in quantum optics. Generator G1 provides pulses at a frequency of 10 MHz. By means of a 50 Ohms power splitter (aka reflection free T-pad) identical pulse trains are fed to the MultiHarp’s sync input and photon timing input channel 1. Gener- ator G2 provides an independent periodic pulse train of 1 MHz that is fed to the MultiHarp’s photon timing input channel 2. The generator frequencies and the choice of input channels are somewhat arbitrary and we only pin them down here for consistency with instrument settings and experimental results shown further on. While event filtering is a feature available solely in TTTR mode, it is helpful to first consider what kind of results they would generate in histogramming mode. Indeed the experimental setup was designed to permit this and for didactic purposes you are encouraged to try it out. Given that the signals from G1 are identical on sync and in- put channel 1, the time difference between them is constant, except for a small stochastic measurement error of a few ps. Therefore, one would expect a histogram looking like a sharp spike, in fact a gaussian distribution with a width corresponding to the instrument’s timing uncertainty of a few ps, provided we run it at the best possible resolution. With identical cable lengths after the splitter we should expect the peak to sit at time zero of the his- togram axis. Since the histogram results from positive timing differences between input channel and sync, we would only be able to see the positive half of the peak. In order to see the full peak it is useful to introduce a de- lay in the input channel. This can be done physically by means of cable, but one great feature of PicoQuant’s TCSPC systems is that the same can be achieved by means of a programmable offset, so we use the latter and set it to 30 ns. The signal from G2 is temporally independent from G1 so that the corresponding time difference is taking all possible values within the sync period, i.e. the 100 ns period of G1. Over some sufficient measure- ment time we would therefore obtain a histogram that is evenly filled, with only some statistical fluctuations ac- cording to counting statistics. The figure following below shows the actual measurement results. Page 44...
- Page 45 PicoQuant GmbH MultiHarp Software V. 3.1.0.0 Now we take one step further and perform the same experiment in TTTR mode, first without filtering and then with filtering. We use T3 mode because it is functionally related to histogramming mode, in that it also assumes a typically periodic sync signal and, more important here, the MultiHarp software permits loading T3 mode files directly into the histogram display. We could do the experiment by way of a regular TTTR mode measurement (See section 5.3.4) but for didactic purposes we shall do it through the dialog for Filtered TTTR mode. The Filtered TTTR Mode dialog can be reached through the corresponding toolbar button shown here on the right. The dialog is conceptually similar to that of regular TTTR mode. Upon clicking on the but- ton you will notice a moment of delay where the hardware is re-configured for the new measurement mode. When this is completed the dialog will appear similar to the figure following below. Page 45...
- Page 46 PicoQuant GmbH MultiHarp Software V. 3.1.0.0 Most prominent on the top left there is a pair of radio buttons for T2 versus T3 mode. It is important to make this selection first, as it will determine the permitted filter settings for the sync channel. Below on the left in the group box ‘Event Filter’ there is a large matrix of tick boxes for the selection of whether and how individual channels are going to be used in the filter. Note that this matrix caters for the largest possible MultiHarp device with three extension units X1..X3 and a total of 64 channels, laid out to roughly resemble the front panel of the device. If your particular device has fewer channels, the extraneous elements will be disabled and greyed out. For each channel there is one tick box ‘use’ to indicate if the channel is going to participate in the data collection and in the filtering scheme. In addition, for each channel there is another tick box ‘pass’ to in- dicate if the channel is to be passed through the filter unconditionally, whether it is marked as ‘use’ or not. The events on a channel that is marked neither as ‘use’ nor as ‘pass’ will not pass the filter, provided the filter is actu- ally enabled, as marked by the tick box ‘Enable filter’ further right on the bottom. Also within the group box ‘Event Filter’ there is a set of buttons for loading and saving the filter settings. This is a convenience feature for quick retrieval of standard settings you may wish to keep. The filter settings are also memorized in the Windows registry as well as in each data file. Yet another convenience feature are the buttons ‘Use all’, ‘Use none’,‘Pass all’, and ‘Pass none’. The make it easier to fill entire rows with the desired setting. The other controls ‘Range’, ‘Match Count’, and ‘Inverted logic’ determine how the filter will act. ‘Range’ deter- mines the time window the filter is acting on. It can be entered in whole nanoseconds or as floating point num- bers. If you enter fractions smaller than the device’s resolution the effective range will be rounded down. The parameter ‘Match Count’ specifies how many other events must fall into the chosen time window for the filter condition to act on the event at hand. The tick box ‘Inverted logic’ inverts the filter action, as you will see more clearly further in this section. For now, let it be not inverted. Then, for instance, if ‘Match count’ is 1 we will obtain a simple ‘singles filter’. This is the most straight forward and most useful filter in typical quantum optics experi- ments. It will suppress all events that do not have at least one coincident event within the chosen time range, be this in the same or any other channel marked as ‘use’. Before showing the actual filter operation, let us first complete the introduction of the remaining dialog elements. The group box ‘Input rates’ at the top right is self explanatory and identical to what you find in the regular TTTR mode dialog. It gets updated every 500 ms. As of software version 3.1.0.0 the input rows are ordered bottom to top, so as to match the physical MultiHarp front panel layout. Page 46...
- Page 47 PicoQuant GmbH MultiHarp Software V. 3.1.0.0 Further down on the right you find a group box ‘Filter Test’. This provides a useful feature for testing a filter con- figuration, and in particular checking as to whether the resulting data rate may or may not be sustainable over USB. Recall that the MultiHarp has an extremely high input bandwidth: each channel can in principle capture events at up to 1.5 GHz. Despite a sophisticated FIFO buffering scheme (see section 5.3.2) combined over the instrument’s many channels this high rate cannot be sustained for long in internal processing and USB transfer. The filter test will permit to try this out without doing a real measurement and running into FIFO overruns. Be- cause the test performs a quasi-real measurement, only without forwarding data from the filter to the FIFO, it cannot be performed when a real measurement is running and vice-versa. The corresponding buttons will be mutually disabled and greyed out to prevent this. Using the setup with the two generators as sketched above we can now perform a filter test by clicking the Run button and observe the Input and Output rates: As expected with the filter still being disabled, the Output Rate matches the Input Rate. After stopping the filter test we can then proceed to a real measurement. This involves the dialog elements for ‘Acquisition Settings’ and Status as well as the buttons START and STOP. The procedure is the same as in plain TTTR mode described in section 5.3.4. We use an acquisition time of 1 s and the filename ‘unfiltered.ptu’. After completion of the measurement we leave the filtered TTTR mode dialog by clicking EXIT. When the software is back in histogramming mode we load the file we have just collected into the regular histogramming mode dis- play. Note that this requires selecting the file type *.ptu in the file opening dialog. As the collected data is from T3 mode, the software will prompt for which range of the TTTR records it should perform the histogramming. We accept the default setting of using the entire range. The result will be a set of histograms as shown in the next figure: Page 47...
- Page 48 PicoQuant GmbH MultiHarp Software V. 3.1.0.0 As expected, because the filter was disabled, we obtain histograms exactly as in our initial test in histogramming mode. Having completed this basic test we can now return to the filtered TTTR mode dialog and proceed to a filtered measurement. The filter settings are the same as previously, except that the filter is now enabled. Like before, we perform a quick filter test. As we see in the next figure, the output rate has now dropped to 1.20e5. Page 48...
- Page 49 PicoQuant GmbH MultiHarp Software V. 3.1.0.0 After stopping the filter test we can again proceed to a real measurement. This time we name the file ‘fil- tered.ptu’. After completion of the measurement we can again leave the filtered TTTR mode dialog and then load the new file into the regular histogramming mode display. As this switching between TTTR and histogram- ming mode always takes time for re-configuration you may want to use a little trick: If you open a second in- stance of the MultiHarp software you can leave the first instance in TTTR mode and use the second instance as a file viewer. Whichever way you load the file, the result will be a set of histograms as shown in the next figure: Page 49...
- Page 50 PicoQuant GmbH MultiHarp Software V. 3.1.0.0 The effect of the filter can now nicely be seen. First observe the red trace (Generator G2 on Channel 2). The histogram is now empty everywhere, except in the vicinity of the blue peak. The remaining slice of the red trace is exactly the chosen filter range of 3ns on either side of the blue peak from G1. Next, observe the blue peak. Compared to the unfiltered data collection it is now substantially smaller. This also is the effect of the filter, as all blue events that had no red companion in the 3ns range were suppressed. This now gives a nice visual expla- nation for the significantly lower output rate of the filter we observed before. Finally, we can perform the same experiment with the filter switched to ‘Inverted logic’, leaving all other settings as before. What this means is that the filter will now suppress events that previously would NOT have been sup- pressed and vice versa. This inversion may have rather few practical use cases but as you will see shortly, it makes for a nice way of filter verification and demonstration. The following figure shows the corresponding state of the filter dialog with filter test running. The output rate is now significantly closer to the input rate but from the fact that it is lower than the input rate we see that some events are still being filtered out. Indeed you may check that the filter output rates of inverted versus uninverted logic sum up to give the input rate. Page 50...
- Page 51 PicoQuant GmbH MultiHarp Software V. 3.1.0.0 Performing a real measurement into the file ‘filtered_inverse.ptu’ and loading the file into the histogram display we can nicely visualize the inverse filter operation: Page 51...
- Page 52 PicoQuant GmbH MultiHarp Software V. 3.1.0.0 The part of the red histogram that was previously kept in is now punched out and the blue peak is diminished much less, according to the ratio of removed versus unremoved events in the red histogram. This concludes our demonstration of the filter operation but some more practical hints shall be given here: It is possible and quite useful to keep the filter test running while playing with the individual filter settings and ob- serving the output rate. However, any change of filter settings must always be confirmed with Apply in order to take effect. In some application scenarios it may be worth considering another type of filter. In fact at hardware level there are two types of filters: The Row Filters and the Main Filter. The graphical MultiHarp software implements only the latter. This is mainly for simplicity, because only the Main Filter can act on all channels as well as the sync channel simultaneously. In order to achieve this, it needed to be implemented in the main FPGA that collects and merges all the data from the individual measurement modules before transmitting it over USB. The draw- back of this is, that an overload of data rate within the individual measurement modules (one row of inputs) can- not be prevented this way. Although it is unlikely that many applications will run into this limit (about 200 Mcps per row) we also implemented the Row Filters. These can also be useful if you require more complicated filter conditions, e.g., with multiple different time ranges. In that case the two filters can be daisy-chained. However, in order to do this you will have to use the MultiHarp programming library MHLib and write your own software. If the problem is not one of row-wise data rate overload it may be easier and more flexible to use only the main fil- ter and to perform the more complex filtering in software. All other aspects of TTTR data collection with event filtering are the same as in plain TTTR mode as described in sections 5.3.1 through 5.3.6. Topics such as using external markers or how to use the data files should be looked up there. Page 52...
-
Page 53: Time-Resolved Excitation And Emission Spectra
PicoQuant GmbH MultiHarp Software V. 3.1.0.0 5.4. Time–Resolved Excitation and Emission Spectra In time-resolved fluorescence research it is often of interest to observe time-dependent spectral shifts and de- cay changes in the context of solvent relaxation dynamics and general spectral evolution. This requires record- ing Time-Resolved Excitation/Emission Spectra (TRES), ideally with automated wavelength scan and TCSPC data collection under full software control. In order to measure spectra in combination with fluorescence lifetime, the MultiHarp software provides an auto- mated TRES measurement mode. This mode allows to control a monochromator via a stepper motor and auto- mated collection of spectrally resolved lifetime histograms. Data is collected as in standard “Integration Mode” and saved in different blocks of memory for each wavelength. Note, however, that TRES data is always col- lected through input channel 1 only. If a monochromator with appropriate stepper motor and associated drivers is installed, a special- ized dynamic link library (Mono.dll) can be installed together with the MultiHarp software. The pres- ence of this DLL will be detected by the software. In this case the button for Monochromator and TRES control on the toolbar will be enabled. Note that most of the monochromators can be controlled only through dedicated stepper motor hardware from PicoQuant or selected vendors, usually installed as part of a complete PicoQuant spectrometer. Custom config- urations can only be supported upon special request. Clicking the monochromator button will launch the dialog for manual monochromator control and TRES setup. There you can set up parameters such as the start, step, and end of the wavelength scan. There will be error messages if the monochromator / stepper and associated drivers are not configured properly. The monochromator used for TRES measurements is controlled through a special dialog. It shows three tabs at the top and a status panel at the bottom of the dialog. The three tabs give access to the Manual, TRES, and Ini- tialization pages of the dialog. The status panel shows the current monochromator position in nm and whether the monochromator is currently moving (the red "LED" labeled Stepping is flashing, when it moves). The dialog is "non modal", i.e. it does not need to be closed before other windows can be accessed. It has its own icon in the Windows Taskbar, from where it can be brought back to the top, should it have been covered by other windows. Monochromator Models The type of the current monochromator is displayed in the title bar of the dialog. Apart from a simulation mode, the following monochromator models are supported: Sciencetech ST–9030, ST–9030DS and ST–9055, Acton Research SP–2150, SP–2155, SP–150 and SP–275. Some other Acton Research models are partially sup-... - Page 54 PicoQuant GmbH MultiHarp Software V. 3.1.0.0 Monochromator Initialization Before use, the monochromator must be initialized. This means, it has to seek its mechanical reference position (determined by a micro switch). Physical calibration values are kept in a monochromator configuration file (monochromator.cfg) which is generated by the system supplier at the time of delivery. Do not edit this file un- less you have exact instructions for doing so. Position initialization is required each time the software is started. It can be controlled on the Initialization page of the dialog. At first startup the dialog shows the state "not initialized". This means the software has no informa- tion about the current monochromator / stepper position.
- Page 55 PicoQuant GmbH MultiHarp Software V. 3.1.0.0 If there is a large difference between the current monochromator position and the position entered, the move- ment will take some time. If you wish to interrupt this process, press the Stop button. The monochromator will immediately slow down and then stop. The deceleration is necessary to preserve the calibration. Running TRES Measurements The TRES page of the dialog contains the controls used to set up an automated scanning of the monochroma- tor. The start and stop wavelengths of the scan can be entered in the corresponding edit boxes, the D (delta) box defines the step width of the scan. The scan starts always exactly at the Start value. If the Stop position cannot be reached by an integer multiple of the step width, the scan stops at the last position within the start / stop range. If the start position is larger than the stop position, the scanning direction will be reversed.
- Page 56 PicoQuant GmbH MultiHarp Software V. 3.1.0.0 A TRES measurement can then be started or canceled as usual via the toolbar buttons for start and stop. The data acquisition will be performed like a standard “Integration Mode” measurement, while the block number is incremented for each new wavelength. At the beginning of each TRES run, the active curve (block) will be set to 0, or to 1 if no IRF is collected. All curves that were previously collected and not saved to a file will be overwritten with new data. During a TRES run, the currently collected data will always be shown as Trace 0 (dark blue), even though the block (Trace) number is actually incremented at each wavelength step. This is to overcome the limitation of only 16 display curves being available. You can check the block number in the control panel to see the curve currently being collected. Manual entry will be disabled during the run. Also, you can watch the status bar to see the current wavelength and stepping activity. Note that for a TRES measurement the control panel setting 'Stop Of' applies as in Integration mode, while 'Restart' is meaningless in TRES mode. TRES Data Analysis and Visualization Having collected a complete TRES data set you can save it to a regular *.phu file. You can also inspect indi- vidual curves via the Trace Mapping dialog. You can furthermore use the software tool FluoPlot from PicoQuant to visualize and analyze the data in various 2D and 3D representations with a multitude of options for coloring, scaling, and changing view aspects in 3D. The figures below show FluoPlot visualizations from a TRES mea- surement of mixed oxazine dyes in ethanol. FluoPlot is provided on your software installation media. Just run FluoPlotSetup.exe from there. If you received your MultiHarp software by download or email you may need to request FluoPlot separately. Note that the pro- gram requires a modern graphics processing unit with support for OpenGL version 1.5 or higher. Speedy han- dling of large data files requires sufficient system memory. Further data analysis may need to be performed by dedicated software, either custom programs or specialized solutions available from PicoQuant. Page 56...
-
Page 57: Multi-Channel Scaling
PicoQuant GmbH MultiHarp Software V. 3.1.0.0 5.5. Multi-Channel Scaling In contrast to classic TCSPC systems (based on TACs), the sync and the signal channels of the MultiHarp are completely independent. This makes it possible to allow multi-stop measurements, i.e. the detection of multiple photons between two subsequent START signals. The shorter the dead times of the detectors and the timing electronics are, the less these multi-stop measurements are prone to dead-time-induced photon losses. If the histogram bin width is chosen wider than the dead time, the pile-up artifacts due to dead time are entirely elimi- nated and it is possible to measure at photon rates much higher than the classic pile-up limit of TCSPC. The MultiHarp can then be operated like a Multi-Channel Scaler. The easiest way to perform multi-channel scaling with the MultiHarp is via histogramming mode. The detector is connected to one of the input channels. In addition, a reference signal at the sync input marking the start of the MCS measurement is needed (see chapter 8.3.1 for the signal specifications). The integration time should then be set to a value significantly larger than the time bin width multiplied by the number of time bins (65536). Then start a measurement in in integration (INT) mode. The resulting histogram will display the MCS curve. Please note that the time range that can be obtained with this method is limited to the time bin width multiplied by 65536. MCS measurements on longer time ranges are possible via TTTR mode. However, this will require additional software for data analysis (e.g., SymPhoTime 64). Page 57... -
Page 58: Controls And Commands Reference
PicoQuant GmbH MultiHarp Software V. 3.1.0.0 6. Controls and Commands Reference 6.1. Main Window The Title Bar The title bar is located along the top of a window. To move the window, drag the title bar. Note: You can also move dialog boxes by dragging their title bars. The title bar may contain the following elements: System Menu MultiHarp – [Name of the file or dialog] Minimize Button Maximize or Restore Button, resp. / Close Button Scroll bars Displayed at the right and bottom edges of the MultiHarp window if a certain minimum window size is reached. The scroll boxes inside the scroll bars indicate your vertical and horizontal location in the display area. You can use the mouse to scroll to other parts of the window. Size command Use this command to resize the active window. Note: The command is unavailable for already maximized or minimized windows. Shortcut Mouse: Drag the corners or edges of the window. Keys: <Alt>+<Space> S Minimize command Use this command to reduce the MultiHarp window to an icon. Running measurements will continue. - Page 59 PicoQuant GmbH MultiHarp Software V. 3.1.0.0 Restore command Use this command to return from a maximized or minimized window to the previous size. Note: The command is only available for already maximized or minimized windows. Shortcut Mouse: Click the maximize button on the title bar; or double–click the title bar of the enlarged window. Keys: <Alt>+<Space> R Close command Use this command to close the active window or dialog box. Double–clicking a system menu box is the same as choosing the Close command. Shortcuts Mouse: Click the close button on the title bar. Keys: <Alt>+<F4> <Alt>+<Space> C Panel Meters At the bottom of the main window there is a set of panel meters. The meters showing units of cps (counts per second) in their title are rate meters. The leftmost rate meter shows the sync input rate. The next meter shows the channel input rate. Note the selector on the right of the panel meters. This selects the channel the rate me- ters (except Sync) are referring to. The other meters show the histogramming rate, the total count in the his- togram, the maximum (peak) count, and the position of the maximum. They all depend on the input selector. Note that the Input selector also has a selection option called Sum. In this case the meters are fed from the sum of all input channels. This is the default setting. Also note that the rate meters have a fixed gate time of 100 ms and limited accuracy, notably at low rates. They are only a means of quick diagnostics and should not be taken for actual measurements. Page 59...
-
Page 60: Menus
PicoQuant GmbH MultiHarp Software V. 3.1.0.0 6.2. Menus 6.2.1. File Menu The File menu offers the following commands: Clears all histogram data and restores default settings. Open Opens an existing histogram file. Save Saves a histogram file. Save As… Saves an opened histogram file to a specified file name. Print Prints the currently displayed histogram. Page Setup Allows modifying the page layout for printing. Print Preview Displays the layout as it would appear printed. Print Setup Selects a printer and printer connection. 1…4 <Recent Filename> Opens one of the four last recently opened files Exit Exits MultiHarp software. New command Use this command to create a blank histogram with the last default settings. You can open an existing histogram file with the Open command. Shortcuts Toolbar: Keys: <Ctrl>+N... - Page 61 PicoQuant GmbH MultiHarp Software V. 3.1.0.0 Save command Use this command to save the current histogram data to a file with current name and directory. When you save a histogram for the first time, MultiHarp displays the Save As… dialog box so you can name your file. This com- mand is unavailable if a measurement is running. If you want to change the name and directory of an existing file before you save it, choose the Save As command. Shortcuts Toolbar: Keys: <Ctrl>+S <Alt>+F S Save As… command Use this command to (re–)name the current histogram data and save. The software displays the Save As… dia- log box so you can name your file. To save a file with its existing name and directory, use the Save command. File Save As… dialog box The following fields allow you to specify the name and location of the file you are about to save: Save in: Select (i.e. browse into) the directory where you want to store the file. Main box In this box you see the content of the chosen directory, filtered by Save as type. File name: Type a new filename to save a histogram with a different name. The software automati- cally adds the extension you specify in the Save as type: box.
-
Page 62: Edit Menu
PicoQuant GmbH MultiHarp Software V. 3.1.0.0 Print Setup command Use this command to select a printer and a printer connection. This command presents a Print Setup dialog box, where you specify the printer and its connection. Shortcut Keys: <Alt>+F R 1, 2, 3, 4 command (most recently used files) Use the numbers and filenames listed at the bottom of the File menu to open the last four files you closed. Choose the number that corresponds with the file you want to open. Shortcuts Keys: <Alt>+F 1 <Alt>+F 2 <Alt>+F 3 <Alt>+F 4 Exit command Use this command to end your MultiHarp session. Save your data before exiting. Shortcuts Mouse: Click the close button on the title bar. Keys: <Alt>+<F4> <Alt>+F X 6.2.2. -
Page 63: View Menu
PicoQuant GmbH MultiHarp Software V. 3.1.0.0 6.2.3. View Menu The View menu offers the following commands: Toolbar Shows or hides the toolbar. Status Bar Shows or hides the status bar. Axis Panel Shows the axis settings panel. Control Panel Shows the control panel. Trace Mapping Shows the trace mapping dialog. Toolbar command Use this command to display and hide the Toolbar, which includes buttons for the most common commands, such as File Open. A check mark appears next to the menu item when the Toolbar is displayed. Shortcut Keys: <Alt>+V T Status Bar command Use this command to display and hide the status bar, which describes the action to be executed by the selected menu item or depressed toolbar button, the current measurement activity and keyboard latch state. A check mark appears next to the menu item when the status bar is displayed. The status bar is displayed at the bottom of the MultiHarp main window. Shortcut Keys: <Alt>+V S Axis Panel command Use this command to display the axis settings panel. The result is the same as the axis panel button in the tool-... -
Page 64: Help Menu
PicoQuant GmbH MultiHarp Software V. 3.1.0.0 6.2.4. Help Menu The Help menu offers the following commands, which provide you assistance with this application: Help Topics Offers you the contents list of topics on which you can get help. Help Index Offers you an index to topics on which you can get help. Help Search Offers you a means of full text search on all help topics. Activate Context Help Switches the cursor mode to “point to item” for context help. Check for Updates Checks for the availability of a newer software version. Visit Website Opens www.picoquant.com in your browser. Request Support Provides support details and access to the support website. About MultiHarp… Displays version information of the MultiHarp software. Note: Online help (context help) on most functions, dialogs, control items etc. is available via the F1 key. Help Topics command This command opens a browser offering a tree view like list of contents, and a help page. Browse through the contents with your mouse or the cursor keys. <Enter> opens / closes chapters, <Cur Up> / <Cur Down>... - Page 65 PicoQuant GmbH MultiHarp Software V. 3.1.0.0 Check for Updates command Use this command to check if newer software is available. This requires internet access. If a newer version is available it can immediately be downloaded. Note that this does not perform any installation. You still need to unzip and install the downloaded software. Do this only after reading the release notes. Shortcut Keys: <Alt>+H U Visit Website command Use this command to open www.picoquant.com in your browser. Of course this requires internet access. Shortcut Keys: <Alt>+H W Request Support command Use this command to open a form with important support details of your system and direct access to the support page on the web. The latter requires internet access. If you cannot access the web directly, please copy the support details and send them later by email to support@picoquant.com together with a precise description of the problem. If your setup is not working at all, provide at least the serial number of your MultiHarp and a pre- cise description of the installation environment and the observed issues, including the exact wording of any oc- curring error messages. Shortcut Keys: <Alt>+H S About MultiHarp... command Use this command to display the copyright notice and version number of your MultiHarp software and hardware, if installed. It also provides access to the PicoQuant Web site and software updates. Shortcut Keys: <Alt>+H A...
-
Page 66: Toolbar
PicoQuant GmbH MultiHarp Software V. 3.1.0.0 6.3. Toolbar Toolbar buttons of special interest are explained in some more detail here: Context Help When you choose the Context Help button, the mouse pointer will change to an arrow with question mark. If you then click somewhere in the MultiHarp window, such as on another toolbar button, the help topic associated with it will be shown. Axis Panel Clicking this button opens the Axis Panel. This panel provides controls for the axis limits and lin / log display switching. Double-clicking the axes opens the same dialog. The dialog is non-modal, so it can remain perma- nently open. The panel will remember its last position when closed. When it is opened the next time it will be at that screen position again. Data Cursor Opens the data cursor dialog box. You can use this dialog to mark and retrieve the data values of individual his- togram bins. A pair of crosshairs will be provided for marking data points with the mouse or keyboard. When the data cursor dialog is activated, the crosshairs will appear in the histogram display area. By clicking on or near a data point, the current crosshair (black) will snap to that point. At the same time a second crosshair (grey) will jump to the previously marked point. The data cursor dialog then shows the current count and time values for these points as well as the corresponding differences (deltas). The data cursor always applies to one "active" curve only. You can select this active curve at the top of the dialog where it is shown with its corresponding curve color. While the grey crosshair normally jumps to the previous data point, you can modify this behavior by holding down the SHIFT key while clicking on curve points. The grey crosshair will then remain at its previous position. This allows finding a particular point while keeping the other one fixed. Another advanced mode of operation of the data cursor is possible via the LEFT and RIGHT arrows of the key- board. Pressing these keys will direct the black cursor to the next left or right point in the curve. Again, the be- havior of the marker for the previous point (grey cross) can be controlled via the SHIFT key. Control Panel Launches the MultiHarp Control Panel. If the control panel is already open, subsequent clicking of this button will just make the control panel the active window. The dialog is non-modal, so it can remain permanently open. - Page 67 PicoQuant GmbH MultiHarp Software V. 3.1.0.0 TTTR Real–Time Correlator Opens the TTTR mode real-time correlator dialog box. Use this dialog for FCS preview during a TTTR mode run. Make sure all other measurement parameters have been set and tested in interactive mode before entering TTTR correlator mode. Changing to this mode takes a few seconds for reconfiguration of the hardware. See also section 5.3.7. Monochromator / TRES In order to measure Time-Resolved Excitation/Emission Spectra (TRES), the MultiHarp software provides a TRES measurement mode, that allows to control a monochromator via stepper motors and automated collection of spectrally resolved lifetime histograms. Clicking this button will launch the dialog for manual monochromator control and TRES setup. There you can set parameters such as the start, stepping, and end of the wavelength scan. There will be appropriate error messages if the monochromator / stepper and associated drivers are not configured properly. General Settings Opens the software settings dialog box. Use this dialog to change standard settings of the MultiHarp software. Notably these are: Display rate (0.1 to 1s), Draw mode (lines, stairs), Grid check box, Prompt overwrite (warning before overwriting existing data), selective disabling of Warnings and TTTR Marker Settings. The control con- nector of the MultiHarp provides TTL inputs for synchronization signals. The markers can be enabled or dis- abled as well as recorded at either the rising or falling edge of the corresponding TTL signal. The active edges...
-
Page 68: Control Panel
PicoQuant GmbH MultiHarp Software V. 3.1.0.0 6.4. Control Panel The control panel consists of several sections containing edit boxes and other controls for related parameters. These are described in the following subsections. Note that the settings of the control panel as well as the posi- tion of the control panel on the screen will be stored in the registry and retrieved at the next program start. When you load a MultiHarp data file the settings of the control panel will change according to the settings in that file. This can be used as a means of reverting to a standard setting for the given experiment. 6.4.1. Sync–Input / Trigger Out The settings in this group configure the behavior of the Sync input and the Trigger output. See section 5.1 “Set- ting Up the Input Channels“ to get started. Sync Trigger Edge edit box and spin control Here the trigger edge (rising/falling) for the Sync input can be set. The value 0 stands for falling, 1 stands for ris- ing edge. Type the value as an integer in the edit box and press <Enter> or click on Apply. Alternatively, use the spin control (next to it) to increment / decrement the current value. In this case changes take effect immedi- ately without pressing <Enter>. Sync Trigger Level edit box and spin control Here the trigger level for the Sync input can be set. Units are millivolts (mV), the permitted range is -1200 to 1200. Type the value as an integer in the edit box and press <Enter> or click on Apply. Alternatively, use the spin control (next to it) to increment / decrement the current value. In this case changes take effect immediately without pressing <Enter>. Sync Offset edit box and spin control Shifts the relative timing of Sync and photon events and is designed to compensate optical and electrical delays (due to differences in cable lengths and optical paths), e.g., in order to shift your fluorescence decay within the sync frame so that it is not truncated. This feature completely eliminates the need for adjustable delay boxes. ... -
Page 69: Inputs 1
PicoQuant GmbH MultiHarp Software V. 3.1.0.0 Sync Divider edit box and spin control Here the programmable divider of the Sync input can be set. This allows to reduce the sync input rate so that the period is at least as long as the dead time. This is required for fast sync sources (≥78 MHz). Internal logic determines the sync period and re–calculates the sync signals that were divided out. It should be noted that this only works with stable sync sources that provide a constant pulse-to-pulse period. All fast laser sources known today meet this requirement within an error of a few picoseconds. Set the divider only as large as necessary. With random and low rate signals (< 1 MHz), the divider must be set to 'None'. Trigger Output Period edit box and spin control The trigger output can be used to trigger a light source. Here the period of this output can be set. The unit is mi- croseconds. The allowed range is 0.1 µs to 1.6 s. Trigger Output Force On check box Here the trigger output can be switched on regardless of whether a measurement is running. Trigger Output Auto On check box Here the trigger output can be set to turn on only when a measurement is running. This can reduce bleaching. 6.4.2. Inputs 1..8, 9..16, ... The settings in these dialog tabs configure the behavior of the input channels. See section 5.1 “Setting Up the Input Channels“ to get started. The MultiHarp can have up to 64 input channels. Dependent on how many channels the device has, one or more tabs with control elements for the channels will be shown. The specific... -
Page 70: Acquisition
PicoQuant GmbH MultiHarp Software V. 3.1.0.0 Units are nanoseconds (ns), the permitted range is from 0 to 160 ns. Note that Tdead = 0 does not really mean zero dead time, instead, the input will then operate at its shortest (native) dead time of about 650 ps. When a dead time >0 is set then the timing hardware will suppress events falling into the dead time. This is only a sup- pression of further processing and does not prevent the TDC to go into another (native) dead time. Type the value as an integer in the edit box and press <Enter> or click on Apply. The value can be entered in steps of nanoseconds but note that the actual step is approximated only to the instrument’s base resolution (5, 10 or 80 ps dependent on the model). Alternatively, use the spin control next to the edit box to increment ⁄ decre- ment the current value. In this case changes take effect immediately without pressing <Enter>. The programmable dead time is only available with suitable firmware (“gateware”), which must be version 0.8 or higher. Devices shipped after September 2019 will have it by default. Otherwise the edit box for Tdead will re- main grayed out. Older devices can be upgraded, please contact PicoQuant. 6.4.3. Acquisition Resolution edit box and spin control Use this set of input controls to specify the time resolution. Units are picoseconds (ps). Possible choices are the device's base resolution and successive multiples by two. Type the desired resolution value as an integer in the edit box and press <Enter> or click on Apply. Alternatively, use the spin control (next to it) to increment / decre- ment the current value. In this case, changes take effect immediately without pressing <Enter>. In case of en- tering values other than valid resolutions, the next suitable resolution step is chosen automatically. There are always 2 = 65536 time bins in one histogram. With the chosen resolution, the respective time range covered is 65536 * Resolution. The choice of range must be a compromise between resolution and time span covered. The smallest range offers the best resolution and the shortest span (vice versa for the largest range). For high sync rates the highest resolution is usually most appropriate, since the smallest range still covers the full sync period. For lower sync rates the histogram range may be too small to cover the full sync period. The decay curve region of interest may therefore lie outside the acquisition window of 65536 time bins. Apart from switching to a lower resolution it is possible to shift the acquisition window relative to the sync frame by means of the offset. Note that working with very long time spans (low sync rates) at high count rates also requires long acquisition times to minimize noticeable “steps” in the acquired histograms. Acquisition Time edit box and spin control Set the desired measurement time here. Units are seconds (s). The permitted range is 0.001 to 360,000 s in steps of 0.001 s. Type the desired value in the edit box and press <Enter> or click on Apply. Alternatively, use the spin control (next to it) to increment / decrement the current value. In this case, changes take effect immedi-... - Page 71 PicoQuant GmbH MultiHarp Software V. 3.1.0.0 Trc./Block trace color indicator, edit box and spin control The MultiHarp software can measure and store histograms in up to 512 memory blocks. Out of these, up to 16 curves can be displayed and one "active block" can be used for measurements. Choose the active memory block you wish to use for the next measurement here. The trace mapping dialog is used to select the curves for display. Make sure the curve you are using is switched on (shown). You can open this dialog directly by clicking on the trace color indicator. The color indicator shows the trace color the chosen block is currently mapped to. If it is a solid square, the curve is mapped and shown. If it is mapped but not shown, the indicator shows a small striped square. If the curve is not even mapped for display the indicator remains white. Make sure not to over- write existing data in a block that was used before. In order to warn you that a trace is used, the heading of the Trc/Block selector will turn red. Restart check box If this box is ticked (checked) the measurement will automatically restart after the acquisition time has elapsed. Toggle the current setting with a mouse click. The setting is without effect in TRES mode. Stop on Overflow check box If this box is ticked (checked) the measurement will stop on overflow of any histogram bin. The overflow limit is set by the "Stop At" parameter. Toggle the current setting with a mouse click. Mode selection box Here you can select between three different acquisition modes: Oscilloscope Mode: In oscilloscope mode the acquisition and display, once started, repeats at intervals given by the current ac- quisition time setting. The histogram accumulation always starts from scratch. This is useful for monitoring fast changes during optical alignment etc. Note that in this mode you may see nothing for a long time if you set the acquisition time to a high value. Typically one would not set an acquisition time of more than 1 sec- ond in this mode. Integration Mode: As opposed to oscilloscope mode, the histogram acquisition in integration mode is not reset to zero with each display refresh. The histogram continues to grow while the display is updated every 0.1 to 1 seconds. The update rate is determined by the refresh rate value selected in the General Settings Dialog. Acquisition can be manually started and stopped, additionally the option "Stop on Overflow" will stop the acquisition...
-
Page 72: Axis Panel
PicoQuant GmbH MultiHarp Software V. 3.1.0.0 6.5. Axis Panel The controls of the Axis Panel are used to customize the main window's curve display. All mouse actions on the spin controls on this dialog result in instant modification of the display. If you choose to alter the values in the edit fields by keyboard, you have to finalize your changes by pressing <Enter> or clicking the Apply button. The controls are grouped as follows: 6.5.1. Time Axis Group Note that the time axis labeling is precise in terms of relative information only. At offset=0 the absolute time dif- ference between the inputs is close to the shown times but may be off by some tens of picoseconds. Offsets >0 change the placement of the acquisition window and the true time differences are then off accordingly. Minimum edit box and spin control Here the starting value of the displayed time axis can be set. Units are nanoseconds (ns). The minimum is 0. If the entered value exceeds the current time axis maximum, an error message appears. When using the spin control exceeding the current time axis maximum is not possible. Instead of incrementing the minimum value further, the system beeps as a warning. Keep in mind the notes on time axis interpretation given in the para- graph Time Axis Group above. Also note that the increment upon using the spin buttons grows with the current value. This permits fast changes across the entire range. Maximum edit box and spin control Here the end value of the displayed time axis can be set. Units are nanoseconds (ns). If the entered value be- comes smaller than the current time axis minimum, an error message appears. When using the spin control, vi- olating the current time axis minimum is automatically prevented. Instead of decrementing the minimum value further, the system beeps a warning. Keep in mind the notes on time axis interpretation given in the paragraph Time Axis Group above. Also note that the increment upon using the spin buttons grows with the current value. This permits fast changes across the entire range. The time axis settings will determine the number of time bins exported via clipboard copy / paste. Only the bins within the displayed time range will be used. 6.5.2. Count Axis Group Minimum edit box and spin control... -
Page 73: Trace Mapping Dialog
PicoQuant GmbH MultiHarp Software V. 3.1.0.0 6.6. Trace Mapping Dialog The MultiHarp software can measure and store histograms in up to 512 memory blocks. Out of these, up to 16 curves can be displayed at the same time. The trace mapping dialog is used to select the curves to display. Tick the individual boxes ‘Show’ to display a curve. Select the number of the memory block you wish to map the indi- vidual display curve to. The Trace Mapping Dialog also provides some statistics on each curve. These items are: FWHM The Full Width Half Maximum of the curve peak (usually for IRF traces) Max Count The count in the highest point of the curve At Time The time corresponding to the histogram bin where Max Count occurred Resolution The time bin width of the curve Furthermore there are several buttons: Details Can be clicked to see more curve information Can be clicked to mark all traces as shown None Can be clicked to mark all traces as not shown 0..15 Can be clicked to set the default mapping of trace 0..15 to block 0..15 16..31 Can be clicked to set the mapping of trace 0..15 to block 16..31 32..47 Can be clicked to set the mapping of trace 0..15 to block 32..47 48..63 Can be clicked to set the mapping of trace 0..15 to block 48..63 Clear (trash can) Can be clicked to delete the contents of individual blocks... -
Page 74: White Rabbit Dialog
PicoQuant GmbH MultiHarp Software V. 3.1.0.0 Warnings Group Here you can selectively enable / disable individual warnings. Activate the check box for each warning you wish to receive. See section 8.1 for details. Input Hysteresis Group Starting with MultiHarp software version 3.0 and the MultiHarp 160 it is possible to set a hysteresis of the input comparators larger than the default value. This setting can be made here. It applies to all inputs simultaneously, including the sync input. There are only two choices: the default value of about 3 mV and the large hysteresis value of about 35 mV. The larger hysteresis may in some cases help to suppress noise artefacts on the input signals. Consider this only a last rescue when it is impossible to eliminate the noise at its origin. Note that this setting changes upon loading an existing measurement file according to what was set in this file. Note also that the radio buttons for the hysteresis setting will be disabled (grayed out) when the present hard- ware does not have the programmable hysteresis feature. The MultiHarp 150 models out in the field at the time of this software release do not yet have this feature. However, it is planned to make it available by way of a firmware update. Please contact PicoQuant if you need it. TTTR Marker Settings Group Here you can set the signal specifications for external marker signals used in TTTR mode (T2 and T3 mode). The settings for the different markers are independent from each other. The following table applies to each of the four markers: enable Check this if you want the marker to be included into the TTTR data stream. rising / falling Radio buttons to identify the active edge of the signal. Reference Clock Source Group Here you can select the MultiHarp‘s clock source. Normally it runs on its own internal crystal clock. In cases where clock synchronization with other devices is required it is possible to use an external source, e.g., another MultiHarp, a GPS/GLONASS receiver, or an atomic clock. The latter are of interest when a more accurate clock... - Page 75 PicoQuant GmbH MultiHarp Software V. 3.1.0.0 White Rabbit EEProm Data In order to use White Rabbit in the MultiHarp it is first necessary to provide the WRPC with some configuration data. This configuration data is stored in Electrically Erasable Programmable Read-Only Memory (EEPROM) and the controls in this group serve the purpose of editing, storing, and retrieving it. The topmost set of controls labeled MAC is used to assign a Media Access Control (MAC) address to the Multi- Harp‘s WR network port. The MAC is essentially a string of 6 bytes and must be unique within your network. If you are connecting to a non-private network then it should also be globally unique . The button Read will re- trieve the MAC address from EEPROM and place it as a hexadecimal number in the edit field on the left. If there is no MAC address in EEPROM you may want to enter one in the edit field (as a hexadecimal number) and then click the button Write in order to store it in EEPROM. The status field on the right will show success or failure information regarding the last read or write activity. The next set of controls further down, labeled Init Script is for configuration of an initialization script that runs when the WRPC starts (i.e. when the WR link is switched on, see below). For details of the script syntax please refer to the WRPC documentation. The procedure of reading and writing the script from/to EEPROM is the same as described for the MAC address above. The next set of controls further down, labeled SFP DATA is for configuration of the Small Form-factor Pluggable transceiver (SFP) module(s) being used. The WR socket at the MultiHarp‘s front panel is a receptacle for an SFP module converting between electrical and optical signals. The SFP modules require calibration and the group of controls described here allows for depositing the calibration data so that the WRPC can use it. The controls and procedures for editing, reading and writing are the same as described for the other two control groups above. The EEPROM provides space for calibration data of up to 4 SFP modules. This corresponds to 4 lines in the edit box on the left. The syntax for each line is SFP-Module-name Delta-Tx Delta-Rx Alpha where the SFP-Module-name is an ASCII string given by the module manufacturer and the following three cali- bration values are signed decimal numbers. All items are separated by spaces. Not all lines need to be popu- lated. The specific calibration parameters must be obtained by a calibration procedure according to the WRPC...
-
Page 76: Setting Up White Rabbit Connections
PicoQuant GmbH MultiHarp Software V. 3.1.0.0 WR Console Output The WRPC is internally running an embedded software that provides a command console that in principle be accessed like using a terminal. The current implementation in the MultiHarp firmware and software does not al- low full access to this console. However, the group of controls described here provides read access to the con- sole output. If the tick box Auto-Refresh is checked the WR console output is periodically refreshed. Note that the WRPC’s console output is providing meaningful status information only when the WRPC is running and has received the command gui which starts the WRPC monitor. 6.8.2. Setting up White Rabbit Connections As outlined above, using White Rabbit as a clock source for the MultiHarp requires establishing a WR connec- tion. The following describes the necessary steps to set up such a connection by the example of a point to point WR connection between two MultiHarp devices. As a first step it is always necessary to switch the WR link on (starting the embedded WRPC software). This is done by clicking the button Link On in the WR dialog of both devices. In order to see if this is successful it is advisable to have the automatic status refresh enabled. It may take a few seconds until the link is established. Now you can select the WR mode of one device as master and the other as slave. Then click the button Set Mode in each device’s WR dialog. Observe the status display and wait until the PTP status switches to MAS- TER and SLAVE respectively. The console output should now say “Locked Calibrated” in green letters on both sides and on the slave side the servo state should eventually switch to “TRACK_PHASE”. The WR connection is now established and you can inspect the console output, e.g., to check the timing accuracy between the two devices or other connection statistics. For details please refer to the WRPC manual. After the WR connection is established it is possible to set the current time of the master side as the common time for master and slave. This can be done by clicking the button Set Time at the master. Note that this time is obtained from the operating system (as UTC). This is only as accurate w.r.t. true UTC as the accuracy of the master’s Windows clock setting. More accurate time can be obtained by using the Grand Master mode, which, however, requires an accurate time source such as a GPS/GLONASS receiver, an atomic clock or similar, con- nected to the MultiHarp via the 10MHz clock reference and PPS inputs at the back of the housing. Note how- ever, that such functionality is not yet conveniently supported by the MultiHarp software. Serious work in this di- rection should use the MultiHarp programming library and custom software. In practice it is probably more con-... -
Page 77: About Multiharp
PicoQuant GmbH MultiHarp Software V. 3.1.0.0 6.9. About MultiHarp… Dialog This dialog provides version information on the MultiHarp software and hardware, the latter only if it is con- nected and operational. It can be opened via the Help menu or via the toolbar. The button Request Support opens a small text viewer window that provides a listing of MultiHarp hardware and software versions that you can copy and paste into your support enquiry. This information is very important for adequate support. Support requests without this information cannot be processed and will be delayed by return questions for this informa- tion. If your system is not functional at all, the minimum information you must provide for support is the serial number of your MultiHarp. It can be found at the back of the housing. The dialog also provides buttons for links to relevant web pages and a button for checking for and downloading software updates. Note that downloading a software update does not automatically install it. The downloads contain zip files that must be unpacked and installed manually. Even though updates are typically bringing improvements and bugfixes, please note that it may not always be advisable to blindly install the latest software. This is the case especially when a user or his/her laboratory have developed custom software that relies on a certain feature of the old version that may have changed. Updates may break such compatibility. Therefore, always carefully read the release notes before installing and/or ensure a safe fallback. 6.10. Title and Comment Editor You can use this dialog to edit the file title / comment. It can be opened via double–click on the title, via the File menu or via the Print Preview Toolbar. The text you enter here will be stored in the data file. The first line will be displayed as the file title above the histogram display area. The text you can enter here is limited to 4 lines and 255 characters. Upon loading of a data file, the title and comment will also be retrieved. It will also be included in prints, if the corresponding check mark is set in the page setup dialog box available through the File menu. 6.11. Print Preview Dialog Use this Dialog to preview the layout as it would appear when printed. When you choose this command, the... -
Page 78: Problems, Tips & Tricks
PicoQuant GmbH MultiHarp Software V. 3.1.0.0 7. Problems, Tips & Tricks 7.1. Basic Pitfalls The hardware settings in the MultiHarp software are retrieved to the current settings upon loading an existing measurement file. This is a convenient feature most users like because it easily permits repeating a measure- ment with identical settings. However, the retrieved settings may become pitfalls when they are not in agree- ment with the measurement you are intending to run. This may be general settings (see section 6.7) as well as control panel settings (see section 6.4). If measurements behave strangely, always check your active settings in both places. 7.2. PC Performance Issues The MultiHarp device and its software interface are a complex real–time measurement system requiring appro- priate performance both from the host PC and the operating system. This is why a fairly modern CPU and suffi- cient memory are required, along with a recent USB 3.x (or compatible) host controller. The screen resolution should be at least 800x600. At least a 2 GHz dual core (better quad core) processor, 4 GB of memory and a fast hard disk (preferably SSD) are recommended. In order to maintain correct interaction between the measurement hardware, the display of histogram curves and user input, the operating system’s message passing mechanism is used. It is recommended not to overload the system by running other processes in the background while measuring with the MultiHarp. The PC’s own occasional network activity should be no problem but running the machine e.g., as a server for other PCs is not recommended. In principle any kind of background activity is allowed. However, should the system become overloaded, photon events may be lost and measurement times and display rates may become irregular. You can minimize the running MultiHarp software during measurements without issues. This may be of interest for lengthy measurements in integration mode, where one is only interested in accumulating a certain amount of counts without need for permanent monitoring. However, the things you do in the meantime must not overload the CPU. The "panel meters" showing the current count rates are not meant to be 100 % accurate. They merely serve as an aid for setting up the system. Some of them may suffer from system overload. Accordingly the values shown in the curve details (trace mapping dialog) are subject to such tolerances. -
Page 79: Warming Up Period
PicoQuant GmbH MultiHarp Software V. 3.1.0.0 An often overlooked problem in fluorescence lifetime measurements is pile–up and dead time related histogram distortion. It becomes noticeable if the detector count rate exceeds ~5 % of the sync rate. This is why high exci- tation rates are so important. The effect is an inherent problem of high resolution TCSPC and not a fault of the hardware. The MultiHarp is less significantly affected by such issues because of its very short dead time. Never- theless, the safest way to handle dead time related histogram distortions is to maintain count rates < 5 % of the excitation rate. If high throughput is a primary objective and the detector dead time is not limiting, then this rule of thumb may of course be intentionally ignored. This may bring about the issue of pulse-pile-up because indi- vidual detector pulses begin to overlap. Pulse pile-up may also be corrected for in data analysis. Indeed, com- bined with suitable detectors (e.g., PMA Hybrid from PicoQuant) the MultiHarp will allow fluorescence lifetime measurements with count rates as high as 80 MHz, i.e. as fast as the excitation rate. For further details see the literature given at the end of section 2.4 and the publications on PicoQuant's concept of rapidFLIM. 7.4. Warming Up Period Observe the warming–up period of at about 20 minutes (depending on ambient temperature) before using the MultiHarp for important measurements. You can use this time for set–up and preliminary measurements. The maximum permissible ambient temperature is 35 °C. Make sure that the cooling air can circulate freely and no other hot instrument is directly under the MultiHarp. 7.5. Custom Programming of the MultiHarp A programmer's library (DLL) for custom Windows software development is available to build your own applica- tions e.g., in LabVIEW, Matlab, Python, C/C++, C#, and Pascal (Delphi/Lazarus). A rich set of demo code is pro- vided for an easy start. If you care about performance, consider using a proper compiled high level program- ming language such as C/C++ or Pascal. Scripted languages like Matlab and Python tend to be very slow. There is also a library version for Linux (x86-64 processor architecture only) which is fully compatible with that for Windows so that applications can easily be ported across the two platforms. 7.6. Software Updates We constantly improve and update the software for our instruments. This includes updates of the configurable hardware (FPGA). Such updates are important as they may affect reliability and interoperability with other prod- ucts. The software updates are free of charge, unless major new functionality is added. The latest software is... - Page 80 PicoQuant GmbH MultiHarp Software V. 3.1.0.0 quant. com and include the same information. Complete information will help us to help you more quickly. When you submit an error report referring to measurement data you have taken, attach the original data file. If the file is too large for email (>5 MB) please provide access to it on a public file server. If the device must to be sent in for inspection / repair / upgrade, please request an RMA number before shipping the hardware. Observe precautions against static discharge, moisture, and mechanical damage under all cir- cumstances in handling, packaging, and shipping. Use original or equally protective packaging material. Of course we also appreciate good news: If you have obtained exciting results with one of our systems, please let us know, and where appropriate, please mention the instrument in your publications. At our web–site we maintain a large bibliography of publications related to our instruments. It may serve as a reference for you and other potential users. See http://www.picoquant.com/scientific/references. Please submit your publications for addition to this list. Page 80...
-
Page 81: Appendix
PicoQuant GmbH MultiHarp Software V. 3.1.0.0 8. Appendix 8.1. Warnings When the MultiHarp software is running with functional hardware it continuously collects information about the input signals and the current acquisition settings. If these settings along with the input rates indicate possible errors, the software will indicate this by showing a warning icon. While the software is running in interactive histogramming mode the warning icon is displayed at the bottom of the main window in the status bar. In the case of TTTR mode, it will appear directly in the TTTR mode dialog. The icon can be clicked to display a list of current warnings together with a brief explanation of each warning. Similarly the Warnings (if any) will be stored in the data files and can be inspected via the Curve Details dialog, also after re-loading such a file later. The warnings are to some extent dependent on the current measurement mode. Not all warnings will occur in all measurement modes. Also, count rate limits triggering a specific warning may be different in the various modes. The following table lists the possible warnings in the three measurement modes and gives some expla- nation as to their possible cause and consequences. Warning Histo Mode T2 Mode T3 Mode WARNING_SYNC_RATE_ZERO No pulses are detected at the sync input. In histogramming and √ √ T3 mode this is crucial and the measurement will not work without this signal. WARNING_SYNC_RATE_VERY_LOW The detected pulse rate at the sync input is below 100 Hz and √ √... - Page 82 PicoQuant GmbH MultiHarp Software V. 3.1.0.0 Warning Histo Mode T2 Mode T3 Mode WARNING_INPT_RATE_RATIO This warning is issued in histogramming and T3 mode when the rate at any input channel is higher than 5% of the sync rate. This √ √ is the classic pile-up criterion. There are some measurement sce- narios where this condition is expected and the warning can be disabled. Examples are antibunching measurements or Rapid- FLIM where pile-up is either tolerated or corrected for during data analysis. One can usually also ignore this warning when the cur- rent time bin width is larger than the dead time. WARNING_DIVIDER_GREATER_ONE In T2 mode: The sync divider is set larger than 1. This is probably not intended. The sync divider is designed primarily for high sync rates from lasers and requires a fixed pulse rate at the sync input. In that...
- Page 83 PicoQuant GmbH MultiHarp Software V. 3.1.0.0 If any of the warnings you receive indicate wrong pulse rates, the cause may be inappropriate input settings, wrong pulse polarities, poor pulse shapes or bad connections. When in doubt, check all signals with an oscilloscope of sufficient bandwidth. Note that the software can detect only a subset of all possible problematic measurement conditions. It is there- fore not safe to assume “all is right” just by seeing no warning. On the other hand, if any of the warnings turns out to be an unnecessary nuisance, e.g., because your specific measurement conditions inevitably trigger it,...
-
Page 84: Data File Formats
PicoQuant GmbH MultiHarp Software V. 3.1.0.0 8.2. Data File Formats While for many purposes the ASCII export of histograms to files or to the clipboard is sufficient and easy, you also may want to access the MultiHarp data files via custom programs. This section provides only a brief over- view on the file format. For details please refer to the online help file available via the help menu. To overcome certain limitations of various different formats used in the past, PicoQuant now uses a unified file format. It is designed to be future poof in the sense that files created by a current software version stay valid for future software revisions and, moreover, files created by future software versions will most likely still be read- able by older software, although they might contain information, that software can't even "know" about. This is achieved by using a tagged format. Tags identify the data to follow, and give the type, length and even meta in- formation. The exact location of an individual item in the file is then irrelevant. Version robustness is granted as long as version-breaking changes to the semantics of a given field are implemented by a tag with a new identi- fier rather than expanding the range or interpretation of the old one. The list of tags (identifiers) and their inter- pretation rules can be kept in a tag dictionary. With this as a precondition, the software only has to show toler- ance on missing non-mandatory (i.e. optional) content. The new format definition unifies PicoQuant's existing file formats which individually evolved over many years. The resulting new TTTR file format with the extension *.ptu will be used for all current and future TCSPC products supporting TTTR mode and enriches them with powerful new features. Similarly, a tagged file format with the extension *.phu covers the histogram data formats of our current and future TCSPC products. To support understanding of the format and implementation of custom software accessing these files, a set of demos is provided in the subfolder \Filedemo in your chosen software installation folder. If you need to evaluate more header items than the demos do, please refer to the MultiHarp online help file available via the help menu. A file format related HTML help file is also provided in the file demo folder. It contains a list of tag types and a tag dictionary that explains the individual items. Note that the dictionary contains more items than the MultiHarp software actually uses. It is recommended to go by a specific file, have one of the demos read it and then look at the list of header items you get. You can also use the PicoQuant File Info shell extension that will be installed by the MultiHarp software setup to inspect individual header items of a *.ptu or *.phu file. - Page 85 PicoQuant GmbH MultiHarp Software V. 3.1.0.0 ware aiming solely at retrieving the event record data content can (and should be) be tolerant about this tag and go for the pure event record data. This tolerance will ensure compatibility for the future. Indeed, the demos in the subfolder \Filedemo in your chosen installation directory are following this tolerant approach. For more information on individual file tags and their content, please consult the online help file available via the help menu. It is worth noting that the actual TTTR record data following the file header corresponds directly to the raw data obtained with custom programs using the MultiHarp programming library. Page 85...
-
Page 86: Hardware Technical Data
PicoQuant GmbH MultiHarp Software V. 3.1.0.0 8.3. Hardware Technical Data 8.3.1. Specifications All information given here is reliable to our best knowledge. However, no responsibility is assumed for possible inaccuracies or omissions. Specifications and external appearance are subject to change without notice. Input Channels and Sync Number of Input Channels MultiHarp 150 N MultiHarp 150 P MultiHarp 160 4 or 8 4, 8, or 16 16, 32, 48, or 64 Trigger principle edge trigger, software adjustable Trigger edge rising or falling, software adjustable Input impedance 50 Ω Input voltage operating range (pulse peak) −1200 … 1200 mV optimum: abs. Amplitude 150..300 mV Input voltage max. range (damage level) ± 2500 mV −1200 … 1200 mV Trigger level adjust Resolution < 3 mV Input trigger hysteresis ca. 3 mV (default) or 35 mV (settable) Input pulse width ≥ 0.4 ns... - Page 87 PicoQuant GmbH MultiHarp Software V. 3.1.0.0 Histogrammer Maximum number of time bins 65536 Full scale time range MultiHarp 150 N MultiHarp 150 P MultiHarp 160 (depending on chosen resolution) 5.24 µs … 21.99 s 328 ns … 2.74 s 328 ns … 2.74 s Count depth per time bin 4,294,967,296 (32 bit) Acquisition time 1 ms … 100 h MultiHarp 150 N MultiHarp 150 P MultiHarp 160 Sustained throughput to device memory (total for max. number of possible channels) 180 · 10 cps 332 · 10 cps * 1328 · 10 cps * * 166 · 10 cps per row of 8 or less input channels TTTR Engine MultiHarp 150 N MultiHarp 150 P MultiHarp 160 T2 mode resolution 80 ps 5 ps 5 ps T3 mode resolution (settable)
-
Page 88: Connectors
PicoQuant GmbH MultiHarp Software V. 3.1.0.0 Operation altitude max. 2000 m above sea level Warm–up period to meet specs 20 min Recommended PC specifications ≥ 2 cores, ≥ 2 GHz RAM ≥ 4 GB USB minimum required USB 2.0 USB required to meet specs USB 3.0 or compatible higher Windows 8.1, 10 or 11 Operating system or Linux with Wine (see section 8.4) Power Supply MultiHarp 150 MultiHarp 160 Line voltage 100...240V AC 100...240V AC 50...60 Hz 50...60 Hz (direct input)* (direct input) Power consumption ≤ 50 W ≤ 150 W Fuse 2 x T1.6A/250V* 2 x T4A/250V * Exception: Hardware model MultiHarp 150 4P EPS receives 12V DC from a dedicated external power supply with fuse built in. Dimensions MultiHarp 150 models 4P, 4N, 8P, 8N incl. feet and handles 305 × 240 × 95 mm MultiHarp 150 models 16P, 16N... - Page 89 PicoQuant GmbH MultiHarp Software V. 3.1.0.0 The control connector is a 25-pin female sub-D connector labeled 'CTRL'. In case of the MultiHarp 150 mod- els 4P, 4N, 8P and 8N it is located on the front panel and in case of the MultiHarp 160 and MultiHarp 150 mod- els 16P and 16N it is located at the back of the housing. Note that future firmware/software is going to allow re- configuration of some of these pin assignments. Note furthermore that the MultiHarp 160 X extension units also have a control connector, which is, however, reserved for future use and must not be connected at this time. The following figure shows the pin layout and the table below contains the connector's default pin assignments. CTRL Connector – Pin numbering scheme CTRL Connector – Default Pin Assignments Pin# Name Purpose/Description GPIO 0 TTL in marker 1 input GPIO 1 TTL in marker 2 input GPIO 2 TTL in marker 3 input GPIO 3 TTL in marker 4 input GPIO 4 reserved GPIO 5 reserved GPIO 6 reserved GPIO 7 reserved GPIO 8...
- Page 90 PicoQuant GmbH MultiHarp Software V. 3.1.0.0 MACT TTL out high when measurement running ground (0V) D3V3 DC out +3.3V / ≤ 350 mA supply for external hardware add-ons ground (0V) The specifications for TTL signals can be found at http://wikipedia.org/wiki/Transistor-transistor_logic. Note that for the hardware described here a maximum high level of 3.3V is permitted. For further details regarding signal specifications, notably the trigger output (voltages, frequencies pulse widths etc.) see section 8.3.1. Pins 1, 2, 3 and 4 accept TTL compatible synchronization signals that will be recorded as markers in TTTR mode. The pins are internally pulled down, so that they are inactive when left unconnected. The active edge is chosen in the software settings dialog. Rise/fall times must be 50 ns or faster. Both high and low state must be at least 50 ns long. The clock period may therefore (in principle) be as short as about 100 ns but data bus throughput constraints will apply. Each marker creates an additional TTTR record, so that one must ensure not to swamp the data stream with too many marker records. When bandwidth gets tight, markers take precedence over photon records, so that excess marker traffic can suppress photon records. In fast imaging applications it is therefore recommended not to use a pixel clock but a line clock only. Because each photon has a time tag, it is usually not necessary to use an additional pixel clock. For more information on how to use the marker inputs see section 5.3.5. Pin 17 can be used to connect the serial TX line of a GPS/GLONASS receiver for time transmission via the NMEA ZDA Message protocol at 115.2 kbps, 3.3V. We have successfully tested this with the Mini-T™ GG disci- plined clock module from Trimble Inc., USA. See section 6.7 for suitable clock source selection. Pins 19 and 20 can be used to implement hardware triggered measurements. Note that this requires custom software (see the DLL manual and related demos).
-
Page 91: Multiharp 160 - Connectors For The Extension Units
PicoQuant GmbH MultiHarp Software V. 3.1.0.0 PPS IN accepts the “pulse per second” signal of e.g., GPS receivers. In combination with the 10 MHz clock and the time code transmitted by the GPS receiver it is possible to synchronize the MultiHarp with clock and time from GPS. This can be used to synchronize two or more MultiHarp to GPS and one another. The accuracy of such a synchronization depends on that of GPS and the quality of the receiver. It is typically on the order of some tens of ns. The benefit is remote synchronization over large distances. If better accuracy is required, con- sider White Rabbit instead. The MultiHarp 160 also has dedicated connectors at the back for the extension units and the external FPGA in- terface. These are Samtec ERI8/ERC series latching compound connectors explained in the following dedicated sections. 8.3.3. MultiHarp 160 - Connectors for the Extension Units The MultiHarp 160 is modular by design. Up to three extension units can be added on top of the base unit in or- der to provide more input channels. The extension units must be stacked on the main unit in ascending order, i.e. first X1, then X2 and finally X3. The extension connectors are labeled E1, E2, and E3 on the base unit and just E on the extension units. Each extension unit ships with a dedicated cable (Samtec EPLSP) for its connection to the base unit. The figure be- low shows how the corresponding connections must be made. The dedicated Samtec EPLSP cables (orange) must then be connected at the back as shown, starting at con- nector E1 for the first extension unit (shortest cable), continuing up to E3 for the last extension unit (longest ca- ble). Other (cross-) connections are not allowed. If the maximum of 3 extension units is not exhausted then the corresponding sockets remain unconnected. These connections must be made before the device is switched on and must not be connected or disconnected while the device is powered on. Page 91... -
Page 92: Multiharp 160 - Connector For The External Fpga Interface
PicoQuant GmbH MultiHarp Software V. 3.1.0.0 8.3.4. MultiHarp 160 - Connector for the External FPGA Interface The MultiHarp 160 has a high speed interface for data transfer to one or more external FPGAs. The Samtec ERI8/ERC connector for this purpose is located at the back of the main unit and labeled EXT. It is listed here for completeness only, for all other details on the External FPGA Interface (EFI) please see the separate documen- tation. It is provided on the MultiHarp distribution media as part of the EFI gateware and software pack (currently EFI_v01_00_00.zip). The most recent EFI pack can be downloaded from the MultiHarp 160 product page at https://www.picoquant.com/products/category/tcspc-and-time-tagging-modules/multiharp-160. 8.3.5. Indicators The MultiHarp shows some status information by means of three LEDs on the front panel labeled STATUS. The meaning of these indicators, from left to right, is as follows: USB Status (left) = no connection orange = USB 2.0 connection green = USB 3.0 connection Measurement Status (middle) = measurement active green = inactive This reflects the state of pin 22 of the CTRL connector (high when measurement running). Error Status (right) = error (or not yet initialized) orange = info green = OK... -
Page 93: Using The Software Under Linux
PicoQuant GmbH MultiHarp Software V. 3.1.0.0 8.4. Using the Software under Linux The MultiHarp software can also be used under Linux (x86 platform only). This requires that Wine is installed (see https://www.winehq.org). You can run the regular software setup as explained in section 3.4. Instead of in- stalling a device driver, running under Linux with Wine requires that you have Libusb 1.0 installed (see https:// libusb.info/). We have successfully tested three configurations: - Wine 4.0 and Libusb 1.0.21 on Linux Mint 19.3 (64 bit). - Wine 5.0 and Libusb 1.0.23 on Ubuntu 20.04 LTS (64 bit). - Wine 6.0 and Libusb 1.0.23 on Ubuntu 20.04 LTS (64 bit). In all cases we used the package winehq-stable which is typically more mature than the version provided by the Linux distribution. Libusb Access Permissions For device access through libusb, your kernel needs support for the USB filesystem (usbfs) and that filesystem must be mounted. This is done automatically, if /etc/fstab contains a line like this: usbfs /proc/bus/usb usbfs defaults 0 0 This should routinely be the case if you installed any of the mainstream Linux distributions. The permissions for the device files used by libusb must be adjusted for user access. Otherwise only root can use the device(s). The most appropriate way of setting the suitable permissions is by means of hotplugging scripts or udev. Which mechanism you can use depends on the Linux distribution you have. Most recent distributions use udev. ... - Page 94 PicoQuant GmbH MultiHarp Software V. 3.1.0.0 All information given here is reliable to our best knowledge. However, no responsibility is assumed for possible inaccuracies or omissions. Specifications and external appearances are subject to change without notice. PicoQuant GmbH P +49-(0)30-1208820-0 Rudower Chaussee 29 (IGZ) F +49-(0)30-1208820-90 12489 Berlin info@picoquant.com Germany http://www.picoquant.com Page 94...
Need help?
Do you have a question about the MultiHarp 150 and is the answer not in the manual?
Questions and answers