Advertisement
Quick Links
Advertisement

Related Manuals for Manhattan Comfort 181GMC


Summary of Contents for Manhattan Comfort 181GMC
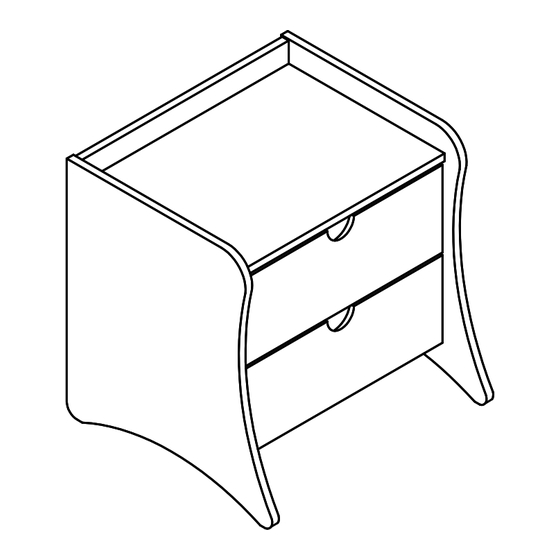
- Page 1 MANHATTAN COMFORT 181GMC V.04152024...
- Page 2 STOP! Before beginning the assembly process, ensure all boxes and parts have been delivered. ATTENTION: BEFORE START ASSEMBLING TAKE A PICTURE OF THE LABELS ON THE PACKAGES, THIS WILL BE RECQUIRED IN CASE THE PRODUCT HAS ANY ASSISTANCE DEMAND. FOR BEST RESULTS: Do not throw away packaging materials until assembly is complete.
-
Page 3: Included In This Package
Included in this package: Base Right side panel of the drawer Left side panel Rear panel of the drawer Right side panel Base of the drawer Crossbar Top panel Back panel Left slides Front of the drawer Right slides Left side panel of the drawer A - x20 B- x11 C - x16... -
Page 4: Weight Capacity
Weight capacity: 11 lb 11 lb Rear view... - Page 5 HOW TO IDENTIFY THE SLIDES? LEFT PANEL SLIDES *plastic wheel always pointed to the ground. RIGHT PANEL SLIDES *plastic wheel always pointed to the ground. WICH HOLES USE TO ATTACH THE SCREWS?
- Page 6 Attention, all the assemblage must be done on the cardboard box or the Styrofoam boards to avoid damage to the parts. Step 01 Apply the parts 12 onto the part 02 and the part 13 onto the part 03 with the hardware A.
- Page 7 Step 02 Apply the hardware (C) into the parts 02 and 03. C = 08x Step 03 Connect the part 11 onto the part 04 with the hardware (B). B = 03x...
- Page 8 Step 04 Connect the part 04 onto the part 03 with the hardware D. D = 02x G = 02x Apply the hardware (G) onto the hardware (D). Step 05 Connect the part 01 onto the part 03 with the hardware D. D = 02x G = 02x Apply the hardware (G) onto the hardware (D).
- Page 9 Step 06 Connect the part 02 onto the parts 01 and 04 with the hardware D. D = 04x G = 04x Apply the hardware (G) onto the hardware (D). Step 07 Connect the part 05 with the hardware F. F = 16x...
- Page 10 Assembling the drawers Attention, all the assemblage must be done on the cardboard box or the Styrofoam boards to avoid damage to the parts.
- Page 11 Step 08 Apply the hardware (C) into the part 06. C = 04x Repeat the same procedure to assemble the second drawer. Step 09 Connect the part 07 and 08 onto the part 06 with the hardware D. D = 04x Repeat the same procedure to assemble the second drawer.
- Page 12 Step 10 Apply the part 10 in the groove of the parts 07, 08 until the groove of the part 06. Repeat the same procedure to assemble the second drawer. Step 11 Connect the part 09 onto the parts 07 and 08 with the hardware (B).
- Page 13 Step 12 You must apply the screws on the holes indicated by the arrows. *plastic wheel always pointed to the rear panel of the drawer part 09. A = 04x Repeat the same procedure to assemble the second drawer.
- Page 14 Step 13 Install the drawers fitting them into the slides fixed on the parts 02 and 03.
-
Page 15: Warranty Policy
COMFORT WARRANTY POLICY All Manhattan Comfort furniture products are warranted, to the original purchaser at the time of purchase and for a period of 30 days thereafter. Our warranty is limited to new products purchased in factory sealed cartons. This wa- ranty is valid in the United States of America and Canada.
Need help?
Do you have a question about the 181GMC and is the answer not in the manual?
Questions and answers