Table of Contents
Advertisement
Quick Links
Advertisement
Table of Contents

Related Manuals for Extech Instruments EX623A


Summary of Contents for Extech Instruments EX623A
- Page 1 Quick Start 600 A True RMS AC/ DC Clamp Meter with IR Thermometer MODEL EX623A...
- Page 2 Quick Start (EN) INTRODUCTION The Extech EX623A measures temperature with its infrared (IR) de- tector and dual Type K thermometer inputs. Electrical measure- ments include AC/DC Voltage/Current, Resistance/Continuity, Capacitance, Frequency/Duty Cycle, Diode, and a non-contact volt- age detector. This meter features a water-proof, rugged design in- tended for industrial use.
- Page 3 CAUTION • Always remove the test leads before replacing the battery or fuses. • Inspect the condition of the test leads and the meter itself for any damage before operating the meter. • Use caution when making measurements if the voltage > 35 V DC or 25 V AC RMS.
-
Page 4: Meter Description
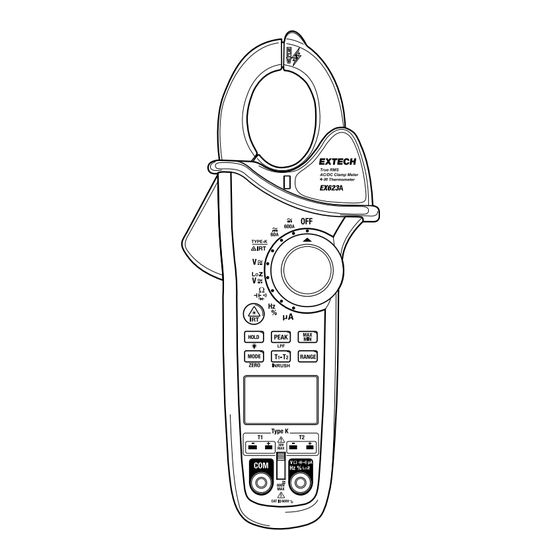
METER DESCRIPTION Non-contact voltage (NCV) detector. Current clamp. NCV indicator. Clamp trigger. Function switch. Control buttons. Backlit LCD. Thermocouple inputs. Negative test lead jack. 10. Positive test lead jack. 11. Input shutter switch. Battery compartment, IR lens, and la- ser pointer lens on back of meter. CONTROL BUTTONS Press and hold to display the temperature of the targeted spot. -
Page 5: Meter Power
Short press to step through MAX and MIN readings and then back to normal display mode. Short press to select an alternate mode for the function in use. For example, select AC or DC when measuring voltage. Long press to activate the DC current zero function. With a thermocouple connected to one or both inputs, choose the display configuration (T1, T2, or T1 minus T2). - Page 6 Data Hold To freeze the displayed reading, press the HOLD button, the HOLD icon will appear. Press the HOLD button to return to normal operation. Maximum and Minimum Readings Press the MAX/MIN button to toggle the maximum and minimum reading displays. The MAX and MIN display icons show the se- lected mode.
- Page 7 MEASURING CURRENT WITH THE CLAMP WARNING Disconnect the test leads before making clamp measurements. 1. Set the function switch to the 60A or 600A position. 2. Press MODE to select AC or DC. 3. Press the trigger to open jaw. Fully enclose only one conductor as shown.
- Page 8 μA CURRENT MEASUREMENTS 1. Slide the input shutter to the upper position. 2. Set the function switch to the μA position. 3. Press MODE to select AC or DC. 4. Insert the black test lead plug into the negative COM jack. Insert the red test lead plug into the positive μA jack.
- Page 9 MEASURING VOLTAGE, FREQUENCY, RESISTANCE, DIODE, CAPACITANCE These measurements are made with the test leads placed ‘across’ the device or circuit under test (in parallel). WARNING Risk of electrocution. High-voltage AC/DC circuits are extremely dangerous and should be measured with great care. Do not measure resistance, diode, or capacitance on powered devices.
-
Page 10: Ir Temperature Measurements
IR TEMPERATURE MEASUREMENTS CAUTION Do not directly view or point the laser at an eye. 1. Set the function switch to the IRT position. 2. Press and hold the IRT button and aim the laser pointer toward a surface. 3. With the IRT button still depressed, long press MODE to toggle °F and °C. - Page 11 TYPE K TEMPERATURE MEASUREMENTS CAUTION The supplied thermocouple is rated for 482℉ (250℃) maximum. 1. Place the input shutter switch in the lower position. 2. Rotate the function switch to the TYPE K position. Press MODE to select °F or °C. 3.
-
Page 12: Non-Contact Voltage Detector
NON-CONTACT VOLTAGE DETECTOR 1. Remove the test leads from the meter. 2. Set the function switch to any position. 3. Place the clamp tip near, or on, the conductor under test. 4. If AC voltage is present, the red NCV detector LED will switch on. -
Page 13: Basic Specifications
BASIC SPECIFICATIONS For complete specifications, please download the user manual. Display Backlit LCD with bar graph Over-range OL display indication Battery power 9 V battery Operating 32 to 122℉ (0 to 50℃) temperature Operating humidity 80% RH max. up to 87℉ (31℃) Dimensions 9.5 x 3.8 x 1.75 in. -
Page 14: Customer Support
CUSTOMER SUPPORT Customer Support Local Telephone List: https://support.flir.com/contact Returns (RMA): https://customer.flir.com/Home WARRANTY Teledyne FLIR warrants this Extech brand instrument to be free of defects in parts and workmanship for two years from date of ship- ment. To view the full warranty text, please visit the support site, link below. -
Page 16: Quick Start
Quick Start last page Website http://www.flir.com Customer support http://support.flir.com Copyright © 2024, FLIR Systems, Inc. All rights reserved worldwide. Disclaimer Specifications subject to change without further notice. Models and accessories subject to regional market considerations. License procedures may apply. Products described herein may be subject to US Export Regulations. Please refer to exportquestions@flir.com with any questions.
Need help?
Do you have a question about the EX623A and is the answer not in the manual?
Questions and answers