Advertisement
- 1 PARTS
- 2 BEFORE USING FOR THE FIRST TIME
- 3 CORD STORAGE
- 4 SET THE CLOCK
- 5 CONTROLS AND DISPLAY
- 6 OPERATING MODES
- 7 USING GRIND & BREW MODE
- 8 USING PRE-GROUND COFFEE MODE
- 9 KEEP WARM
- 10 USING THE TIMER
- 11 A QUICK CUP
- 12 CARE AND MAINTENANCE
- 13 ERROR CODES
- 14 IMPORTANT SAFEGUARDS
- 15 Documents / Resources
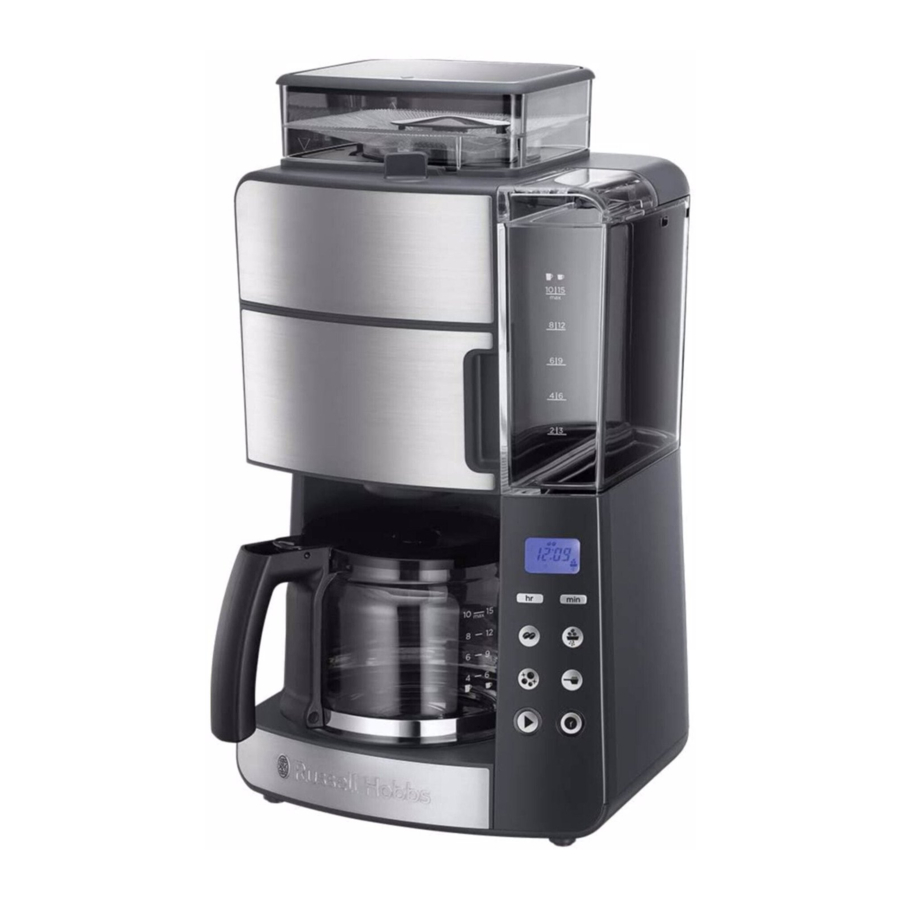
PARTS

- Coffee bean hopper and lid
- Grind control
- Water reservoir
- Display
- Control panel
- Hot plate
- Carafe
- Filter holder chamber
- Filter holder
- Paper filter #4 (not supplied)
- Cleaning brush
BEFORE USING FOR THE FIRST TIME
Follow the directions under USING PRE-GROUND COFFEE MODE but WITHOUT adding a filter paper or coffee. Once the water has cycled through the machine, discard it. Wash then dry the carafe.
CORD STORAGE
Excess power cord can be pushed back into the body of the appliance for storage.
SET THE CLOCK
It isn't necessary to set the clock to use your coffee maker but you will need to set it if you want to use the timer functions.
- Put the plug into the power socket.
- 12:00 will flash on the display.
- Use the hr and min buttons to set the correct time in 24 hour format.
- The clock will retain its settings until the coffee maker is unplugged.
- Use the hr and min buttons to set a new time. If you don't press either the hr or min buttons within 15 seconds, the coffee maker will go back to showing the previously set time.
CONTROLS AND DISPLAY

OPERATING MODES
Your coffee maker has two operating modes.
GRIND & BREW MODE
This mode uses fresh coffee beans to make the coffee.
PRE-GROUND COFFEE MODE
This mode uses pre-ground coffee added directly to the filter to make the coffee.
USING GRIND & BREW MODE
The quality and flavour of your coffee is determined by the type of beans, the grind size and the brewing time. We recommend experimenting with the grind size and coffee strength button until you find the settings that work best for you.
- To select Grind & Brew mode, press the
![]() button until the
button until the ![]() icon shows on the display.
icon shows on the display. - Fill the reservoir with the required amount of water. Note that during the brewing cycle, ALL of water you put in the reservoir will be used.
- Open the filter compartment and place a #4 paper filter into the filter holder. Close the compartment.
- Open the coffee bean hopper lid and fill it with fresh coffee beans. Don't overfill the hopper so that you can't refit the lid. The lid seal will help to keep the coffee beans fresh between uses.
- Turn the grind control to the required setting (
![]() fine,
fine, ![]() medium and
medium and ![]() coarse).
coarse). - Press the
![]() button to select the number of cups you are brewing. The setting you choose will depend on how much water you have added to the reservoir. For example, if you have filled the reservoir to the 6 cups mark, set the number of cups to 6 as well. The default setting is 8.
button to select the number of cups you are brewing. The setting you choose will depend on how much water you have added to the reservoir. For example, if you have filled the reservoir to the 6 cups mark, set the number of cups to 6 as well. The default setting is 8. - Select the desired coffee strength using the
![]() button. The default setting is
button. The default setting is ![]() .
. - Press the
![]() button to start brewing. After a short time, the grinder will operate and the light around the button will flash while the coffee is brewing.
button to start brewing. After a short time, the grinder will operate and the light around the button will flash while the coffee is brewing. - Once the coffee is brewed, the light will stop flashing and remain lit.
 button until the
  icon shows on the display.
 fine,
fine,  medium and
  coarse).
 button. The default setting is
  button to start brewing. After a short time, the grinder will operate and the light around the button will flash while the coffee is brewing.
USING PRE-GROUND COFFEE MODE
- To select pre-ground coffee mode, press the
![]() button until the
button until the ![]() icon shows on the display.
icon shows on the display. - Fill the reservoir with the required amount of water. Note that during the brewing cycle, ALL of water you put in the reservoir will be used.
- Open the filter compartment and place a #4 paper filter into the filter holder.
- For each large cup, add 6g of ground filter coffee to the filter. The amount of ground coffee you add will depend on how much water you have added to the reservoir. For example, if you have filled the reservoir to the 6 cups mark, add 6 measures of ground coffee.
- Close the filter compartment.
- Select the desired coffee strength using the
![]() button. The default setting is OFF. Setting coffee strength to ON will give a stronger brew by slowing down the rate that water passes through the pre-ground coffee.
button. The default setting is OFF. Setting coffee strength to ON will give a stronger brew by slowing down the rate that water passes through the pre-ground coffee. - Press the
![]() button to start brewing. After a short time, the light around the button will flash while the coffee is brewing.
button to start brewing. After a short time, the light around the button will flash while the coffee is brewing. - Once the coffee is brewed, the light will stop flashing and remain lit
KEEP WARM
- Once brewed, the hotplate will keep the coffee warm for 40 minutes after brewing. The keep warm mode is indicated by the light around the
![]() button coming on. After 40 minutes, the light will go out.
button coming on. After 40 minutes, the light will go out.
USING THE TIMER
Note: Make sure the clock is set to the correct time. Use the hr and min buttons.
- Prepare the coffee maker according to which mode you are using but do not press the
![]() button to start brewing.
button to start brewing. - Press the
![]() button. The button will flash and the
button. The button will flash and the ![]() icon will flash on the display.
icon will flash on the display. - Within 10 seconds of pressing the
![]() button, use the hr and min buttons to enter the time you want your coffee maker to start brewing.
button, use the hr and min buttons to enter the time you want your coffee maker to start brewing. - If a time has previously been programmed, it will flash on the display otherwise the display will show the default setting of 8:00.
- 10 seconds after you have finished entering the time, the
![]() button will stop flashing and remain lit. The
button will stop flashing and remain lit. The ![]() icon on the display will also stop flashing and remain lit. Your coffee maker is now programmed to brew at the time you have entered.
icon on the display will also stop flashing and remain lit. Your coffee maker is now programmed to brew at the time you have entered.
 button. The button will flash and the
 - If you want to check the program time press the
![]() button. The programmed time will show for 3 seconds and then return to the time of day.
button. The programmed time will show for 3 seconds and then return to the time of day. - If you want to cancel the timer before brewing has started, press and hold the
![]() button for 5 seconds until the
button for 5 seconds until the ![]() light goes out and the
light goes out and the ![]() icon disappears from the display.
icon disappears from the display. - If you want to stop the coffee maker while it's brewing, press the
![]() button.
button.
A QUICK CUP
If you want a quick cup of coffee before the brewing cycle has finished:
- You can remove the carafe at any time. The non-drip valve will prevent coffee dripping on to the hotplate.
- To prevent the filter holder overflowing, replace the carafe on the hotplate within about 20 seconds.
- When you replace the carafe on the hotplate the non-drip valve opens to let any remaining coffee through.
CARE AND MAINTENANCE
GENERAL CLEANING
- Unplug the appliance and let it cool.
- Tip the contents of the filter holder into the bin.
- Wipe all surfaces with a clean damp cloth.
- Hand wash the carafe and filter holder. Wipe out the hopper with kitchen paper.
- Wipe the shaded area shown in Fig H with a piece of damp kitchen paper. Use the brush if necessary to loosen any coffee debris.


Note: If you haven't used your coffee maker for more than 4 weeks, we recommend that you follow the steps under BEFORE USING FOR THE FIRST TIME before brewing coffee again.
CLEANING THE GRINDER
The grinder can be disassembled in order to clean it. If you try to disassemble the grinder without first removing any surplus coffee beans, it will be very difficult to reassemble correctly. The grinder cannot be cleaned if the coffee maker is in keep warm mode. Follow these steps:
- Twist the coffee bean hopper and lid counterclockwise until the
![]() symbol aligns with the
symbol aligns with the ![]() symbol (Fig A).
symbol (Fig A).

- Lift off the hopper, remove the lid and empty out any coffee beans. Wipe out the hopper with kitchen paper.
- Replace the lid then refit the hopper onto the coffee maker aligning the
![]() symbol with the
symbol with the ![]() symbol. Twist the hopper clockwise until the
symbol. Twist the hopper clockwise until the ![]() symbol aligns with the
symbol aligns with the ![]() symbol (Fig B).
symbol (Fig B).

- Turn the grind control to the fine (
![]() ) setting.
) setting. - Press the
![]() button to select the 6 cup setting.
button to select the 6 cup setting. - Press the
![]() button. After a few moments the grinder will start. Once it has stopped, press the
button. After a few moments the grinder will start. Once it has stopped, press the ![]() button until the
button until the ![]() light goes out.
light goes out. - Follow step 1 again to remove the bean hopper.
- Turn the grind control to the
![]() setting (Fig C).
setting (Fig C).

- Lift up the handle on the grinding head (Fig D).

- Lift the grinding head out of the body of the appliance (Fig E). If it doesn't lift out easily, make sure that the
![]() marks on the grinding head are aligned with the
marks on the grinding head are aligned with the ![]() markings (Fig G).
markings (Fig G).

- Use the cleaning brush to clean the grinding head and the area where it fits into the appliance. Do not use water. (Fig F)

- Refit the grinding head by aligning the
![]() marks on the grinding head with the
marks on the grinding head with the ![]() markings and pressing it down (Fig G). Fold the handle back down.
markings and pressing it down (Fig G). Fold the handle back down. - Turn the grind control to any of the grind settings.
- Refit the hopper.
 symbol aligns with the
  symbol (Fig A).
 symbol (Fig B).
 ) setting.
 setting (Fig C).

 marks on the grinding head are aligned with the
  markings (Fig G).

SELF CLEAN
After 60 brewing cycles, the display will show  and the
  icon to indicate that the appliance needs descaling. Descaling flushes out the deposits that naturally build up over time.
- Use a proprietary brand of descaler suitable for use in plastic-bodied products. Follow the instructions on the package of descaler.
- Pour the descaling solution into the water reservoir to the max mark.
- Press the
![]() button.
button. - The automatic self clean process will start and will continue for about 45 minutes.
- After the process has finished, your coffee maker will switch off.
- Products returned under guarantee with faults due to scale will be subject to a repair charge.
CLEANING FREQUENCY
Daily - Remove any used coffee grounds and filter papers as required. Clean the filter holder and carafe. Wipe the shaded area shown in Fig H with a piece of damp kitchen paper. Use the brush if necessary to loosen any coffee debris.
Weekly - Clean the grinder.
ERROR CODES
To assist in troubleshooting, your coffee maker may show one of the following error codes.
| CODE | MEANING |
E01 | The coffee bean hopper is not fitted correctly. Remove then refit the bean hopper. |
E02 | The shutter is open (located under the grinding head). Unplug the appliance and let it cool. Wipe the shaded area shown in Fig H with a piece of damp kitchen paper. Use the brush if necessary to loosen any coffee debris. |
E03 | The shutter cannot close (located under the grinding head). Unplug the appliance and let it cool. Wipe the shaded area shown in Fig H with a piece of damp kitchen paper. Use the brush if necessary to loosen any coffee debris. |
IMPORTANT SAFEGUARDS
Read the instructions, keep them safe, pass them on if you pass the appliance on. Remove all packaging before use.
Follow basic safety precautions, including:
This appliance can be used by persons with reduced physical, sensory or mental capabilities or lack of experience and knowledge if they have been supervised/instructed and understand the hazards involved.
Children must not use or play with the appliance.
Keep the appliance and cable out of reach of children.
Misuse of the appliance may cause injury.
 The surfaces of the appliance will get hot. Residual heat will keep the surfaces hot after use.
Don't immerse the body of the appliance in liquid.
If the cable is damaged, it must be replaced by the manufacturer, its service agent, or someone similarly qualified, to avoid hazard.
The surface of the heating element is subject to residual heat after use.
The coffee-maker shall not be placed in a cabinet during use.
 Use the appliance according to these instructions. Any misuse may cause potential injury, electric shock or other hazards.
This appliance can be used by persons with reduced physical, sensory or mental capabilities or lack of experience and knowledge if they have been given supervision or instruction concerning use of the appliance in a safe way and understand the hazards involved.
This appliance is intended to be used in household and similar applications such as:
- staff kitchen areas in shops, offices and other working environments;
- by clients in hotels, motels and other residential type environments;
- bed and breakfast type environments;
- farm houses.
![]() Do not use this appliance near bathtubs, showers, basins or other vessels containing water.
Do not use this appliance near bathtubs, showers, basins or other vessels containing water.
- Sit the appliance on a stable, level, heat-resistant surface.
- Keep the appliance and cable away from the edges of worktops.
- Don't use accessories or attachments other than those we supply.
- Don't use the appliance for any purpose other than those described in these instructions.
- Don't use the appliance if it's damaged or malfunctions.
Documents / Resources
References
Download manual
Here you can download full pdf version of manual, it may contain additional safety instructions, warranty information, FCC rules, etc.
Advertisement


Need help?
Do you have a question about the 25610-56 and is the answer not in the manual?
Questions and answers