Advertisement
Advertisement
Table of Contents

Related Manuals for HITWAY BK27M


Summary of Contents for HITWAY BK27M
- Page 1 Model: BK27M Operation Manual UNK V 3.07.05...
- Page 2 Step 3: Click the "Ask a Question" button. Choose your topic from list displayed. Step 4: Select Contact seller. *If you purchased HITWAY products by other platforms or channels, please also find the corresponding seller contact support. Thanks for your support and patience!
-
Page 3: Battery And Charging
ATTENTIONS Battery and Charging: Battery and Charging: Charge at 0℃~45℃, discharge at -20℃~60℃, keep the battery dry. Do not put the battery Charge at 0℃~45℃, discharge at -20℃~60℃, keep the battery dry. Do not put the battery in acidic or alkaline liquid. Avoid rain and keep away from fire, heat and high temperature in acidic or alkaline liquid. -
Page 4: Maintenance
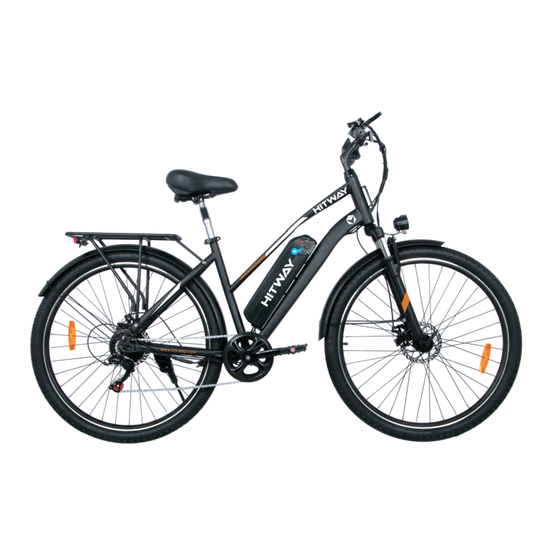
must be parked correctly in accordance with the safety rules. must be parked correctly in accordance with the safety rules. Liability statemen: Liability statemen: After riding, please store the bike in a place without sunlight and rain, not in a residential After riding, please store the bike in a place without sunlight and rain, not in a residential building;... - Page 5 PRODUCT FUNCTION DIAGRAM Figure 1 (Whole bike diagram) Note: The product upgrade may cause the actual product you receive to be different from the sample in the photo, please don't worry, the specific functions are the same and will not affect your normal use.
-
Page 6: Function Introduction
Function introduction: (Picture 1) 1. Charging: Unscrew the plastic cover on the battery (Picture 1), connect the charger to start charging, when the battery is full and the indicator light of the charger changes from red to green, it means it is fully charged. (Picture2) (Picture 3) 2. - Page 7 3. Power display: After powering on, the dashboard lights up to display the power, and the power is divided into 5 grids, corresponding to high, medium and low power. 4. Headlights: refer to Picture 3, long press the button to turn on/off the headlights.
-
Page 8: Product Parameters
PRODUCT PARAMETERS Parameter Standard Version Carbon Structural Steel Body Material Color BLACK/WHITE 1850mm*615mm*1210mm Unfolding Size Outlook & Dimension Wire spoked wheels Hub Form Wheel Size 28 inches 1510mm*240mm*870mm Package Size 33.3kgs/26.8kgs Gross/Net 73.41lbs/59.08lbs Maximum Load 120kg (264.55 lb) 20mph Maximum Speed Performance 55KM-120KM(Affected by load, Parameters... - Page 9 Battery Type 18650 lithium ion power battery 15AH Battery Capacity Battery Rated Voltage Motor Rated Power 500W Motor Form Assist mode Electrical Specifi- 28 inch/36V/high speed brushless cations Motor Type motor with gear Motor Rated No-Load Speed 310±10r/min Charger Output 42V 2.0A Charger Input 100~240V 50/60Hz 3.0A...
- Page 10 MANUAL CONTROL INSTRUMENT PANEL INSTRUCTION Function description: 1. Display function Speed display, power assist display, power indicator, fault prompt, mileage display, voltage display, single boot time, 3.75mph boost, brake indication, headlight display,cruise control 2. Control, set function Power switch control, headlight switch control, 3.75mph booster setting,cruise control 3-speed booster ratio setting, speed display switching, mileage and single boot time and voltage display switching.
- Page 11 Display content introduction 1.Voltage status level POWER 2.Multifunctional display area Total mileage ODO, single mileage TRIP (unit: mile, km), single boot time TIME, battery voltage VOL 3.Speed display area AVG:Average speed, MAX: maximum speed, SPEED: current speed; unit Mp/h, km/h 4.Bike power-assisted gear adjustment , 0-3 digital display and gear bar display;...
-
Page 12: Button Introduction
6.Instrument Status Code Meaning Status Code State Meaning Normal Status Battery Undervoltage Motor Failure Controller Failure Communication Reception Failure Communication Sending Failure Button Introduction The specific combination of buttons is as follows Use Introduction Button operation is divided into short press and long press. Specific operation explanation I. - Page 13 2. In the power-on state, press and hold the button to turn it off. II. Change the assist gear In power-on state 1. Short press button, assist gear will be + 1 2. Short press button, assist gear will be - 1 III.
- Page 14 2. When the bike is in the electric state, long press the button, it will enter the cruise mode.Pinch any brake or turn the handle to exit cruise mode. 3. Press and hold button to turn the headlights on or off. V.
Need help?
Do you have a question about the BK27M and is the answer not in the manual?
Questions and answers