Advertisement
NOTE: Please read all instructions before assembling the bed cover.
Keep the boxes and packaging until the installation is complete. Unpack carefully to prevent scratching. DO NOT remove any
protective films from the cover and canister until after the installation is complete. DO NOT USE A LUBRICANT OR THREAD-
LOCKER ADHESIVE ON THE ROLLING COVER. USE OF THESE WILL VOID THE WARRANTY. See the maintenance page
for proper care.
A
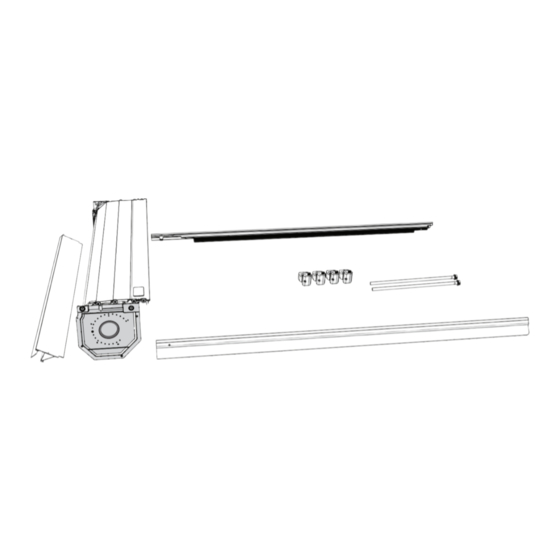
PARTS INCLUDED IN YOUR KIT
1x Front cover
A
1x Driver side rail
B
1x Passenger side rail
C
(Rail is designated by a green sticker)
1x Spiral canister
D
4x Canister mounting screws (10-32 x 7/16")
E
2x Front cover mounting screws (10-24 x 3/4")
F
4x Clamps (6x for 8' beds)
G
2x Drain tubes
H
1x 1/8" Allen wrench
I
1x 6mm Allen wrench
J
1
Remove shipping materials:
Remove the screws, shipping
brackets and the white shipping tubes from
both sides. Retain a shipping bracket for later
use as a shim.
Retrax • 917 S. 46th St., Grand Forks, ND 58201 • 800-206-4070 © Retrax is Retrax Holdings, LLC, 2023
C
F
I
E
D
B
E
F
G
2
Install the rails to the canister:
Lift the lock cover and open the lock by pressing the release button.
Pull the cover out of the canister (D) 6 to 8 inches, holding it from rolling back in,
guide the cover into the rail (B & C) channel while positioning the rails into the
canister (D). Align the front and rear rail attachment tabs and holes to the inside
of the corresponding canister holes.
RetraxONE/RetraxPRO Models Only
INSTALLATION SHEET
Any damaged or missing parts?
Parts will be shipped to you directly.
Call 800-206-4070 Mon - Fri, 8:00 a.m. - 5:00 p.m. central
or email retrax@retrax.com
G
J
H
TOOLS REQUIRED
•
#2 Phillips screwdriver
•
9/16" Wrench
•
1/2" Wrench
•
Scissors or utility knife
B
D
H
I
4000-174 IR-RTS-01 Rev. 10.17.23
J
Advertisement
Table of Contents

Related Manuals for Retrax ONE


Summary of Contents for Retrax ONE
- Page 1 (D). Align the front and rear rail attachment tabs and holes to the inside of the corresponding canister holes. Retrax • 917 S. 46th St., Grand Forks, ND 58201 • 800-206-4070 © Retrax is Retrax Holdings, LLC, 2023 4000-174 IR-RTS-01 Rev. 10.17.23...
- Page 2 1/8” from the tailgate. Shipping Bracket 1/8” Retrax • 917 S. 46th St., Grand Forks, ND 58201 • 800-206-4070 © Retrax is Retrax Holdings, LLC, 2023 4000-174 IR-RTS-01 Rev. 10.17.23...
- Page 3 Both the pushing down and tilting of onto the bolt. the rail will position the rail best to minimize water intrusion. Retrax • 917 S. 46th St., Grand Forks, ND 58201 • 800-206-4070 © Retrax is Retrax Holdings, LLC, 2023 4000-174 IR-RTS-01 Rev. 10.17.23...
- Page 4 Loosen the clamps and move the rail. Check again for equal spacing, adjust as necessary then tighten all the clamps per step 8. Retrax • 917 S. 46th St., Grand Forks, ND 58201 • 800-206-4070 © Retrax is Retrax Holdings, LLC, 2023 4000-174 IR-RTS-01 Rev. 10.17.23...
-
Page 5: Final Notes
Do not ever exceed the maximum vehicle capacity when loading the vehicle. Retrax • 917 S. 46th St., Grand Forks, ND 58201 • 800-206-4070 © Retrax is Retrax Holdings, LLC, 2023 4000-174 IR-RTS-01 Rev. 10.17.23... -
Page 6: Maintenance And Care
The bearings are sealed and will not need any lubricant or spray. If the rails feel sticky, run paraffin wax along the rail. Retrax • 917 S. 46th St., Grand Forks, ND 58201 • 800-206-4070 © Retrax is Retrax Holdings, LLC, 2023 4000-174 IR-RTS-01 Rev. 10.17.23... -
Page 7: Safety Instructions
OPENING AND USING THE COVER To use your RETRAX cover, open the lock cover and press the button at the center of the latch to pop open the handle. CLOSING AND LOCKING THE COVER To latch your RETRAX cover anywhere along the rail, push down firmly on the end of the lock handle using both thumbs. Insert the key and make sure it locks and unlocks. -
Page 8: Limited Warranty
The truck bed covers carries a limited lifetime warranty from the original date of purchase, subject to the terms below. RetraxONE - The truck bed covers carries a limited warranty for one (1) year from the original date of purchase, subject to the terms below. WARRANTY IS NOT TRANSFERABLE The warranty is to the initial consumer purchasing the truck bed cover and it is not transferable to a subsequent end user.
Need help?
Do you have a question about the ONE and is the answer not in the manual?
Questions and answers