AudioCodes RXV200 User Manual
Mtr on android compute with rx-pad meeting room controller
Hide thumbs
Also See for RXV200:
- User and administrator manual (90 pages) ,
- Quick installation manual (9 pages) ,
- Quick manual (7 pages)

Related Manuals for AudioCodes RXV200


Summary of Contents for AudioCodes RXV200
- Page 1 User’s and Administrator’s Manual Room Experience (RX) Suite RXV200 MTR on Android™ Compute with RX-PAD Meeting Room Controller Version 2.4...
-
Page 3: Table Of Contents
Dialing a Number ......................28 Enabling Proximity Join ....................29 Sharing a Whiteboard ....................29 Screen Sharing ......................33 Updating RXV200 Audio and Camera Peripherals Firmware........34 About Microsoft Teams.....................36 4.10 Signing out ........................37 4.11 Enrolling a Device with Intune Policies ..............37 4.11.1 Creating a Dynamic Group ................37 4.11.2 Creating an Exclusion Group ................ - Page 4 Determining Device Status from LED Color Indications ..........75 Performing Recovery Operations using Power Button ..........76 Saving Logs while Device is in Recovery Mode ............77 Restoring RXV200 Firmware via USB Disk .............77 List of Tables Table 1-1: RXV 200 Bundles......................8 Table 1-2: RXV 200 Specif ications ....................
- Page 5 Customer Support Customer technical support and services are provided by AudioCodes or by an authorized AudioCodes Service Partner. For more inf ormation on how to buy technical support f or AudioCodes products and f or contact inf ormation, please visit our website at https://www.audiocodes.com/services-support/maintenance-and-support.
- Page 6 RXV200 This page is intentionally lef t blank. Version 2.4 Document #: LTRT-09980...
-
Page 7: Introduction
AudioCodes RX-PAD. To meet this specif ic need, AudioCodes has created a range of RXV200 bundles which f unction as Microsof t Teams Rooms on Android devices. -
Page 8: Benefits
The RXV200 supports multiple devices f or mix-and-match adaptability and simplif ied deployment and management. RXV200 bundles provide a reliable solution f or every room layout and allow easy meeting room component upgrades. The RXV200 is available in three main bundles. -
Page 9: Rxv200-B40 Bundle
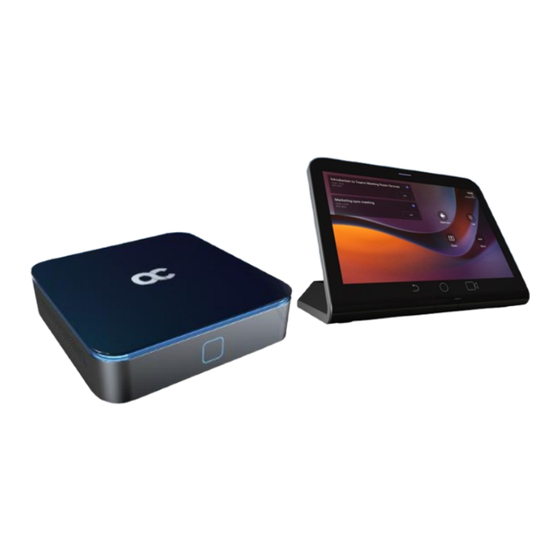
User’s and Administrator’s Manual 1. Introduction 1.3.1 RXV200-B40 Bundle The f igure below illustrates the RXV200-B40 bundle. Figure 1-1: RXV200-B40 1.3.2 RXV200-B20 Bundle The f igure below illustrates the RXV200-B20 bundle. Figure 1-2: RXV200-B20 Version 2.4 RXV200... -
Page 10: Hardware
RXV200 supports a single display irrespective of whether it's connected to HDMI1 or HDMI2: • When RXV200 boots up, if a single TV screen is connected to RXV200, it can be connected to either HDMI1 or to HDMI2. This TV screen will f unction as the primary screen irrespective of whether it is connected to HDMI1 or HDMI2. -
Page 11: Rxv200
User’s and Administrator’s Manual 1. Introduction 1.6.1 RXV200 The table shows RXV200 specif ications. Table 1-2: RXV200 Specifications Feature Description ▪ 2 x 4K HDMI Outputs to external screens HDMI Outputs ▪ HDMI 2.0 Input (including audio) HDMI Input type •... -
Page 12: Rx-Pad
RXV200 1.6.2 RX-PAD Following are the RX-PAD specif ications. Table 1-3: RX-PAD Specifications Feature Description Landscape Touch 8” LCD (1280 x 800 resolution) Display • Ethernet: 10/100/1000 Mbps (RJ-45) network interf ace (PoE) Device interf aces • Wi-Fi (dual band support) •... -
Page 13: Rx15
Frequency response 150Hz~16kHz Interf aces Buttons 6 (Power, Answer/Hang Up, Mute, Bluetooth, Volume +, Volume -) Indicator light Power, Volume, Bluetooth, Mute, Answer/Hang Up Other parameters Device weight 395gr Dimensions 120mm x 35.2mm Storage temperature -20°C to 65°C Version 2.4 RXV200... -
Page 14: Rxvcam50M
RXV200 1.6.4 RXVCAM50M Following are the RXVCAM50M specif ications. Feature Description Camera Image Sensor 1/2.5 inch high quality 4K CMOS sensor Effective Pixels 8.28MP, 16:9 Video Output USB3.0, Type B. 3840×2160 @30fps, 1920×1080P @30fps/25fps, 1280×720P@ Video Resolution 30fps/25fps Sub stream: 1280×720P @30fps/25fps, 640×480P @30fps/25fps, 320×172P @30fps/25fps... -
Page 15: Getting Started
2. Getting Started Getting Started Note: See the RXV200 Microsoft Teams Rooms on Android Compute Unit Quick Installation Guide shipped with the product or available f rom AudioCodes f or how to get started, including: • Package contents checklist •... - Page 16 RXV200 This page is intentionally lef t blank. Version 2.4 Document #: LTRT-09980...
-
Page 17: Connecting To Rxv200
See the RXV200 Microsoft Teams Rooms on Android Compute Unit Quick Installation Guide shipped with the product or available f rom AudioCodes f or inf ormation about connecting the RXV200. Af ter mounting and cabling RXV200, pair it with RX-PAD (see the guide Pairing RX-PAD with Teams Rooms on Android AudioCodes Devices). - Page 18 RXV200 1. Sign in to the Teams admin center. 2. Expand Devices. 3. Select Provision new device f rom the Actions tab. In the ‘Provision new devices’ window, you can either add the MAC address manually or upload a f ile.
- Page 19 User’s and Administrator’s Manual 3. Connecting to RXV200 Once the device is powered up and connected to the network, the technician provisions the device by choosing the ‘Settings’ gear on the top right of the new ‘Sign in’ page and selecting Provision phone.
- Page 20 RXV200 The tenant admin is expected to complete authentication on the device f rom any browser or smartphone. When the tenant admin is signing in f rom Teams Admin Center, the user interf ace on the device is blocked to prevent other actions on the phone.
-
Page 21: Using General Rxv200 Functions
➢ To configure a bundle: Open the Bundle page (Settings > Bundle). Select the bundle the enterprise acquired. The preceding f igure shows RXV200 + RX -PAD as the selected bundle. See here f or more inf ormation about available bundles. -
Page 22: Managing Camera Presets
RXV200 Managing Camera Presets You can adjust RXV200 camera presets to suit your pref erences. ➢ To access RXV200 camera presets: On the RX-PAD device, touch the camera button. Figure 4-2: Camera Settings Note: The def ault Room preset enables you to capture all participants and actions in a meeting room. - Page 23 • Camera Settings can be changed during a meeting without turning of f the video to remote parties. • Camera Settings can optionally be accessed f rom RXV200’s Device Settings though admin permissions are necessary. Version 2.4 RXV200...
-
Page 24: Configuring A Color Mode Preset On The Rxvcam50M/L Camera
RXV200 4.2.1 Configuring a Color Mode Preset on the RXVCAM50M/L Camera When RXV200 is connected to the AudioCodes RXVCAM50M/L camera, users can conf igure a Color Mode preset f rom RX-PAD. Users can conf igure either: ◼ Def ault ◼... -
Page 25: Starting A New Meeting
User’s and Administrator’s Manual 4. Using General RXV200 Functions Starting a New Meeting ➢ To start a new meeting: In the home screen, navigate to and select the Meet Now option. Figure 4-5: New meeting – Invite someone In the ‘Invite someone’ f ield, enter the name of a person to invite; af ter entering the f irst letters in the name, matching contacts f rom directory are displayed. - Page 26 RXV200 Figure 4-7: New meeting – Select the name of a person Invite someone else – or others – and then select Start meeting. Note: The server allocates a meeting ID number and sends an invite message to all participant devices.
- Page 27 User’s and Administrator’s Manual 4. Using General RXV200 Functions Version 2.4 RXV200...
-
Page 28: Dialing A Number
RXV200 Dialing a Number You can manually dial someone’s phone number. ➢ To dial a phone number: In the home screen, navigate to and select the Dial pad option. Figure 4-8: Dial pad Enter the digits of the destination to call and select Call. -
Page 29: Enabling Proximity Join
Microsof t Teams Rooms (MTRs). The MTR device is RXV200. If you bring a laptop or a Teams Mobile Client near the RXV200, it’ll of f er the RXV200 as the room audio device. The f igure below shows how to select the room audio device. - Page 30 RXV200 Teams meetings on the RXV200 allow participants to open a virtual whiteboard – a digital canvas - on which they can sketch, illustrate, collaborate, brainstorm, plan, and share perspectives with one another in real time. The f ocus switches away f rom the presenting participant to the whiteboard. For more inf ormation about this Microsof t f eature, see here.
- Page 31 User’s and Administrator’s Manual 4. Using General RXV200 Functions View the Whiteboard in the Teams desktop application or in Teams client: Edit the Whiteboard; every participant with privileges can edit it. Version 2.4 RXV200...
- Page 32 RXV200 Version 2.4 Document #: LTRT-09980...
-
Page 33: Screen Sharing
User’s and Administrator’s Manual 4. Using General RXV200 Functions Screen Sharing RXV200 enables users to share their PC/laptop screen via the RX -PAD HDMI In port, to be shared on the screen in IDLE mode and peripheral mode. Note: •... -
Page 34: Updating Rxv200 Audio And Camera Peripherals Firmware
Updating RXV200 audio and camera peripherals f irmware is a saf e and streamlined process. Peripherals are updated at the same time as the RXV200 f irmware update; audio and camera peripheral updates are integrated directly within the RXV200 f irmware update p rocess to ensure a saf e overall update experience f or the RXV200 device, prioritizing device integrity. - Page 35 User’s and Administrator’s Manual 4. Using General RXV200 Functions Af ter the camera update, view the notif ication 'AudioCodes RXV200 Audio is being updated, do not reboot the device'. Version 2.4 RXV200...
-
Page 36: About Microsoft Teams
RXV200 Click OK; view the f ollowing: Af ter the audio update, view a 'Restarting...’ notif ication. About Microsoft Teams Inf ormation about the Microsof t Teams application can be viewed by navigating to and selecting the Settings screen’s About option shown in the preceding f igure. -
Page 37: Signing Out
Navigate to and select Sign out in the Settings screen shown in the preceding f igure. Optionally, remote sign-out can be perf ormed f rom Microsof t Teams admin center (TAC). Network administrators can provision the RXV200 f rom the TAC, remotely sign in, and also sign out. ➢... -
Page 38: Removing Devices From Intune Admin Center
RXV200 • the device from Intune policies and replace displayName -contains Exclude RXVxx RXVxx where is the name of the device model (device.model). 4.12 Removing Devices from Intune admin center You can remove devices f rom Intune admin center when the maximum capacity of signed-in devices is reached. - Page 39 User’s and Administrator’s Manual 4. Using General RXV200 Functions From the 'OS' drop-down under the Basics tab, select Android (device administrator). From the 'Device action' drop-down, select Delete. Click Next. Version 2.4 RXV200...
- Page 40 RXV200 Select the devices to delete (i.e., to remove f rom Intune admin center), and then click Select. Version 2.4 Document #: LTRT-09980...
- Page 41 User’s and Administrator’s Manual 4. Using General RXV200 Functions Under the Devices tab, click Next. Under the Review + Create tab, make sure your def initions are correct and then click Create; admin receives a notif ication that a delete action f rom Intune was successf ully initiated on all devices and that n devices were removed.
- Page 42 RXV200 This page is intentionally lef t blank. Version 2.4 Document #: LTRT-09980...
-
Page 43: Getting Familiar With Rxv200 Settings
User’s and Administrator’s Manual 5. Getting Familiar with RXV200 Settings Getting Familiar with RXV200 Settings The section f amiliarizes you with the RXV200’s settings. RXV200s are delivered conf igured with their def ault settings. Customers can customize them to suit enterpris e requirements. - Page 44 RXV200 Navigate to and select Device Administration. Log in as administrator. Logging in as Administrator is required f or debugging options. It’s password protected. Note: Def ault: 1234. Af ter logging in as Admin, you can log out | change password.
- Page 45 The def ault password can be changed per device f rom the GUI, or via bulk conf iguration of multiple devices using Microsof t’s TAC or AudioCodes’ Device Manager. Enter a password; you’re prompted to verif y the password you entered. Criteria...
-
Page 46: Device Admin Settings
RXV200 Device Admin Settings Af ter logging in as Device Administration as shown in the previous section, you can conf igure Device Administration settings: Display, Date & Time, Wi -Fi, Camera. 5.1.1 Configuring Admin Login Timeout Admin login timeout can be conf igured using the f ollowing cf g conf iguration f ile parameter: settings/admin_logout_timeout,values=3 ◼... - Page 47 User’s and Administrator’s Manual 5. Getting Familiar with RXV200 Settings Navigate to and select the time to lapse bef ore the interf ace ‘goes to sleep’. Def ault: 10 minutes. Navigate to and select Font size. Navigate to and select Screen saver.
-
Page 48: Configuring Date & Time
RXV200 5.1.3 Configuring Date & Time Date and time are automatically retrieved f rom the deployed Network Time Protocol (NTP) server. ➢ To configure Date & Time: Under ‘Device admin settings’, navigate to and select Date & Time. Navigate to and select Use 24-hour format [Allows you to select the Time f ormat]. -
Page 49: Configuring Wi-Fi
The RXV200 can connect to an Access Point via Wi-Fi. Network administrators can conf igure Wi-Fi parameters f or the RXV200. The parameters are concealed f rom the user's view. Users can enable | disable Wi-Fi in the device’s user interf ace. -
Page 50: Manually Connecting To A Wi-Fi Network
RXV200 5.1.4.2 Manually Connecting to a Wi-Fi Network ➢ To manually connect to a Wi-Fi network: Note: Make sure to f irst disconnect your Ethernet cable. If it's connected, the device will not be able to connect to a Wi-Fi network. -
Page 51: Table 5-1: Configuration File Wi-Fi Parameters
User’s and Administrator’s Manual 5. Getting Familiar with RXV200 Settings Optionally meter the selected network. Leave the setting at its def ault value of Detect automatically if you don't want to meter the network. Select a Metered option to meter Note: •... - Page 52 RXV200 Parameter Description network/wireless/adavanced_ Def ines the list of IP addresses that will be blocked. options/proxy/manual/exclusion_list network/wireless/adavanced_ Def ines the name of the proxy host. options/proxy/manual/proxy_ hostname network/wireless/adavanced_ Def ines the proxy port. options/proxy/manual/proxy_port Def ines the anonymous wireless users who won’t be seen.
-
Page 53: Configuring Camera Settings
User’s and Administrator’s Manual 5. Getting Familiar with RXV200 Settings 5.1.5 Configuring Camera Settings Settings controlling the look and f eel of the video UI can be set to suit individual pref erences. ➢ To configure Camera settings: Under ‘Device admin settings’, navigate to and select Camera. -
Page 54: Configuring Camera Frequency
RXV200 5.1.5.1 Configuring Camera Frequency The Camera frequency (under Device settings) must be set per the power supply as f ollows: ◼ 110V – 60Hz 220V – 50Hz ◼ Version 2.4 Document #: LTRT-09980... -
Page 55: Configuring Ui Language & Input
User’s and Administrator’s Manual 5. Getting Familiar with RXV200 Settings 5.1.6 Configuring UI Language & Input This setting allows users to customize inputting to suit personal requirements. ➢ To set language and input: Under ‘Device admin settings’, navigate to and select Languages & input. -
Page 56: Modifying Ip Network Settings
RXV200 5.1.7 Modifying IP Network Settings This setting enables the Admin user to determine IP network inf ormation and to modif y IP network settings. ➢ To modify network settings: Under ‘Device admin settings’, navigate to and select Modify network. - Page 57 Manually (f rom the screen shown in the preceding f igure). Allows you to conf igure the RXV200 with an HTTP proxy server. Conf igure the proxy hostname and proxy port and then navigate to and select Done. ...
- Page 58 RXV200 Cisco Discovery Protocol (CDP) is a Cisco proprietary Data Link Layer protocol Link Layer Discovery Protocol (LLDP) is a standard, layer two discovery protocol Note: The VLAN conf iguration is by def ault data VLAN rather than voice VLAN, in compliance...
-
Page 59: Configuring Call Settings
User’s and Administrator’s Manual 5. Getting Familiar with RXV200 Settings 5.1.8 Configuring Call Settings This setting enables the user to conf igure call-associated f unctionalities to suit personal pref erences. ➢ To configure call settings: From the home page, navigate to and select More and then navigate to and select Settings. - Page 60 RXV200 This page is intentionally lef t blank. Version 2.4 Document #: LTRT-09980...
-
Page 61: User Settings
User’s and Administrator’s Manual 5. Getting Familiar with RXV200 Settings User Settings In the ‘Settings’ screen you can optionally conf igure the f ollowing User settings: Sound , Accessibility, Reboot and About (read -only). 5.2.1 Setting the Volume You can customize phone volume f or a f riendlier user experience. -
Page 62: Enabling Display Of Meeting Name Using Exchange Online Powershell
RXV200 5.2.4 Enabling Display of Meeting Name using Exchange Online PowerShell here f or inf ormation about how to access the exchange instance (the tenant). Admin must set the two parameters indicated in the f igure below to ‘False’: ‘Identity’ is the name of the account to which admin wants to apply these two settings: ◼... -
Page 63: Hiding Names And Meeting Titles
◼ Under ‘User’, navigate to and select Reboot. 5.2.7 Viewing About RXV200 The ‘About’ screen gives you quick access to inf ormation about the RXV200 deployment. ➢ To access the About screen: Navigate to and select About device. Version 2.4... - Page 64 RXV200 Navigate to and select Status. View the RXV200’s f irmware inf ormation. Admins can monitor the status of the device’s sof tware modules f rom the System State page. Version 2.4 Document #: LTRT-09980...
-
Page 65: Monitoring Modules Operational States
6. Monitoring Modules Operational States Monitoring Modules Operational States AudioCodes provides out-of -the-box troubleshooting capability: Admins can monitor the state of the device’s modules f rom the System State page. If initial provisioning is unsuccessf ul or if admin encounters an issue related to the network / connection to Device Manager, the f eature gives admin an indication as to why. - Page 66 RXV200 Note: • Each state displays its operational result - successf ul or f ailed. • For some states, the reason of f ailure will be displayed as well. Version 2.4 Document #: LTRT-09980...
-
Page 67: Debugging
Company Portal Login) • Launch mobile teams (see under Launch Mobile Teams) • Debug Recording (see under Debug Recording) • Erase all data (see under Erase all data (f actory reset) • Screen Capture (see under Screen Capture) Version 2.4 RXV200... -
Page 68: Log Settings | Collecting Logs
RXV200 7.1.1.1 Log Settings | Collecting Logs Device diagnostics (Logcat) can be collected using the Microsof t Admin Portal. For support purposes, general logs can be collected also using the Microsof t Admin Portal. The logs can help debug Teams application issues and also f or issues related to the device. - Page 69 User’s and Administrator’s Manual 7. Debugging Note: The preceding f igure is f or illustrative purposes. It shows an AudioCodes phone. The same screen is displayed f or the RXV200. Click the icon. Diagnostics Version 2.4 RXV200...
-
Page 70: Remote Logging
RXV200 Click Proceed; the logs are uploaded to the server. Click the History tab. Click Download to download the logs. 7.1.1.2 Remote Logging Remote Logging via Syslog provides the same log level as Device Diagnostic s (perf ormed via the Microsof t Admin Portal) with some additional inf ormation that may be relevant to device issues (not Teams application issues). -
Page 71: Diagnostic Data
To use the tool: Navigate to and select Diagnostic Data. Navigate to and select OK to conf irm ‘Copy logs to sdcard’; the RXV200 creates all necessary logs and copies them to the its SD Card / Logs f older. -
Page 72: Reset Configuration
RXV200 7.1.1.4 Reset configuration Admin users can opt to ‘clean up’ their conf iguration history and return the RXV200 to an Out of Box Experience (OOBE). If the Teams app isn't running well, this might help. ➢ To reset the configuration: Navigate to and select Reset configuration. -
Page 73: Launch Mobile Teams
This f eature enables Admin users to perf orm media/DSP debugging. Note: DSP recording can be activated on the f ly without requiring the network administrator to reset the phone. ➢ To reset the configuration: Navigate to and select Debug Recording. Version 2.4 RXV200... -
Page 74: Erase All Data (Factory Reset)
RXV200 Navigate to and select Voice record to enable the f eature. Navigate to and select Remote IP address to input the IP address of the device whose traf f ic you want to record. Navigate to and select Remote port and input it (Def ault: 5000). -
Page 75: Determining Device Status From Led Color Indications
7. Debugging Determining Device Status from LED Color Indications Users and admins can determine the status of the RXV200 f rom its LED color indications. Use the f ollowing table as ref erence to determine status. Table 7-1: RXV200 Status... -
Page 76: Performing Recovery Operations Using Power Button
The f ollowing f igure shows the power button. ➢ To perform recovery operations: Disconnect the power cord f rom the RXV200 while long -pressing the power button shown in the preceding f igure. Reconnect the power cord and continue pressing the power button. -
Page 77: Saving Logs While Device Is In Recovery Mode
USB stick, providing a convenient and reliable method f or log management during recovery procedures. Restoring RXV200 Firmware via USB Disk For recovery purposes, f irmware can be applied to the RXV200 f rom a USB disk. ➢ To apply the firmware from the USB disk: Enter recovery mode by pressing f or 2-4 seconds the power button (Action: ENTER_RECOVERY);... - Page 78 Website: https://www.audiocodes.com/ ©2024 AudioCodes Ltd. All rights reserved. AudioCodes, AC, HD VoIP, HD VoIP Sounds Better, IPmedia, Mediant, MediaPack, What’s Inside Matters, OSN, SmartTAP, User Management Pack, VMAS, VoIPerfect, VoIPerfectHD, Your Gateway To VoIP, 3GX, VocaNom, AudioCodes One Voice, AudioCodes Meeting Insights, and AudioCodes Room Experience are trademarks or registered trademarks of AudioCodes Limited.
Need help?
Do you have a question about the RXV200 and is the answer not in the manual?
Questions and answers