Table of Contents
Advertisement
Available languages
Available languages
Quick Links
Advertisement
Chapters
Table of Contents

Related Manuals for Infiniton VITRO218


Summary of Contents for Infiniton VITRO218
- Page 1 Placa de Vitrocerámica MANUAL DE USO modelo: VITR0218...
-
Page 2: Table Of Contents
ÍNDICE Carta a los clientes ............ 3 Advertencias ............... 4 Información del producto ........7 Precauciones de Uso ..........8 Instrucciones de Uso ..........9 Consejos de Cocina ..........12 Cuidados y Limpieza ..........13 Consejos ..............14 Especi caciones Técnicas ........15 Instalación ..............15 Servicio Técnico............19 Notas................20 Poliza de Garantía.............21... -
Page 3: Carta A Los Clientes
ES-3... -
Page 4: Advertencias
II. ADVERTENCIAS Instalación Operación y Mantenimiento Peligro de descarga eléctrica • No cocine en una encimera rota o quebrada. • Desconecte el aparato de la red eléctrica Si la super cie de la encimera se quebrase o antes de realizar cualquier trabajo o manten- trizase, apague inmediatamente el aparato y imiento en él. - Page 5 II. ADVERTENCIAS Peligro de Cortes El instructor debe asegurarse de que quien usa expuesta cuando la cubierta ha sido el aparato lo haga sin riesgo de daños a sí retractada. mismo o los alrededores. Use con extremo cuidado y siempre almacene fuera del alcance de los niños.
- Page 6 Precauciones al cocinar • Cocinar con aceite o grasa en un quemador puede ser peligroso y originar fuego. NUNCA intente extinguir el fuego con agua. Apague el aparato y cubra las llamas (Con una tapa de olla o manta antitérmica). •...
-
Page 7: Información Del Producto
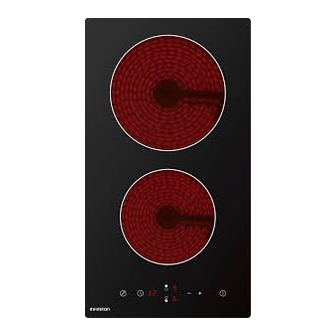
III. INFORMACIÓN DEL PRODUCTO Esta Cocinilla Cerámica satisface los desafíos que los distintos tipos de gastronomía exigen debido a sus cables de resistencias calentadoras, realmente la mejor opción para las familias modernas. Principio de Funcionamiento Esta Cocinilla Cerámica usa resistencias calentadoras. -
Page 8: Precauciones De Uso
IV. PRECAUCIONES DE USO Uso correcto de ollas y otros Teclas touch de panel de control No utlizar utensilios de cocina con bordes • Los controles responden al toque del dedo, irregulares o una base curva. no es necesario presionar. •... -
Page 9: Instrucciones De Uso
V. INSTRUCCIONES DE USO 1. Para empezar a cocinar toque el ON / OFF • Todos los indicadores mostrarán “-”. • Después de enceder un beep sonará. Todos los indicadores se encenderán un segundo y desaparecerán indicando que la placa ha sido encendida. Cuando termine de cocinar 1. - Page 10 Uso de Timer Bloqueo de panel de control Puedes utilizar el timer de dos maneras: Puede bloquear las teclas del panel de • Puedes utilizarlo como timer, en este caso control para evitar su suo indebido cuando el timer este encendido ,este no (por ejemplo que niños conecten la apagará...
- Page 11 5. Al tocar el control ”-“ y “+” juntos, el timer se cancelará y aaparecerá ”--“en la pantalla. 3. Con gure el tiempo tocando los controles: “-“ y “+” . 6. Cuando el timer esté configurado, 4. Al tocar el control ”-“ y “+” juntos, el timer se comenzará...
-
Page 12: Consejos De Cocina
VII. CONSEJOS DE COCINA Tenga cuidado al freír, pues el aceite y la Dorar carne grasa se calientan rápidamente, especial- Para cocinar bistecs jugosos y sabrosos: mente si usa PowerBoost. A temperaturas 1. Deje reposar la carne por cerca de 20 extremadamente altas el aceite y la grasa minutos antes de cocinar. -
Page 13: Cuidados Y Limpieza
VIII. CUIDADO Y LIMPIEZA ¿QUE? IMPORTANTE ¿COMO? Suciedad cotidiana del vidrio • Cuando desconecte la 1. Apague la encimera. encimera, no habrá alerta de (huellas digitales, marcas, 2. Aplique un agente de “superficie caliente”, aún manchas dejadas por comida limpieza mientras esté tibia cuando pueda estarlo! Tenga (¡pero no caliente!) o chorreos no-azucarados... -
Page 14: Consejos
IX. CONSEJOS PROBLEMA SOLUCIÓN POSIBLES CAUSAS Revise que la encimera esté No se puede prender la No hay corriente. conectada a una fuente de encimera. poder y encendida. Revise si hay un corte eléctrico en su hogar o área. Si ha revisado todo y el problema persiste, llame a un técnico cali cado. -
Page 15: Especi Caciones Técnicas
X. ESPECIFICACIONES TÉCNICAS Encimera vitrocerámica VITR0218 Zonas de Cocción 2 ZONAS Tensión de alimentación 220 - 240 V Hz o 60 Hz Potencia eléctrica instalada 27 00- 3 3 00 W Tamaño del producto Largo x ancho x alto (mm) 288X520X55 Medidas de empotramiento A B (mm) - Page 16 La encimera puede sostenerse en la mesa arriba del mueble. Esta debe ser instalada horizontalmente, como se muestra a continuación: 50mm mini 50mm mini En cualquier circunstancia asegúrese de que la Cocinilla Cerámica está bien ventilada y que las entradas y salidas de aire no estén bloqueadas. Asegúrese que la Cocinilla Cerámica está en buen estado.
- Page 17 Antes de jar los soportes de jación La unidad debe ser ubicada sobre una super cie estable y lisa (use el embalaje). No aplique fuerza sobre el panel de control sobresalientes. Fije la cocinilla en la super cie de trabajo atornillando cuatro soportes en la base (ver imagen). Precaución 1.
- Page 18 Conexión de encimera a fuente de poder La fuente de poder debera estar conectada de acuerdo al estándar relevante, o a un disyuntor unipolar, como se muestra más abajo. DESECHO: No deseche este producto como residuos no clasi cados. Recolección para tratamiento de residuos especializada es necesaria.
-
Page 19: Servicio Técnico
Ceramic Hob Instruction Manual modelo: VITR0218... -
Page 20: Notas
Content 1. Foreword ..................3 1.1 Safety Warnings ................. 3 1.2 Installation ................3 1.2.1 Electrical Shock Hazard ..........3 1.2.2 Cut Hazard ..............3 1.2.3 Important safety instructions .......... 3 1.3 Operation and maintenance ............4 1.3.1 Electrical Shock Hazard ..........4 1.3.2 Health Hazard .............. -
Page 21: Poliza De Garantía
1. Foreword 1.1 Safety Warnings Your safety is important to us. Please read this information before using your cooktop. 1.2 Installation 1.2.1 Electrical Shock Hazard Disconnect the appliance from the mains electricity supply before carrying out any work or maintenance on it. ... -
Page 22: Operation And Maintenance
Failure to install the appliance correctly could invalidate any warranty or liability claims. 1.3 Operation and maintenance 1.3.1 Electrical Shock Hazard Do not cook on a broken or cracked cooktop. If the cooktop surface should break or crack, switch the appliance off immediately at the mains power supply (wall switch) and contact a qualified technician. -
Page 23: Important Safety Instructions
the safety cover is retracted. Use with extreme care and always store safely and out of reach of children. Failure to use caution could result in injury or cuts. 1.3.5 Important safety instructions Never leave the appliance unattended when in use. Boilover causes smoking and greasy spillovers that may ignite. - Page 24 agents to clean your cooktop, as these can scratch the Ceramic glass. If the supply cord is damaged, it must be replaced by the manufacturer, its service agent or similarly qualified persons in order to avoid a hazard. This appliance is intended to be used in household and similar applications such as: -staff kitchen areas in shops, offices and other working environments;...
-
Page 25: Product Introduction
Congratulations on the purchase of your new Ceramic Hob. We recommend that you spend some time to read this Instruction / Installation Manual in order to fully understand how to install correctly and operate it.For installation, please read the installation section. Read all the safety instructions carefully before use and keep this Instruction / Installation Manual for future reference. -
Page 26: Working Principle
Read this guide, taking special note of the ‘Safety Warnings’ section. Remove any protective film that may still be on your ceramic hob. 2.6 Technical Specification Cooking Hob VITRO218 Cooking Zones 2 Zones Supply Voltage 220-240V~ 50 or 60Hz... -
Page 27: Choosing The Right Cookware
3.2 Choosing the right Cookware Do not use cookware with jagged edges or a curved base. Make sure that the base of your pan is smooth, sits flat against the glass, and is the same size as the cooking zone. Always centre your pan on the cooking zone. Always lift pans off the ceramic hob –... -
Page 28: Finish Cooking
Touching the heating zone selection control Select a heat setting by touching the “-“ or “+” control. • If you don’t choose a heat setting within 1 minute, the ceramic hob will automatically switch off. You will need to start again at step 1. -
Page 29: Locking The Controls
3.3.3 Locking the Controls You can lock the controls to prevent unintended use (for example children accidentally turning the cooking zones on). When the controls are locked, all the controls except the ON/OFF control are disabled. To lock the controls Touch the lock control The timer indicator will show “... - Page 30 Buzzer will bips for 30 seconds and the timer indicator shows “- - “ when the setting time finished. Hint: a) Touch the “-“ or “+” control of the timer once to decrease or increase by 1 minute. b) Touch and hold the “-“or“+” control of the timer todecrease or increase by 10 minutes. c) If the setting time exceeds 99 minutes, the timer will automatically return to 0 minute.
-
Page 31: Over-Temperature Protection
Setting the timer to turn more than one cooking zones off a). If more than one heating zones use this function, the timer indicator will show the lowest time. (e.g. zone 1# setting time of 5 minutes, zone 2# setting time of 15 minutes, the timer indicator shows “5”.) NOTE: The red dot next to power level indicator will flash. -
Page 32: Cooking Tips
Take care when frying as the oil and fat heat up very quickly, particularly if you’re using PowerBoost. At extremely high temperatures oil and fat will ignite spontaneously and this presents a serious fire risk. 4.1 Cooking Tips When food comes to the boil, reduce the temperature setting. ... -
Page 33: Care And Cleaning
Heat setting Suitability • delicate warming for small amounts of food 1 - 2 • melting chocolate, butter, and foods that burn quickly • gentle simmering • slow warming • reheating 3 - 4 • rapid simmering • cooking rice •... -
Page 34: Hints And Tips
Spillovers on the 1. Switch the power to the cooktop • The cooktop may beep and turn touch controls off. itself off, and the touch controls 2. Soak up the spill may not function while there is 3. Wipe the touch control area with liquid on them. -
Page 35: Before Locating The Fixing Brackets
50mm mini 50mm mini 50mm mini 50mm mini +4 +4 2. The ceramic cooker hob can be used on the table top of cabinet.The ceramic hob should be placed horizontally. As shown below: 50mm mini 50mm mini Under any circumstances, make sure the ceramic cooker hob is well ventilated and the air inlet and outlet are not blocked. -
Page 36: Cautions
The unit should be placed on a stable, smooth surface (use the packaging). Do not apply force onto the controls protruding from the hob. Fix the hob on the work surface by screw four brackets on the bottom of hob (see picture) after installation. Adjust the bracket position to suit for different work surface’s thickness. - Page 37 1. If the cable is damaged or needs replacing, this should be done by an after-sales technician using the proper tools, so as to avoid any accidents. 2. If the appliance is being connected directly to the mains supply, an omnipolar circuit breaker must be installed with a minimum gap of 3mm between the contacts.
- Page 38 También puede ponerse en contacto con nuestro servicio técnico oficial: tel.:(+34) 958 087 169 e-mail reparaciones: info@infiniton.es www.infiniton.es Recuerda que en nuestra web tenemos un apartado de preguntas frecuentes y un formulario de dudas para resolver cualquier consulta relacionada con tu producto Infiniton.
- Page 40 INFINITON WORLD ELECTRONIC S.L. info@infiniton.es INFINITON WORLD ELECTRONIC S.L. info@infiniton.es...
- Page 41 Para mas información sobre nuestra política de RMA y Reparaciones, visite: www.infiniton.es/rma/politica-rma-infiniton.pdf INFINITON WORLD ELECTRONIC S.L. info@infiniton.es WORLD ELECTRONIC...
Need help?
Do you have a question about the VITRO218 and is the answer not in the manual?
Questions and answers