Advertisement
AU: 1800 029 701
N Z: 0800 466 444
DOWNLOAD
OUR APP FOR
ASSEMBLY
VIDEOS
Absco Industries
Assembly Instruction Manual
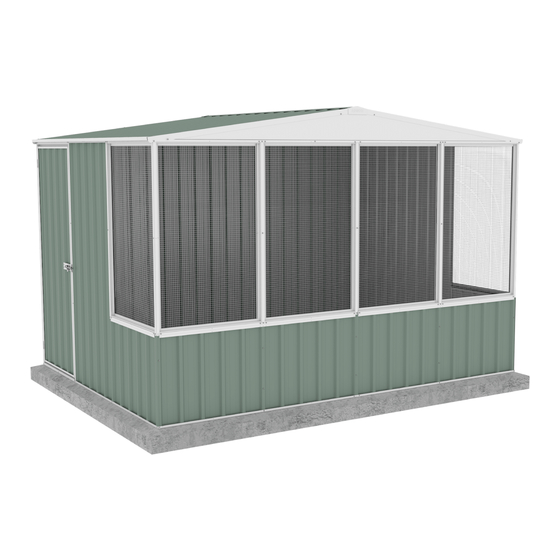
ABSCO CHICKEN COOP
MODEL: A30231GKFD
3.00mW x 2.22mD x 2.06mH
admin@absco.com.au
www.abscosheds.com.au
Model: A30231GKFD
WHEN LAYING YOUR CONCRETE
SLAB, CHAMFER THE 50mm EDGES
DOWNWARDS BY 10mm.
THIS WILL ENSURE THAT
WATER RUN OFF IS KEPT
CLEAR FROM YOUR SHED
PLEASE LEAVE A REVIEW
Tell us about your experience!
Visit www.abscosheds.com.au/review
30/4/24
50mm
10mm
2.1
1
Advertisement
Table of Contents

Related Manuals for ABSCO SHEDS A30231GKFD


Summary of Contents for ABSCO SHEDS A30231GKFD
- Page 1 ABSCO CHICKEN COOP MODEL: A30231GKFD 3.00mW x 2.22mD x 2.06mH AU: 1800 029 701 admin@absco.com.au N Z: 0800 466 444 www.abscosheds.com.au WHEN LAYING YOUR CONCRETE SLAB, CHAMFER THE 50mm EDGES DOWNWARDS BY 10mm. 50mm 10mm THIS WILL ENSURE THAT WATER RUN OFF IS KEPT...
- Page 2 ABSCO CHICKEN COOP MODEL: A30231GKFD 3.00mW x 2.22mD x 2.06mH GENERAL INSTRUCTIONS SAFETY NOTES • Before commencing any assembly, read • Some parts may have sharp edges. It is through these instructions in detail to gain advisable to wear gloves when handling these a thorough understanding of assembly items and safety glasses if drilling holes.
- Page 3 ABSCO CHICKEN COOP MODEL: A30231GKFD 3.00mW x 2.22mD x 2.06mH SHEETING PART PART DESCRIPTION CHK QTY DESCRIPTION STEEL SHEET STEEL SHEET 1785 x 773mm 2045 x 773mm STEEL SHEET STEEL SHEET 260C 1785 x 731mm 1915 x 773mm STEEL SHEET...
- Page 4 ABSCO CHICKEN COOP MODEL: A30231GKFD 3.00mW x 2.22mD x 2.06mH CHANNEL PACK COMPONENT PART COMPONENT PART CHK QTY DESCRIPTION DESCRIPTION CHANNEL CHANNEL 316L 316R 1480mm 1480mm CHANNEL CHANNEL 81BL 81BR 1496mm 1496mm CHANNEL CHANNEL 81CL 81CR 1126mm 1126mm CHANNEL CHANNEL...
- Page 5 ABSCO CHICKEN COOP MODEL: A30231GKFD 3.00mW x 2.22mD x 2.06mH SNAPTiTE ASSEMBLY GUIDE The Snaptite Assembly System locks end channels to all roof and wall sheets without the need for tools and fasteners. To assemble each panel, the perimeter channels are secured to the top and bottom of each panel.
- Page 6 ABSCO CHICKEN COOP MODEL: A30231GKFD 3.00mW x 2.22mD x 2.06mH Guide on Joining Spliced Channels The text marked on all parts must be shown on the same side as each other JOIN>> JOIN>> <<JOIN JOIN>> Step 1. Step 2. Position the channels and the Join the fi...
- Page 7 ABSCO CHICKEN COOP MODEL: A30231GKFD 3.00mW x 2.22mD x 2.06mH PRE-ASSEMBLY OF SPLICED CHANNELS Join together 22 x channel sections using 11 x channel joiners (Part CSJ) = 2x 311 NOTE: Some channels may have holes in them - You will need to redrill holes where CSJ joining channel covers them.
- Page 8 ABSCO CHICKEN COOP MODEL: A30231GKFD 3.00mW x 2.22mD x 2.06mH Guide on Joining a Spliced Ridge Beam If present, remove plastic coating from top side of ridge beam capping before assembly. Follow these three steps to assemble a ridge beam.
- Page 9 ABSCO CHICKEN COOP MODEL: A30231GKFD 3.00mW x 2.22mD x 2.06mH PRE-ASSEMBLY OF SPLICED RIDGE BEAM ZARSP = 1x 97B 1x 97BL 1x 97BR Absco Industries Assembly Instruction Manual Model: A30231GKFD 30/4/24...
- Page 10 ABSCO CHICKEN COOP MODEL: A30231GKFD 3.00mW x 2.22mD x 2.06mH ROOF OVERVIEW Absco Industries Assembly Instruction Manual Model: A30231GKFD 30/4/24...
- Page 11 ABSCO CHICKEN COOP MODEL: A30231GKFD 3.00mW x 2.22mD x 2.06mH WALL OVERVIEW Mesh panels not shown for illustrative purposes. 260C Absco Industries Assembly Instruction Manual Model: A30231GKFD 30/4/24...
-
Page 12: Roof Panel
ABSCO CHICKEN COOP MODEL: A30231GKFD 3.00mW x 2.22mD x 2.06mH ROOF PANEL 2x required FAST001 x8 Fit 81C to edge of sheet with pre-punched holes. FAST001 x8 Absco Industries Assembly Instruction Manual Model: A30231GKFD 30/4/24... -
Page 13: Right Side Panel
ABSCO CHICKEN COOP MODEL: A30231GKFD 3.00mW x 2.22mD x 2.06mH RIGHT SIDE PANEL 1x required Small pan of 33A to this side Absco Industries Assembly Instruction Manual Model: A30231GKFD 30/4/24... - Page 14 ABSCO CHICKEN COOP MODEL: A30231GKFD 3.00mW x 2.22mD x 2.06mH RIGHT SIDE PANEL FAST001 x2 Prepare a short sheet Notch out both bottom corners as shown using tinsnips. FAST001 x10 Absco Industries Assembly Instruction Manual Model: A30231GKFD 30/4/24...
-
Page 15: Left Side Panel
ABSCO CHICKEN COOP MODEL: A30231GKFD 3.00mW x 2.22mD x 2.06mH LEFT SIDE PANEL 1x required Small pan of 33A to this side FAST001 x12 NOTE: Sheet 33A must go behind jamb 89B. Absco Industries Assembly Instruction Manual Model: A30231GKFD 30/4/24... - Page 16 ABSCO CHICKEN COOP MODEL: A30231GKFD 3.00mW x 2.22mD x 2.06mH LEFT SIDE PANEL FAST001 x6 Prepare a short sheet Notch out both bottom corners as shown using tinsnips. FAST001 x12 Absco Industries Assembly Instruction Manual Model: A30231GKFD 30/4/24...
-
Page 17: Door Panel Assembly
ABSCO CHICKEN COOP MODEL: A30231GKFD 3.00mW x 2.22mD x 2.06mH DOOR PANEL ASSEMBLY FAST001 x12 1x required Position 12A Narrow pan of sheet midway along the to this side door. Side channels of door are to be orientated opposite to top and 20mm fl... - Page 18 ABSCO CHICKEN COOP MODEL: A30231GKFD 3.00mW x 2.22mD x 2.06mH Turn over the panel and fi t braces. FAST001 x14 Using the jambs as templates drill 3mm holes into the sheet and secure with screws from the outside of the sheet.
- Page 19 ABSCO CHICKEN COOP MODEL: A30231GKFD 3.00mW x 2.22mD x 2.06mH DOOR PANEL ASSEMBLY FAST009 x6 Lay the LEFT SIDE PANEL Using three rivets per hinge, NOTE: Run the 3mm drill bit face up and lay the DOOR FAST009, secure the door to...
-
Page 20: Rear Panel Assembly
ABSCO CHICKEN COOP MODEL: A30231GKFD 3.00mW x 2.22mD x 2.06mH REAR PANEL ASSEMBLY 1x required 260C Trim the tip of each sheet or bend out of the way to allow channels to fi t hard up to the edge of the sheet. -
Page 21: Front Panel
ABSCO CHICKEN COOP MODEL: A30231GKFD 3.00mW x 2.22mD x 2.06mH FRONT PANEL 1x required FAST001 x10 Prepare four short sheets Notch out both bottom corners as shown using tinsnips. Absco Industries Assembly Instruction Manual Model: A30231GKFD 30/4/24... - Page 22 ABSCO CHICKEN COOP MODEL: A30231GKFD 3.00mW x 2.22mD x 2.06mH FRONT PANEL Fix the jambs from the inside of the front panel as shown. Fixings through the 31D sheet will need to be pre- drilled. FAST001 x18 FAST001 x9 Join the gable...
- Page 23 ABSCO CHICKEN COOP MODEL: A30231GKFD 3.00mW x 2.22mD x 2.06mH PANEL CONSTRUCTION NOTE: Take care to ensure that all wall panels are not upside down. The top channels of each panel are pre-punched for attaching roof sheeting. Typically base channels are not pre-punched.
- Page 24 ABSCO CHICKEN COOP MODEL: A30231GKFD 3.00mW x 2.22mD x 2.06mH ROOF CONSTRUCTION Attaching the roof panel to the ridge beam. NOTE: The roof is to be fi tted to the rear wall. There is a 45mm overhang of the front wall.
- Page 25 ABSCO CHICKEN COOP MODEL: A30231GKFD 3.00mW x 2.22mD x 2.06mH FINAL CONSTRUCTION FAST001 x20 Bend the top and bottom fl anges as shown. Hook the bottom fl anges under the roof lip fl ashings and screw the top fl anges as shown at both ends of the ridge beam.
- Page 26 ABSCO CHICKEN COOP MODEL: A30231GKFD 3.00mW x 2.22mD x 2.06mH FITTING MESH PANELS The mesh panels are fi xed to the inside of the wall panels. FAST001 x6 There’s six holes in the border of the mesh panel, these are fi xed with FAST001 MESH screws.
- Page 27 Absco Sheds Storage Guidelines • Absco Sheds are designed to be weatherproof for normal weather conditions. In the event of extreme weather conditions such as heavy rain, combined with high wind gusts, the ridge capping, sheeting joins, screw fi xings etc., may exhibit minor deformations which may allow some water entry. These areas should be checked regularly to ensure that maximum strength and protection is maintained.
- Page 28 Lifetime Warranty Statement 1. DEFINITIONS 3. WARRANTY CLAIM PROCEDURE In this document, capitalised terms have the following meaning: 3.1. If, during the Lifetime Warranty Period, You believe the Product has a “ABSCO” means John Scholtes Investments (No. 1) Pty Ltd trading Defect, You must comply with the procedure set out in this clause 3.
- Page 29 4. WARRANTY LIMITATIONS / EXCLUSIONS 4.1. To the extent permitted by law, this warranty will not apply where: the Product has been installed or used for a purpose that is not an Authorised Purpose; the Product has not been installed, assembled, maintained and/or special, indirect or consequential loss or damage of any nature operated in complete compliance with ABSCO’s Product Guide;...
Need help?
Do you have a question about the A30231GKFD and is the answer not in the manual?
Questions and answers