
Related Manuals for Rosenbauer FOX 4


Summary of Contents for Rosenbauer FOX 4
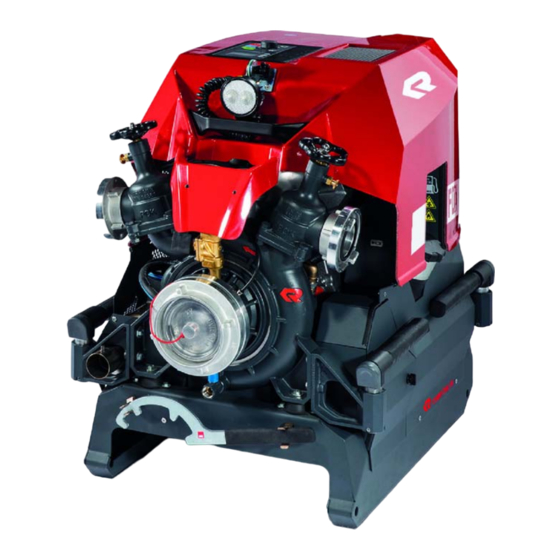
- Page 1 Operation manual FOX 4th Generation Article number: 03806B-003 Edition: 05/2021 Revision number: Language: English...
-
Page 2: Table Of Contents
5.6 Carrying frame ........5.7 Rosenbauer Body Components Logic Control System (RBC LCS). - Page 3 6 Technical description ....... . . 6.1 Components ........6.2 Connections .
- Page 4 7.8.2 Quickstart ....... . 7.8.3 Training mode/competition mode - Variant 1 ..7.8.4 Training mode/competition mode Variant 2 .
- Page 5 10.1.2 Propulsion engine ......114 10.1.3 Detailed information on engine faults ..115 10.2 Warnings .
-
Page 6: Legal Notice
Original operating manual ORIGINAL OPERATION MANUAL Legal notice Copyright All rights to this manual and its attachments lie with Rosenbauer International AG. The documents are only entrusted to the recipient for their personal use. Reproduction, reprinting (electronically or mechanically), translations in other languages or all other duplication, also of parts of the manual, are only allowed with written permission. -
Page 7: Declaration Of Conformity
2.0.1 Declaration of conformity According to EC Machinery Directive 2006/42/EC, Annex II, part 1A Herewith declares Rosenbauer International AG Fire fighting technology A - 4060 Leonding, Paschinger Str. 90 Address: Postbox 176, 4021 Linz, Austria Telephone: +43 (0)732 / 6794-0... -
Page 8: Introduction
If this manual contains a technical error or a typographical error, Rosenbauer reserves the right to make change at any time and without no- tice. This manual may contains figures and descriptions, that are not built into the delivered product. - Page 9 Introduction Identification ► Enter the serial number of the portable fire pump in the table. 9 / 127...
-
Page 10: Use Of The Operation Manual
Introduction Use of the operation manual Use of the operation manual 3.4.1 Validity This manual contains information needed for the operation of the product. This manual contains descriptions of special equipment as well as some abstractions and exemplary illustrations. The actual equipping of your prod- uct may therefore differ in part from the descriptions and illustrations. -
Page 11: Warnings
Introduction Use of the operation manual 3.4.3 Warnings The safety information warns the user of risks and informs them how these risks can be avoided. Safety information stands at the beginning of a chapter before handling in- structions from which a dangerous situation can occur. Further safety infor- mation is found at the start of this manual. -
Page 12: Safety
Improper use of the product can result in personal injury. Additionally, the product or other material assets of value may be damaged. Rosenbauer can warrant the safety, reliability and performance of its prod- uct only if the product is used in accordance with the stipulations in this manual. -
Page 13: Training And Qualifications
Personnel must exhibit physical and mental aptitude. Minors and persons without firefighting training may not operate the product. Modifications and conversions to the product may be performed only with written authorization from Rosenbauer and must be performed by a manu- facturer-authorised person. General safety instructions The following instructions give an overview of how the product is used safe- ly. - Page 14 Safety General safety instructions If you cannot fix faults yourself or repairs could not be carried out by spe- cially trained workshop personnel, Rosenbauer or the nearest Rosenbauer service partner must be contacted immediately. 14 / 127...
-
Page 15: List Of The Safety Symbols Used
Safety List of the safety symbols used List of the safety symbols used 4.6.1 Meaning of the warning signs Danger from electricity. Impending risk of explosion. Impending risk of explosion. Risk from oxidising materials. Risk of harmful or irritating materials. Impending acid burn risk. -
Page 16: Meaning Of The Prohibitory Signs
Safety List of the safety symbols used Impending crushing risk. Danger from high pressure. Threat of environmental contamination. Impending shearing risk. Threat of shearing. Impending risk of tripping. Risk of hand injury. 4.6.2 Meaning of the prohibitory signs No smoking! Handling fire and naked flames forbidden! Do not touch or reach in! 16 / 127... -
Page 17: Meaning Of The Caution Signs
Safety List of the safety symbols used Do not stay in the danger area! 4.6.3 Meaning of the caution signs Use hearing protection. Wear safety goggles or a safety mask. Use safety goggles and hearing protection. Wear a protective helmet. Wear protective gloves. -
Page 18: Warnings
Safety Warnings Warnings DANGER! Inhalation of toxic exhaust fumes can cause death or serious health damage! Toxic gases are produced when running a combustion engine. If operation of internal combustion engines in enclosed spaces is absolutely necessary, note the following: Extract the exhaust gases by means of the exhaust gas hose. - Page 19 Safety Warnings Danger of serious injury and damage due to explosion, fire and chemical burns! When charging vehicle batteries, a highly explosive electrolytic gas mixture (hydrogen and oxygen) is released; it is easily flammable and may release highly acidic battery acid. Wear safety goggles whenever servicing a battery.
- Page 20 Safety Warnings Potentially fatal injuries and danger of explosion! Danger of explosion occurs at operation of the unit in explosive areas.. Do not operate the unit in explosive areas. Danger of shearing in the area of the extinguishing equipment! Body parts can be cut off.
- Page 21 Safety Warnings Safety clearance of materials conducting electricity to overhead lines Voltage Safety clearance up to 1 kV 1 m (3 ft) 1 kV - 110 kV 3 m (9 ft) 110 kV - 220 kV 4 m (13 ft) 220 kV - 380 kV 5 m (16 ft) Safety distance for fire fighting operations on low-voltage systems...
- Page 22 Safety Warnings CAUTION! Danger of injury for the operator due to performing action in wrong order! Individual operating instructions must be done in the prescribed order. Danger of crushing or material damage due to moving parts! Moving components that have not latched into position, or are not at their limit positions, can cause injury to persons or material damage.
- Page 23 Safety Warnings Water under high pressure! Lingering in front of nozzle discharges could result in serious injuries. Do not linger in front of nozzle discharges. Never aim the nozzle at persons or equipment. Before starting fire fighting, close all cabin doors and windows inside ...
- Page 24 Safety Warnings Danger of burns due to touching the hot engine and engine components! Do not linger in the danger zone. Do not touch hot parts of the engine. Do not touch any parts of the exhaust system. ...
- Page 25 Safety Warnings NOTICE Material damage due to the non-observance of optical or acoustic warning signals! Monitor all optical and acoustic warning signals, measured value indicators and pilot lamps. Follow all training and the operating manual. Failure of the engine due to discharged battery! The battery of the engine slowly discharges despite the ignition being switched off.
-
Page 26: Product Description
The portable pump must be supplied from a water tank, an open water source, a supply line or a hydrant. An exact description of the water supply takes place in chapter "Operation". Identification Assignment of the Rosenbauer identification to the standard identification. Rosenbauer identification Standard identification acc. to EN1028... -
Page 27: Pump Unit
Product description Pump unit Pump unit 5.4.1 Water pump Normal pressure pump Normal pressure pump The water pump is a single stage normal pressure pump. The water pump consists of the pump housing, the impeller, the pump shaft, the diffuser and the shaft seal. - Page 28 Product description Pump unit Mechanical overheat protection CAUTION! Danger of burns due to touching the hot pump system and hot water discharge! Operating the pump with closed discharge outlets causes the temperature of the pump to rise quickly. Do not operate pump under full load with discharge outlets closed. ...
-
Page 29: 210E Priming Pump
Product description Pump unit 5.4.2 Priming pump 210E priming pump 210E priming pump Suction line Pressure valve plate Exhaust line Priming pump housing Eccentric Suction valve plate Valve cover Water pumps are not self-priming pumps, so the required vacuum is creat- ed by a priming pump. -
Page 30: Propulsion Engine
Product description Propulsion engine Automatic priming In the case of the automatic priming system, the priming pump is automat- ically activated when the water column is interrupted. Prerequisite: The priming pump must remain selected in the background. Functionality The priming pump is activated and priming process started. If water is ex- pelled at the priming pump, the priming pump is deactivated. -
Page 31: Carrying Frame
Product description Carrying frame Fuel tank Carrying frame The portable pump is mounted on the carrying frame by four elastic rubber- metal bearings. Four swivelling carrying handles are integrated in the carrying frame. Carrying frame 31 / 127... -
Page 32: Rosenbauer Body Components Logic Control System (Rbc Lcs)
Product description Rosenbauer Body Components Logic Control System (RBC LCS) Rosenbauer Body Components Logic Control System (RBC LCS) 5.7.1 RBC LCS Compact RBC LCS Compact The RBC LCS Compact consists of: • RBC LCS display 3.5“ (left) • RBC LCS Digipot (right) The display shows the operating personnel the main status information. -
Page 33: Technical Description
Engine cover handle Working light LCS control panel pump operator's panel Engine cover Fuel tank cap lighting Side LCS control panel pump operator's panel (optional) Rosenbauer LED lighting system socket FireCan socket Charging socket USB charging socket Front cover Carrying frame lighting... -
Page 34: Connections
Technical description Connections 3 3 3 Propulsion engine components Water pump flange Propulsion engine type plate Ignition coil Engine control device Engine oil dipstick Engine oil tank Pressure and temperature sensor Electrical starting device Oil filter housing Connections Connections for the water supply Water pressure gauge Water vacuum gauge Screw down valve for normal pressure outlet... -
Page 35: Indicators
Technical description Indicators Indicators Symbol Name Functional description The pressure gauge shows the pump Water pressure pressure of the water pump. gauge The water pressure/vacuum gauge Water pressure/ shows the overpressure or vacuum in the -0,2 -0,4 -0,6 vacuum gauge suction part of the water pump. -
Page 36: Screen
Technical description LCS operation panel Symbol Name Functional description The switch activates and deactivates the Priming pump priming pump. The speed is regulated with the governor Governor and this adjusts the water pump pres- sure. The switch adjusts the engine speed to Idling speed idling and reduces the pump pressure ac- cordingly. - Page 37 Technical description LCS operation panel Fuel Symbol Name Functional description Propulsion engine The indicator shows the current fuel tank fuel tank fill level of the propulsion engine. The indicator shows the current tempera- Coolant tempera- ture of the coolant of the propulsion en- ture gine.
- Page 38 Technical description LCS operation panel Symbol Name Functional description The indicator shows the operating hours Service interval op- until the next service. erating hours The indicator shows the date of the next Service interval service. date The indicator shows the current software version.
- Page 39 Technical description LCS operation panel Symbol Name Functional description The control displays the status of the in- take pressure monitoring system. The pilot lamp has three switching condi- tions: • Green: intake pressure monitoring Intake pressure system active monitoring system •...
-
Page 40: Optional Equipment
Technical description Optional equipment Optional equipment 6.5.1 Tool kit The tool kit is equipped with the most important tools for the portable pump. Scope of delivery • Tool bag • TORX TX20 angle screwdriver • TORX TX30 angle screwdriver • Spark plugs applicator 5/8 square 16 mm •... -
Page 41: Refuelling Set
Technical description Optional equipment Exhaust gas hose 6.5.3 Refuelling set Fuel canister The fuel canister is to be used for refuelling. The fuel canister has a capacity of 20 litres. The fuel in the fuel canister must be changed (used up or replaced) at least every six months. -
Page 42: Wheel Set
6.5.5 Lighting system frame holder The Rosenbauer LED lighting system can be attached to the carrying frame by means of an optional frame holder. For fastening at least 2 extension poles of the Rosenbauer LED system are required. The extension poles are not included in the scope of delivery. -
Page 43: Integrated Around-The-Pump Foam Proportioning System
Read/observe the supplementary supplier documentation. 6.5.6 Integrated around-the-pump foam proportioning system The Rosenbauer integrated around-the-pump foam proportioning system for the portable pump ensures constant foam proportioning at all times. The proportioning amount is set via a regulating ball valve. The required proportioning quantity can be read off from the desired proportioning rate and the water quantity via a table. -
Page 44: Sockets
Technical description Optional equipment 6.5.7 Sockets 12 volt jump-start socket For further information refer to chapter "Battery". 6.5.8 Key panel RBC LCS Keypad 5 RBC LCS Keypad 5 The RBC LCS Keypad 5 is equipped with 5 function switches. Additional programmable special functions can be operated with the ... -
Page 45: Operation
Operation Preparation for initial commissioning Operation Preparation for initial commissioning The sequence of the described processes is to be maintained without ex- ception! Before initial start-up, check all operating fluids for correct filling level. ► Check oil in the priming pump. For further information refer to Chapter "Testing and inspection ... -
Page 46: Transport
Operation Transport Transport CAUTION! Risk of injury to operating personnel during transport! The device may only be transported using the carry handles provided on the base frame. Unfolded handles represent a tripping hazard. Incorrect transport can lead to injuries to the operating personnel and ... -
Page 47: Transport With The Aid Of Wheel Set (Optional)
Operation Transport 7.2.2 Transport with the aid of wheel set (optional) The portable pump can be equipped with a wheel set for manoeuvring and 1-person transport. Wheel set Assembly/disassembly of the wheel set may only be carried out by trained specialist personnel. - Page 48 Operation Transport Mount wheel set Transporting portable pump ► Swivel out the carrying handles of the portable pump. ► Push down the carrying handles and turn into the direction of trav- ► Lift portable pump on the carrying handles. ► Lift the portable pump so far that the portable is on the wheels.
-
Page 49: Monitoring During Operation
Operation Monitoring during operation Monitoring during operation All operating elements must always be within reach of the operating per- sonnel. ► During operation, constantly monitor the displays and warnings on the operating elements. ► Continuously monitor critical operating states and fill levels of the op- erating materials. -
Page 50: Position The Portable Pump
Operation Position the portable pump Position the portable pump ► Ensure that the portable pump is on a secure footing. ► Do not position the portable pump on a combustible surface or near combustible materials (wood, leaves, hay, dry grass, etc.). ►... - Page 51 Operation Operation WARNING! Potentially fatal injuries due to the engine taking in flammable gases! Do not operate the engine in areas with a heavy concentration of flammable vapors such as e. g. diesel, gas or propane. When handling flammable liquids and gases, always shut off the ...
-
Page 52: Control Portable Pump In Critical Operating Conditions
Operation Operation 7.6.1 Control portable pump in critical operating conditions NOTICE Unplanned event The portable pump can be controlled at all times, even in critical operating states (e.g. burst hose). The approach depends on the situation and is the operating personnel's responsibility. Variant 1: ►... - Page 53 Operation Operation Start propulsion engine with ignition switched off: ► Actuate Start propulsion engine function switch for approx. 5 seconds. The propulsion engine is started. A speed change can only be made with an operational control unit. Start propulsion engine with control unit switched off: ►...
-
Page 54: Adjust Water Pump Pressure
Operation Operation 7.6.3 Adjust water pump pressure The pump pressure will be varied with the governor. ► Turn Governor function switch clockwise, to increase the pump pres- sure. ► Turn Governor function switch counter clockwise, to decrease the pump pressure. LEDs are placed all round the governor, which illuminate or go out in ... -
Page 55: External Drafting/Priming
Operation Operation 7.6.5 External drafting/priming NOTICE Material damage due to cavitation! With increasing suction lift the pump performance is reduced. Too high suction lifts, very large flow rates and high pump speeds can lead to cavitation in the pump. Cavitation causes extreme local pressure peaks, which can damage the pump. - Page 56 Operation Operation The highest pressure of the water pump, read from the pressure gauge, is 17 bar (246 psi). The maximum feed pressure (supply pressure), read on the pressure vacuum gauge, is 17 bar (246 psi). The supply pressure, read on the pressure vacuum gauge, must not drop below 1 to 2 bar (15 to 30 psi), otherwise a cross-sectional constriction of the hose will occur and the water supply will be interrupted.
- Page 57 Operation Operation Deactivate external drafting ► Set the pump to idling speed. Refer to chapter "Adjust water pump pressure". ► Close pressure outlets. Refer to chapter "Open/close discharge pipes". ► Stop water supply. ► Disconnect suction and pressure hoses. The external drafting process is completed.
-
Page 58: Supply Operation/Hydrant Operation
Operation Operation 7.6.6 Supply operation/hydrant operation The highest pressure of the water pump, read from the pressure gauge, is 17 bar (246 psi). The maximum feed pressure (supply pressure), read on the pressure vacuum gauge, is 17 bar (246 psi). The supply pressure, read on the pressure vacuum gauge, must not drop below 1 to 2 bar (15 to 30 psi), otherwise a cross-sectional constriction of the hose will occur and the water supply will be interrupted. - Page 59 Operation Operation Supply operation with intake pressure monitoring system (optional) NOTICE Damage to the pump in the event of use with waste water! Waste water can damage the pump unit through deposits. Before connecting the pressure hoses to hydrants, open them and ...
-
Page 60: Bilge Operation
Operation Operation 7.6.7 Bilge operation NOTICE Material damage due to cavitation! With increasing suction lift the pump performance is reduced. Too high suction lifts, very large flow rates and high pump speeds can lead to cavitation in the pump. Cavitation causes extreme local pressure peaks, which can damage the pump. -
Page 61: Stop Propulsion Engine
Operation Operation 7.6.9 Stop propulsion engine At high ambient temperatures (> 35°C) and an engine temperature of above 95°C allow the propulsion engine too cool down before switching it off in operation. Operate the portable pump at approx. 2000-2500 min- in suction state for approx. -
Page 62: Flush
Operation Operation 7.6.10 Flush A thorough flushing is to be carried out after each foam operation as well as after each operation with sea or dirty water. To ensure faultless functionality of the pump unit the whole pump unit must be flushed. - Page 63 Operation Operation Drain the screw-down valves Open the valves beyond the spindle limit. ► Pull spindle limit and open valves to the stop. The valves are fully open. The water held inside is automatically expelled. ► Re-close the valves. The screw-down valves are drained.
-
Page 64: Activate/Deactivate Lighting
Operation Operation 7.6.12 Activate/deactivate lighting Activate lighting ► Actuate Lighting function switch, to activate the lighting. • First actuation: working lights and fuel tank cap lighting are acti- vated. • Second actuation: carrying frame lighting is activated. • Third actuation: the whole lighting of the portable pump is activat- The corresponding lighting of the portable pump is activated. -
Page 65: Refuel
Operation Refuel Refuel To perform a safe refuelling operation, it is essential to comply with all safe- ty measures. Always use freshly filled fuel during performance checks to avoid loss of performance. WARNING! Fire and explosion risk from flammable fuel! When working on fuel systems the fuel may ignite and cause life- threatening injuries. -
Page 66: Permissible Fuel
Operation Refuel NOTICE Engine damage from the wrong fuel! Only refuel with the appropriate approved fuel. Observe pictograms on the fuel tank and product. Material damage due to the limited storage life of fuel! Due to the limited storage life of fuel, material damage can occur if fuel is stored for too long. -
Page 67: Refueling With Propulsion Engine Running
Operation Refuel 7.7.2 Refueling with propulsion engine running Before refuelling ► Make sure that the portable pump must be refuelled, e.g. observe the fuel warning light. ► Check the area and clear space, if required. A free space for the escape route must be provided. ... - Page 68 Operation Refuel ► Put fuel into the fuel tank with the refuelling set. ► Do not overfill the fuel tank! ► Put down the fuel canister. ► Remove filler neck. ► Close fuel canister. ► Close fuel tank cap. ► Adjust propulsion engine to desired speed.
-
Page 69: Options
Operation Options Options 7.8.1 Pump pressure regulator Activate automatic pump pressure governor If the automatic pump pressure governor is active, the pump pressure re- mains constant, independent of the amount of water discharge. ► Turn Governor function switch clockwise, to increase the pump pres- sure. -
Page 70: Training Mode/Competition Mode - Variant 1
Operation Options With propulsion engine running: ► Press the Quickstartfunction switch. Priming pump is activated. Once the priming process is finished the pump pressure governor is activated. The pump pressure governor is set to 4 bar (58 psi). ... -
Page 71: Training Mode/Competition Mode Variant 2
Operation Options ► Press the Competition mode function switch. Competition mode is preselected. The status LED flashes red. ► Actuate the Stop propulsion engine function switch to deactivate the control unit. Control unit is deactivated. Display is deactivated. ... -
Page 72: Mount Lighting System Frame Holder
Refer to chapter "Pump pressure regulator". 7.8.5 Mount lighting system frame holder To ensure operational safety, the Rosenbauer LED lighting system can only be turned on when the propulsion engine is running and the battery voltage is greater than 11.5 V. ►... -
Page 73: Around-The-Pump Foam Proportioning System
Operation Options Portable pump with lighting system frame holder When using the lighting system frame holder the engine cover cannot be opened! Read/observe the supplementary supplier documentation. 7.8.6 Around-the-pump foam proportioning system Integrated around-the-pump foam proportioning system components Foam induction valve Regulating ball valve Foam compound external drafting connection Pump housing connection... - Page 74 Operation Options Preparation ► Dismantle front cover. ► Release two front cover screws. ► Take off the front cover. ► Dismantle battery box. ► Disconnect battery and take it out. In avoid sparks first disconnect the cable from the earth terminal. ...
- Page 75 Operation Options Integrated around-the-pump foam proportioning system is mounted. Leaks during mounting affect the functionality of the integrated around-the- pump foam proportioning system and the portable pump. Dismantle integrated around-the-pump foam proportioning system ► disassembly integrated around-the- pump foam proportioning system takes place in reverse order to the assembly.
- Page 76 Operation Options Before the content in the external foam compound tank is completely used up, close the regulating ball valve. This prevents air from being sucked in. Suction air leads to breakage of the water column in the portable ...
- Page 77 Operation Options ► Close pressure outlets. Refer to chapter "Open/close discharge pipes". ► Stop propulsion engine. Refer to chapter "Stop propulsion engine". Operation with the external foam compound container has finished. Flush integrated around-the-pump foam proportioning system ►...
-
Page 78: Service And Cleaning
Only technology which is regularly maintained by specialists can meet the high demands. Rosenbauer service partners will gladly provide you with comprehensive advice about inspections and Service PLUS, as well as about the exact scope and costs of testing and maintenance work. -
Page 79: Testing And Inspection Work
Service and cleaning Service plan 8.1.2 Testing and inspection work Symbol Work specification Check oil level of the priming ● ● ● pump Valve plates of the priming ● ● pump V-belt of the priming pump ● ● Check engine oil level ●... -
Page 80: Checking For Signs Of Oil Leakage
Service and cleaning Service plan 8.1.3 Checking for signs of oil leakage Symbol Work specification Priming pump ● ● ● Propulsion engine ● ● ● 8.1.4 Lubrication service Symbol Work specification Carrying handles ● ● Spindle of the pressure valve ●... -
Page 81: Lubrication Table
Service and cleaning Lubrication table Lubrication table Description Medium Dosing Unit Engine oil SAE Engine oil Litres 15W40 Priming pump 0.65 (0.17) (gal- API/SF lons) MIL-L-46152 B Ford M2C-9011 GM 6048 M 5W40 engine oil Litres - fully synthetic 2-2.5 (0.52- Propulsion engine (gal- 4-stroke engine... -
Page 82: Open/Close Engine Cover
Service and cleaning Open/close engine cover Open/close engine cover CAUTION! Risk of crushing! Danger of crushing and entrapment with the movable engine cover. Only touch the engine cover in a suitable place. Use protective equipment. Do not reach into the danger area. ... -
Page 83: Service Menu
Service and cleaning Service menu Service menu 8.5.1 Call up/exit service menu The service menu can be called up via the Operating hours screen page. The language of the service menu is set to English and cannot be ad- ... -
Page 84: Set Service Interval
Service and cleaning Service menu ► Actuate the Confirm message function switch to select the Language setting. ► Actuate the Scroll back screen page or Scroll forward screen page function switch to select the desired display language. ► Actuate the Confirm message function switch to select the SAVE DATA TO CFG setting. -
Page 85: Detailed Information On Engine Faults
Service and cleaning Service menu ► Actuate the Scroll back screen page or Scroll forward screen page function switch to select the desired month. ► Actuate the Confirm message function switch to select the Year set- ting. ► Actuate the Scroll back screen page or Scroll forward screen page function switch to select the desired year. -
Page 86: Maintenance Work
Service and cleaning Maintenance work Maintenance work Maintenance work involves tasks that can be performed by properly trained fire department personnel. This work must be carried out regularly, especially after each use, to ensure optimum condition of the product. ► Keep the safety and warning signs clean and legible. -
Page 87: Maintenance And Cleaning Of 3M Scotchcaltm And Controltactm Films
Service and cleaning Maintenance work ► Clean the device with a suitable sponge or brush. Check the products for contamination before use to avoid surface damage. ► In addition, use a tested car wash detergent to remove road dirt. Do not use household soap or detergent. -
Page 88: Dry Vehicle And Equipment
Service and cleaning Maintenance work 8.6.3 Dry vehicle and equipment Load only dried equipment into the vehicle, to conserve the service life of the equipment and the vehicle. ► Let the equipment and device dry before loading. ► Open compartments of the vehicle in the vehicle garage. 88 / 127... -
Page 89: Testing And Inspection Work
Service and cleaning Testing and inspection work Testing and inspection work WARNING! Risk of accident and injury! Damage to the product, as well as equipment that has not been properly repaired, can cause serious accidents or jeopardise the success of the operation. - Page 90 Service and cleaning Testing and inspection work Dirty V-belts or V-belt pulleys reduce the power or interrupt the power trans- mission. Priming pump Priming pump Oil filler plug Oil dipstick Oil drain plug All moving parts of the priming pump are oil bath lubricated. Checking the oil level Check the oil level of the priming pump with the oil dipstick.
-
Page 91: Propulsion Engine
Service and cleaning Testing and inspection work Mechanical overheat protection ► Put the water pump into operation. ► Pull knurled screw until water flows out of the hose. ► Release knurled screw. The mechanical overheat protection must close and tighten inde- ... - Page 92 Service and cleaning Testing and inspection work Engine oil dipstick Air filter Coolant expansion tank of the propulsion engine Priming pump oil dipstick Oil dipstick with marking The correct engine oil level is determined in two stages. ► Check engine oil level in cool condition. It is checked whether there is enough engine oil for a test at oper- ...
- Page 93 Service and cleaning Testing and inspection work ► Run the propulsion engine at idling speed for at least 30 seconds. ► Stop propulsion engine. ► Remove the engine oil dipstick and wipe it clean. ► Replace engine oil dipstick and tighten. ►...
- Page 94 Service and cleaning Testing and inspection work ► Remove the engine oil dipstick again. ► Check engine oil level. The engine oil level must be just below the top marking. ► If the engine oil level is too low, add oil Refer to chapter "Lubrication table".
- Page 95 Service and cleaning Testing and inspection work Coolant expansion tank of the propulsion engine Pressure cap of the expansion tank Check coolant The propulsion engine coolant must be checked at room temperature. ► Open pressure cap of the expansion tank. ►...
-
Page 96: Electrics
Service and cleaning Testing and inspection work ► Remove air filter cover. ► Remove air filter. Observe the local disposal regulations. ► Insert a new air filter. ► Place the air filter cover on top. ► Mount all the fastening screws on the air filter cover. ►... - Page 97 Fuse allocation 1st fuse holder The fuses are designed as safety fuses. • Charging F3-1/10A: charging socket, FireCan, Rosenbauer LED light- ing system • Operating F3-3/10 A: control unit RBC LCS • Main fuse F3-5/10 A: supply for the main relay, supply for the second...
-
Page 98: Service Work
Service and cleaning Service work Service work Service work is work that may only be carried out by specially authorised expert personnel. This work is to be carried out or allowed to be carried out in accordance with the manufacturer's regulations. Maintain service intervals, as well as officially prescribed testing schedules and create written records for them. - Page 99 Service and cleaning Service work Remove valve cover The removal of the valve cover has is be done on both sides. ► Loosen the nuts of the valve cover and remove valve cover left and right. Check valve plates ►...
- Page 100 Service and cleaning Service work Top up oil ► Open oil filler plug ► Add oil using a suitable funnel and wait until it has run down. Oil quality and oil filling quantity, refer to chapter "Lubrication ta- ble". ►...
-
Page 101: Propulsion Engine
Service and cleaning Service work 8.8.2 Propulsion engine Replace engine oil and oil filter Engine oil and oil filter must always be replaced at the same time. Drain engine oil View of portable pump from below Engine oil drain valve ►... - Page 102 Service and cleaning Service work Replace oil filter 1 1 1 Oil filter Oil filter housing fixing screws Oil filter cover O-ring Oil filter ► Before the oil filter is changed the used oil must be drained. See chapter "Drain engine oil". ...
- Page 103 Service and cleaning Service work Dirty V-belts or V-belt pulleys reduce the power or interrupt the power trans- mission. Coolant of the propulsion engine CAUTION! Burning hazard from the hot cooling system! Only carry out maintenance work after the portable fire pump has been ...
- Page 104 Service and cleaning Service work Existing damage to the cooling system or the propulsion engine must be fixed before filling. Add coolant Before starting the portable pump for the first time, ensure that the ex- pansion tank has been completely filled with coolant. The coolant level must be at the top marking.
- Page 105 ► If after the third repetition the required quantity is still not in the cooling circuit, contact Rosenbauer customer service or the near- est Rosenbauer service centre immediately. The coolant quantity is 2.5 - 2.7 l (0.66 - 0.71 gal).
-
Page 106: Battery
Service and cleaning Service work ► Close engine cover. Refer to chapter "Close engine cover". Spark plugs have been changed. 8.8.3 Battery WARNING! Danger of serious injury and damage due to chemical burns! Battery acid can cause severe injury to eyes and skin. Follow safety instructions on the outside of the battery. - Page 107 Service and cleaning Service work Characte Application Voltage limitation ristic cur (manual monitoring) Single charging max. 14.4 Volts Single charging max. 14.4 Volts a. Chargers with automatic switch-off by timer or temperature monitoring. Regulated chargers without additional monitoring (recommended): Characte Application Voltage limitation ristic cur...
-
Page 108: General Guidelines For Handling Electronic Compo
Service and cleaning Service work 8.8.4 General guidelines for handling electronic components NOTICE Neglecting these recommendations will result in loss of warranty. Working on vehicles fitted with electronic devices Installation and measurement of electronic devices. ► Ensure power is switched off before working on electrical parts (except when measuring). - Page 109 Service and cleaning Service work Painting work or working with chemicals or aggressive substances: NOTICE Damage to electronic components Due to high temperature in a paint box, electronics can be severely damaged. Expose electronics to max. 95 °C (203 °F) for a short period. ...
-
Page 110: Storage And Transport
Service and cleaning Storage and transport Storage and transport The portable fire pump and the corresponding installation material must be stored and transported in its packaging. It must be handled carefully and cautiously. 8.9.1 Preserving and storing If the portable fire pump is not operated for a longer period of time (> 3 months) the following advice must be observed. -
Page 111: Assembling Conditions
Assembling conditions Installation advice Assembling conditions Installation advice The portable pump was developed in accordance with the standards EN1028 or EN14466. According to EN11466 the maximum permissible ambient temperature of the portable pump is 35 °C. The propulsion engine output is reduced at higher ambient temperatures. - Page 112 Assembling conditions Installation advice • In the absence of overheat protection (option), a by-pass line dia. 5 mm (0.2 in) must be provided to the water tank. This serves to prevent the portable pump from overheating when the pressure outlets are closed.
-
Page 113: Troubleshooting
10.1 Failure If problems or repairs can not be clearly identified or solved please contact the customer service department or your Rosenbauer representative. The following list offers an overview of possible faults. The list is not com- plete, but in the event of a malfunction it can be helpful in localising and rec- tifying the fault. -
Page 114: Propulsion Engine
Troubleshooting Failure Fault Cause Remedy Measuring instru- Measure instrument defect Replace meter ment does not dis- Plug not connected Connect plug play anything PIN assignment incorrect Correctly wire PIN assignment 10.1.2 Propulsion engine Faults Cause Remedy Engine oil circuit Low engine oil level (from in- Top up engine oil creased consumption / oil Check oil consumption max. -
Page 115: Detailed Information On Engine Faults
Troubleshooting Failure Faults Cause Remedy Cooling circuit Coolant fluid level too low Localise leaks and fix them Pressurise the cooling system max. 1.1 bar (15 psi) Add coolant Air in cooling system Check / clean thermostat vent hole Add coolant and ventilate the system Thermostat defective (does Replace thermostat not open) - Page 116 Troubleshooting Failure Sensor / plug Error description PCode Diagnostic Fault code for Ubatt diagno- 0x563 sis Max error Charge controller Diagnostic Fault code for Ubatt diagno- 0x562 sis Min error Diagnostic Fault code for performance 0x265 level Max error of injector 1 Diagnostic Fault code for performance 0x264 level Min error of injector 1...
-
Page 117: 10.2 Warnings
Troubleshooting Warnings Sensor / plug Error description PCode Short circuit to plus of accelerator pedal 0x123 sensor 1 Short circuit to plus of accelerator pedal 0x223 sensor 2 Control panel Short circuit to GND of accelerator ped- 0x122 al sensor 1 Short circuit to GND of accelerator ped- 0x222 al sensor 2... - Page 118 Troubleshooting Warnings Message Possible cause Corrective action Disengage pump! The pump is still activated. A Disengage the pump. function can not be started. Pump cooling has Pump overheated. Too less Increase water flow. been engaged. water flow. Drain valve has been Pump was drained.
-
Page 119: Disposal
Disposal Warnings Disposal Dispose of all materials and old parts that are produced through the han- dling and repair of this unit in an environmentally-friendly way. Disposal of used oil, cooling water and fuels Used oil, cooling water and fuels are water-polluting substances. Ensure the correct disposal of used oils and fuel. -
Page 120: Technical Data
Technical data Portable fire pump Technical data 12.1 Portable fire pump Portable pump Manufacturer Rosenbauer International AG Type FOX 4th Generation Standard identification acc. to PFPN 10-1000 EN1028 PFPN 10-1500 Construction guidelines for portable DIN EN 14466 pumps Dry weight without fluids approx. -
Page 121: 12.3 Foam Proportioning System
1028 12.3 Foam proportioning system Approved foam compound All components of the Rosenbauer foam proportioning systems, e. g.: housing, piping and sealing materials, are resistant in operation to all types of commercially available foam compounds. In principle all commercially available foam compounds for firefighting can be used with similar hydraulic properties to water. -
Page 122: 12.4 Propulsion Engine
Technical data Propulsion engine 12.4 Propulsion engine Propulsion engine Manufacturer BRP Rotax Type 903 ACE Operation type Four-stroke petrol engine with elec- tronic injection Cylinder Valves per cylinder Bore / stroke 74 / 69.7 mm Cubic capacity 899.3 cc Output 45 kW at 5200 min (±... -
Page 123: 12.5 Noise Measurements
Technical data Noise measurements Fuel Fuel consumption constant 1500 l/min (396 gpm) approx. 14 l (3.7 gal) at 10 bar (145 psi) (5200 min constant 1000 l/min (264 gpm) approx. 18 l (4.7 gal) at 15 bar (217 psi) (6000 min Lubrication system Lubrication system Dry sump lubrication with ex-... - Page 124 Technical data Noise measurements PFPN 10 - 1000 Measured values Sound pressure level, L based on 20μPa, at the 94.9 p(ST) operating position (dB) Uncertainty factor, K (dB) p(ST) Acoustic power emissions, L based on 1µW (dB) 109.4 Uncertainty factor, K (dB) PFPN 10 - 1500 Measured values...
-
Page 125: 12.6 Pfpn 10-1500 Performance Chart
Technical data PFPN 10-1500 performance chart 12.6 PFPN 10-1500 performance chart Flow rate performance chart Guarantee point according to EN 14466/EN 1028 at 3 m suction lift Suction lift [bar] Pump pressure [l/min] Flow 125 / 127... -
Page 126: Documentation
Calling up the QR code (QR = Quick Response) provides access to the available documents for the portable pump. The online spare parts cata- logue is also available. FOX 4th Generation (PC116) https://link.rosenbauer.com/363359b3-eaef-4ebe-bb91-0c8085a4739d Index of abbreviations General abbreviations i.n. if necessary e. - Page 127 Index of abbreviations Abbreviations for units Litres gallons Pressure unit Pounds per square inch Volt DC voltage Ampere Kilo volt-ampere Watts Kilowatts Hertz Kilonewtons Centistokes Diameter nominal Decibel °C Degrees Celsius °F Degrees Fahrenheit l/min Litres per minute Gallons per minute kg/s Kilogram per second lbs/s...
Need help?
Do you have a question about the FOX 4 and is the answer not in the manual?
Questions and answers