
Related Manuals for Kogan SMARTERHOME KATVSWC75LA


Summary of Contents for Kogan SMARTERHOME KATVSWC75LA
- Page 1 KOGAN SMARTERHOME SWIVELLING FLIP DOWN TV CEILING MOUNT (SUITABLE FOR 32-75" TVS) KATVSWC75LA...
- Page 2 Safety & Warnings Components Overview Pairing the Remote Connect to SmarterHome Installation Operation Troubleshooting Notes...
-
Page 3: Safety And Warnings
IMPORTANT: Ensure that you have received all parts according to the component list prior to installation. If any parts are missing or faulty, contact help.Kogan.com before proceeding. MAINTENANCE: Check that the product is secure and safe to use at regular intervals (at... - Page 4 • Never operate this product with a damaged power cord or plug. If any part is damaged, cease use immediately and contact help.Kogan.com for support. • Do not operate this product in an environment exposed to moisture or if the electrical components have been in contact with water or other liquids.
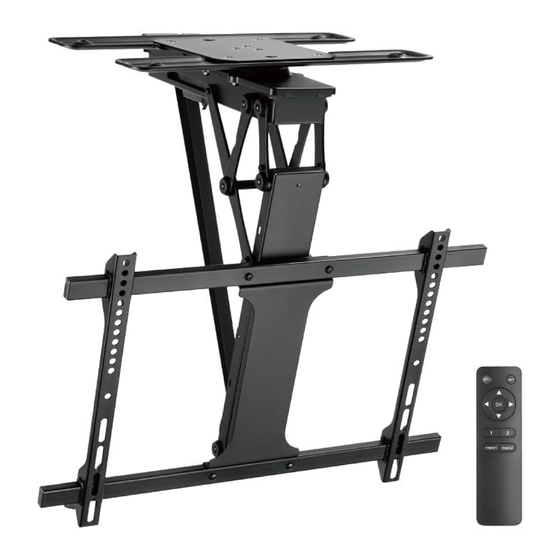
- Page 5 COMPONENTS A Ceiling Mount (x1) B Centre C Template (x1) D TV Bracket Bracket (x1) (short) (x2) E Ceiling Mount F TV Bracket G Power H Remote (x1) Bracket (x2) (long) (x2) Adaptor (x1) I Cable Tie (x4) J Cable Guide (x2) K M6 Nut (x4) L M6x10 Screw (x4)
- Page 6 M-C M6x30 M-D M8x35 M-E D8 Washer (x4) M-F Spacer (x4) Screw (x4) Screw (x4) M-G Spacer (x4) W-A ST6.3x55 W-B Wall Anchors W-C D6 Screw (x4) (x4) Washer (x2) Tools Required Pen/pencil Phillips Head Stud Finder Drill & Drill Bit Open spanner Screwdriver 10mm...
- Page 7 OVERVIEW Remote Set button Directional buttons OK button Position 1 button Position 2 button Memory 1 button Memory 2 button...
-
Page 8: Pairing The Remote
PAIRING THE REMOTE Insert x2 AAA batteries (not included) into the remote (H). Connect the power adaptor (G) to the ceiling mount (A) and then using a pin or other small item (such as a paperclip) press the code button located on the side of the TV mount. The TV mount will emit a ‘beep’... - Page 9 CONNECT TO SMARTERHOME™ APP Install App Download the “Kogan SmarterHome” app from the Play Store (Android) or App Store (iOS). Play Store (Android) App Store (iOS) To Register: If you already have a SmarterHome account, select ‘Log In’. To register a new account, select ‘Sign Up’.
- Page 10 Once registered, tap “Add Device” on the app’s home page, or the “+” in the upper right corner, to add a new device through the network. Select the product type from the list of options in the app (Other > Kogan Swivelling Flip Down TV Ceiling Mount).
- Page 11 Ensure that the device is in pairing mode, with the indicator flashing rapidly, and tap “Confirm light is rapidly flashing”. The device will commence the pairing process and connect to the app. Ensure your Wi-Fi router, mobile phone, and the SmarterHome™ device are kept close until connection is complete.
-
Page 12: Installation
INSTALLATION WARNING: Ensure the mounting surface will safely support the combined weight of the ceiling mount and all attached hardware. Do not exceed the maximum load capacity of 35kg. If you are not confident in installing this product or unsure as to what additional hardware you require, consult a licensed trade professional before proceeding. - Page 13 Step 2: Using a pencil and the template (C), mark the desired holes position for the mount on your ceiling. If mounting on dry wall or plaster-board, use a stud finder first to check positions of studs and ensure the position is free from electrical wiring. Using a drill, create the pilot holes.
- Page 14 Step 3: Drywall / plaster: Attach 2 ST6.3x55 screws (W-A) to the ceiling, in the positions shown below. Ensure a 5mm excess is left between the head of the screw and the ceiling surface. Do not use wall anchors. Attach the ceiling mount to the screws and secure it in place using the x2 remaining ST6.3x55 screws (W-A) and x2 D6 washers (W-C).
- Page 15 Step 4: • Attach the centre bracket (B) to the x2 long TV brackets (F) using x4 M6x25 screws (N), x4 D6 washers (P) and the x4 M6 nuts (K). • Slide the x2 short TV brackets (D) onto the long TV brackets and attach x4 M4x8 screws (M) in the positions shown.
- Page 16 Step 5: • Remove the x4 VESA screws (B1) from the centre bracket and retain them for later use. • Undo the middle screw on the centre bracket approximately 5mm. Step 6: Align the brackets (B) with your TV’s VESA holes and secure using supplied screws (“M-”...
- Page 17 Step 7: • Hook the TV with brackets installed onto the ceiling mount. 2 people should carry the TV to prevent damage. • Once in place, fasten the previous removed VESA screws (B1) to secure the brackets in place. WARNING: Ensure there is a gap of ≥15mm between the top of the TV and the ceiling.
- Page 18 Step 8: Peel the backing from the cable guides (J) and along with the cable ties (I), secure the cables to the ceiling mount as shown below. Note: Ensure there is enough slack left in the cables to allow for movement. WARNING: Ensure the cables are kept clear from the moving parts and will not be damaged when the ceiling mount it closed.
- Page 19 Step 9: Connect the power adapter (G) to the electrical outlet. Use the remote to adjust the position of the TV. WARNING: Do not operate the mount until it has been fully mounted and installed.
-
Page 20: Operation
OPERATION Adjusting the Upward/Downward Movement • Ensure the remote has been paired to the ceiling mount (refer to Assembly section). Note: Even if/when ceiling mount is unplugged after initial pairing, you will not have to pair the ceiling mount to the remote again. •... -
Page 21: Troubleshooting
24 hours without Remote fault for support. operation Replace the batteries have power. If the problem isn't solved, contact help.Kogan.com for a Remote stops responding Low batteries replacement remote. If the problem is still not solved after the replacement, contact help.Kogan.com for a replacement unit. - Page 22 NOTES...
- Page 24 Need more information? We hope that this user guide has given you the assistance needed for a simple set-up. For the most up-to-date guide for your product, as well as any additional assistance you may require, head online to help.kogan.com...
Need help?
Do you have a question about the SMARTERHOME KATVSWC75LA and is the answer not in the manual?
Questions and answers