Table of Contents
Advertisement
Available languages
Available languages
Quick Links
Advertisement
Table of Contents

Related Manuals for Honeywell RPLS730B1000


Summary of Contents for Honeywell RPLS730B1000
- Page 1 User Manual of Product 1: Honeywell Home RCHT8610WF T5 Smart Thermostat ENERGY STAR Wi-Fi Programmable Touchscreen Alexa Ready - C-Wire Required User Manual of Product 2: Honeywell Home RPLS730B1000 7-Day Programmable Light Switch Timer, White...
- Page 2 Quick Install Guide Lyric™ T5 Wi-Fi Thermostat For more information visit yourhome.honeywell.com/lyric...
- Page 3 Included in your box: Quick Install Guide Screws and anchors Mounting System Lyric T5 (UWP) Wi-Fi Thermostat...
- Page 4 Get the most from Lyric T5 Wi-Fi Thermostat Multiple programming options that fit your lifestyle: Location-Based scheduling – The Lyric thermostat uses your smart- phone’s location to know when you’re away, and saves you energy. Through geofence technology, it senses your return and helps make you comfortable upon arrival.
- Page 5 To install your thermostat and Phillips screwdriver photograph existing wiring. Small flat head screwdriver Pencil Level Home Wi-Fi Honeywell Lyric app Password To configure your system and connect to your smartphone. You may need: Wire stripper Needle-nose pliers Drill and...
- Page 6 • Does not support Universal Input (S terminals) for indoor and outdoor sensors • Does not support Universal Relay (U terminals) for ventilation • Android or iOS smartphone, tablet, or device For help, contact: WEB yourhome.honeywell.com/support EMAIL MyLyric@honeywell.com PHONE 1-800-633-3991 SOCIAL Twitter: @Honeywell_Home, Facebook: Honeywell Home...
- Page 7 Removing your old thermostat Turn power OFF To protect yourself and your equipment, Turn off the power at the breaker box or switch that controls your heating/ cooling system. Switch Breaker box Check that your system is off Change the temperature on your old thermostat.
- Page 8 Lyric thermostat will not work. Wire nut If you are unsure visit: Thick black wire yourhome.honeywell.com/support Take a picture of how your wiring looks right now Be sure to include the letters next to the terminals where the wires are inserted.
- Page 9 Required S and U terminals are not supported with this thermostat. If there are wires in terminals that are not listed, you will need additional wiring support. Visit yourhome.honeywell.com/support to find out if the Lyric thermostat will work for you.
- Page 10 Disconnect the wires and remove the old wall plate Use a screwdriver to release wires from terminals. Tip: To prevent wires from falling back into the wall, wrap the wires around a pencil.
- Page 11 Installing your Lyric T5 Wi-Fi Thermostat Lyric T5 Wi-Fi Screws Mounting Anchors Wall Thermostat System...
- Page 12 10 Bundle and insert wires through the UWP Pull open the UWP and insert the bundle of wires through the back of the UWP. Make sure at least 1/4-inch of each wire is exposed for easy insertion into the wire terminals. 11 Insert the wall anchors It is recommended that you use the wall anchors included in the box to...
- Page 13 12 Set R-switch position and insert R-wire or wires Set the R-switch up or down based on your wiring notes in Step 7. Insert wires into the inner holes of the terminals on the UWP. The tabs will stay down once the wire is inserted. If you have 1 R-wire (R, Rh, or Rc) Set R-switch to Insert your...
- Page 14 13 Connect remaining wires from Step 8 This wiring is just an example, actual wiring may vary. Tip: Do not mount the UWP to the wall prior to connecting the wires. Depress the tabs to put the wires into the inner holes of their corresponding termi- nals on the UWP (one wire per terminal) until it is firmly in place.
- Page 15 Breaker box 17 Return to the thermostat Return to the thermostat. Confirm the screen shows START SETUP. If it does, continue to “Setup with Lyric App” on page 15. If your thermostat does not show START SETUP, please contact Honeywell support.
- Page 16 APP screen. Back Your thermostat is now ready to be configured using the Honeywell Lyric app a) Download the “Honeywell Lyric” app from the App store or Google play. b) Open the Honeywell Lyric app. Your thermostat should appear under Thermostat Found.
- Page 17 Schedule your home comfort Change mode - View weather Auto/Heat/Cool/ forecast Off/EM Heat Set desired temperature Interested in more Lyric products? Visit yourhome.honeywell.com to learn about all available products connected by the Honeywell Lyric App. App is regularly enhanced and may change.
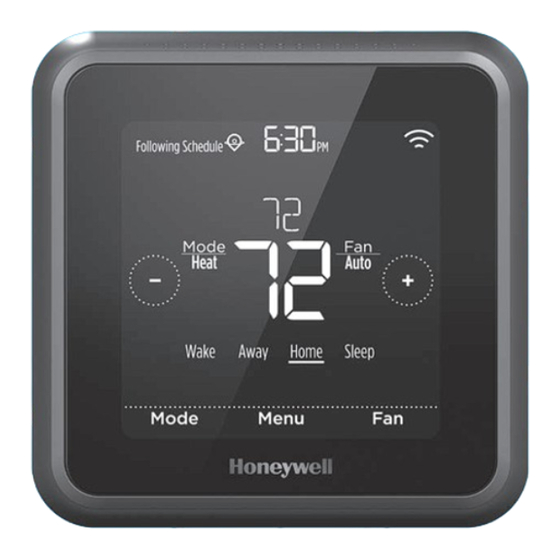
- Page 18 How to use your Lyric T5 Wi-Fi Thermostat Desired temperature Indoor Temperature Adjust temperature Displays desired Displays current Touch + or - to set indoor temperature. indoor temperature. your desired indoor temperature. Menu Mode Menu Select system mode Contains features: Select Fan mode Auto/Heat/Cool/Off/ schedule, screen lock,...
-
Page 19: Manual Setup
Manual Setup If your Wi-Fi network is not working, you can alternatively setup your thermostat manually and connect your phone later. Start manual setup Touch START SETUP to begin. Select manual setup On the USE LYRIC APP screen, touch No. Navigate and edit setup options to navigate through all the setup options. - Page 20 Manual Setup (cont.) Finish Setup Touch until you see Finish Setup. Touch Select or touch text area. Select Setup Wi-Fi At the end of setup process you will be prompted to SETUP WIFI. If your Wi-Fi is still not working, you have to manually set the time and date.
- Page 21 Equipment Setup Options Option # Option Name Option Value (factory default in bold) Schedule Type No Schedule MO-SU = Every day the same MO-FR SA SU = 5-1-1 schedule MO-FR SA-SU = 5-2 schedule Each Day = Every day different Note: You can change default MO-FR, SA-SU schedule here.
- Page 22 Equipment Setup Options Option # Option Name Option Value (factory default in bold) 0, 1, 2 Cool Stages/ Compressor Note: Select how many Cool or Compressor stages of your equipment Stages the thermostat will control. Maximum of 2 Cool/Compressor Stages. (#200=Conv./ #200=HP) Heat Stages/...
-
Page 23: Frequently Asked Questions
Most routers will broadcast two networks, one SSID on the 5.0 GHz radio and one SSID on the 2.4 GHz radio. A change was made on the Honeywell Lyric App but it has not shown up on the Lyric T5 Wi-Fi thermostat. -
Page 24: Regulatory Information
If the Lyric thermostat displays a strike-through Wi-Fi icon on its screen or shows up as offline on the Honeywell Lyric App, it has lost connection to the network. Make sure the router is powered and broadcasting. The home’s Wi-Fi network may need to be reset by power cycling the router. -
Page 25: Year Limited Warranty
Apple® HomeKit™ Setup Code The Lyric T5 Wi-Fi supports Apple HomeKit. When prompted by the Honeywell Lyric App, scan the code on the last page (back cover) of this guide. 2-Year Limited Warranty For Warranty information go to yourhome.honeywell.com Automation and Control Solutions Wi-Fi®... - Page 26 Guide d’installation rapide Thermostat Wi-Fi T5 Lyric™ Pour plus d’informations, visitez yourhome.honeywell.com/lyric...
- Page 27 Inclus dans cette boîte : Guide d’installation rapide Vis et ancres Système de montage UWP (UWP) Thermostat Wi-Fi T5 Lyric...
- Page 28 Tirez le meilleur parti de votre thermostat Wi-Fi T5 Lyric Plusieurs options de programmation pour votre style de vie : Programmation géodépendante – Le thermostat Lyric Il vous permet de réaliser des économies d’énergie en surveillant vous allées et venues en utilisant l’emplacement de votre téléphone intelligent.
- Page 29 Tournevis cruciforme une photo du câblage existant. Petit tournevis plat Crayon Niveau Mot de passe Application Lyric Honeywell Wi-Fi de la Pour configurer votre système et connecter votre résidence téléphone intelligent. Vous aurez besoin des outils suivants : Dénuder de fils Pince à...
- Page 30 • Ne prend pas en charge le relais universel (bornes U) pour la ventilation • Téléphone intelligent, tablette ou dispositif Android ou iOS Pour obtenir de l’aide, veuillez contacter : SITE WEB yourhome.honeywell.com/support COURRIEL MyLyric@honeywell.com TÉLÉPHONE 1-800-633-3991 RÉSEAUX SOCIAUX Twitter : @Honeywell_Home, Facebook : Honeywell Home...
- Page 31 Retrait de l’ancien thermostat Coupez l’électricité Arrêt Pour vous protéger ainsi que pour Marche protéger votre équipement, coupez l’alimentation au niveau du disjoncteur Marche ou de l’interrupteur contrôlant le système de chauffage/refroidissement. Interrupteur Disjoncteur Arrêt Vérifiez que le système est hors tension Modifiez la température sur l’ancien Marche...
- Page 32 Lyric ne fonctionnera pas. Fil noir épais En cas d’incertitude, visitez : yourhome.honeywell.com/support Prenez une photo du câblage existant Veillez à inclure les lettres près des bornes d’insertion des fils. Ceci permettra une consultation plus facile lors du câblage du thermostat Lyric.
- Page 33 Les bornes S et U ne sont pas prises en charge par ce thermostat. S’il y a des fils sont dans des bornes non énumérées, une assistance sup- plémentaire sera requise pour le câblage. Visitez yourhome.honeywell.com/ support pour déterminer si le thermostat Lyric fonctionnera dans votre config-...
- Page 34 Débranchez les fils et retirez l’ancienne plaque murale Utilisez un tournevis pour dégager les fils des bornes. Conseil : Pour éviter que les fils ne tombent derrière le mur, enroulez-les autour d’un crayon.
- Page 35 Installation du thermostat Wi-Fi T5 Lyric Système de Thermostat Wi-Fi T5 montage Ancres Lyric...
- Page 36 10 Regroupez et insérez les fils dans le système de montage UWP Ouvrez le système UWP et insérez le faisceau de fils à l’arrière du système UWP. Assurez-vous qu’au moins 1/4 po de chaque fil est exposé pour faciliter l’insertion dans les cosses de câble.
- Page 37 12 Réglez la position du contacteur R et insérez le ou les fils R Placez le contacteur R en position haute ou basse en fonction des notes de câblage prises lors de l’étape 7. Insérez les fils dans les trous internes des bornes du système UWP. Les languettes resteront abaissées lorsque le fil est inséré.
- Page 38 13 Connectez les fils restants de Ce câblage n’est qu’un exemple; le câblage actuel peut être différent. l’étape 8 Conseil : Ne montez pas le système UWP sur le mur avant d’avoir connecté les fils. Appuyez sur les languettes pour insérer les fils dans les orifices internes de leurs bornes correspon- dantes sur le système UWP (un fil par...
- Page 39 START SETUP (Commencer la configuration). Si c’est le cas, passez à « Configuration avec Marche l’application Lyric » à la page 15. Si le thermostat n’affiche pas START SETUP (Commencer la configuration), veuillez contacter l’assistance de Honeywell.
- Page 40 Votre thermostat est maintenant prêt à être configuré à l’aide de l’application Lyric de Honeywell a) Téléchargez l’application « Honeywell Lyric » dans l’App Store ou Google Play. b) Ouvrez l’application Lyric. Votre thermostat devrait apparaitre sous Thermostat Found (Thermostat trouvé). Touchez SET UP NOW (Configurer maintenant) tel qu’illustré...
- Page 41 Modifier le mode - Auto/ Afficher les Chauffage/Refroidissement/ prévisions météo Arrêt/Chauffage d’urgence Régler la température désirée Vous souhaitez découvrir d’autres produits Lyric? Visitez yourhome.honeywell.com pour découvrir tous les produits disponibles connectés avec l’application Honeywell Lyric. L’application est constamment améliorée et peut être modifiée.
- Page 42 Comment utiliser le thermostat Wi-Fi T5 Lyric Température désirée Température Réglage de la intérieure température Affiche la température intérieure désirée. Affiche la température Touchez + ou - pour intérieure actuelle. régler la température intérieure désirée. Menu Mode Menu Fan (Ventilateur) Sélectionnez le Contient les Sélectionnez le mode...
-
Page 43: Configuration Manuelle
Configuration manuelle Si le réseau Wi-Fi ne fonctionne pas, il est aussi possible de configurer manuellement le thermo- stat et de le connecter ultérieurement à votre télé- phone. Commencez la configuration manuelle Touchez START SETUP (Commencer la configuration) pour commencer. Sélectionnez la configuration manuelle Sur l’écran USE LYRIC APP (Naviguez et modifiez les options de configuration),... - Page 44 Configuration manuelle (suite) Terminez la configuration Touchez jusqu’à ce que « Finish Setup » (Terminer la configuration) s’affiche. Touchez Select (Sélectionner) ou touchez la zone de texte. Select Configurez le Wi-Fi À la fin du processus de configuration, une invitation s’affichera pour la CONFIGURATION WIFI (SETUP WIFI).
- Page 45 Options de configuration de l’équipement N° de l’option Nom de l’option Valeur de l’option (réglage d’usine en gras) Type de programme No Schedule (Pas de programme) MO-SU = Every day the same (LUN-DIM = Chaque jour identique) MO-FR SA SU = 5-1-1 schedule (LUN-VEN SAM DIM = Programme 5-1-1) MO-FR SA-SU = 5-2 schedule (LUN-VEN SAM-DIM = Programme 5-2) Each Day = Every day different (Chaque jour = Chaque jour différent) Remarque : Le programme par défaut LUN-VEN, SAM-DIM peut être modifié...
- Page 46 Options de configuration de l’équipement N° de l’option Nom de l’option Valeur de l’option (réglage d’usine en gras) 0, 1, 2 Étages de refroid- issement / Étages Remarque : Sélectionnez le nombre d’étages de refroidissement ou de compresseur du compresseur contrôlés par le thermostat.
-
Page 47: Foire Aux Questions
2,4 GHz et 5,0 GHz) détecte le réseau. La plupart des routeurs diffusent deux réseaux, un SSID sur la radio 5,0 GHz et un SSID sur la radio 2,4 GHz. Une modification a été faite sur l’application Honeywell Lyric, mais elle n’apparaît pas sur le thermostat Wi-Fi T5 Lyric. -
Page 48: Informations Réglementaires
Si le thermostat affiche une icône barrée indiquant que le Wi-Fi est déconnecté ou si l’application Honeywell Lyric montre qu’il est hors ligne, la connexion au réseau a été perdue. Assurez-vous que le routeur est alimenté et en mode de diffusion. Le réseau Wi-Fi résidentiel peut nécessiter d’être réinitialiser en éteignant et rallumant le routeur. -
Page 49: Garantie Limitée De 2 Ans
Code de configuration Le thermostat Wi-Fi T5 Lyric prend en charge Apple HomeKit. Balayez ce code lorsque l’application Honeywell Lyric vous invite à le faire. Garantie limitée de 2 ans Pour obtenir des renseignements à propos de la garantie, visitez yourhome.honeywell.com... -
Page 50: Installation
RPLS730B / RPLS731B Installation and User Guide Programmable Wall Switch Applications The RPLS730B / RPLS731B programmable wall switch has been designed to control lightings and motors: Load type Maximum load Examples • incandescent lights 2400 W Resistive load • halogen lights (20 A @ 120 V) •... - Page 51 Power-On Pry the switch door open from the bottom using a small screwdriver. Reset Ensure the ON/OFF selector is set to ON. Reset the switch using a paper clip. 0:00 will flash. Control (4) If the display is blank: •...
-
Page 52: Troubleshooting
Programming the schedule You can set up to 7 programs. To set a program, you need to enter its start time (ON) and its end time (OFF). Pry the switch door open using a small screwdriver. Press the PGM button to display a program and its On or Off time. For example, when you first press PGM, program number 1 (P1) and its On time (ON) will appear. -
Page 53: Technical Specifications
This warranty does not cover removal or reinstallation costs. This warranty shall not apply if it is shown by Honeywell that the defect or malfunction was caused by damage which occurred while the product was in the possession of a consumer. - Page 54 RPLS730B / RPLS731B Mode d’installation et d’emploi Interrupteur mural programmable Applications L’interrupteur mural programmable RPLS730B / RPLS731B a été conçu pour commander des appareils d’éclairage et des moteurs. Type de charge Charge maximale Exemples • éclairage incandescent 2400 W Charge résistive •...
-
Page 55: Modes De Fonctionnement
Démarrage Soulevez le bas du couvercle de l’interrupteur à l’aide d’un petit tournevis. réinitialisation S’assurer que le sélecteur ON/OFF est placé à ON. Réinitialiser l’interrupteur à l’aide d’un trombone. 0:00 touche de clignotera à l’écran. contrôle (4) Si rien n’est affiché à l’écran : sélecteur •... -
Page 56: Problèmes Et Solutions
Programmation de l’horaire Vous pouvez enregistrer jusqu'à 7 programmes. Pour enregistrer un programme, vous devez régler l’heure du début (ON) et l’heure de la fin (OFF). Soulevez le bas du couvercle de l’interrupteur à l’aide d’un petit tournevis. Appuyer sur la touche PGM pour afficher un programme et l’heure du début (ON) du programme ou l’heure de la fin (OFF) du programme. -
Page 57: Fiche Technique
Garantie Honeywell garantit ce produit, à l'exception des piles, contre tout vice de fabrication ou de matière dans la mesure où il en est fait une utilisation et un entretien convenables, et ce, pour un (1) an à partir de la date d'achat par le consommateur. -
Page 58: Instalación
RPLS730B / RPLS731B Guía de instalación y uso Interruptor mural programable Descripción El interruptor mural programable RPLS730B / RPLS731B se utiliza para controlar dispositivos de alumbrado y motores. Tipo de carga Carga máxima Ejemplos • iluminación incandescente 2400 W Carga resistiva •... -
Page 59: Modos De Funcionamiento
Encendido Levantar la tapa del interruptor con un pequeño destornillador. reinicialización Asegurarse de que el selector ON/OFF esté en On. Presionar en Reinicialización con un sujetapapeles. 0:00 botón de parpadeará en la pantalla. control (4) selector On/Off Si en la pantalla no apareciera nada: •... -
Page 60: Solución De Problemas
Programación Se pueden registrar hasta 7 programas. Para registrar un programa, debe definirse la hora de inicio (ON) y la hora de finalización (OFF). Levantar la parte inferior de la tapa del interruptor con un pequeño destornillador. Presionar el botón PGM para visualizar un programa, la hora de inicio (ON) y la hora de finalización (OFF). -
Page 61: Asistencia Técnica
Garantía Honeywell garantiza por un período de un (1) año, a partir de la fecha de compra por el consumidor, que este producto, sin incluir las baterías, no presentará defectos en los materiales ni en lo referente a la mano de obra, en condiciones normales de uso y de servicio.
Need help?
Do you have a question about the RPLS730B1000 and is the answer not in the manual?
Questions and answers