Table of Contents
Advertisement
Quick Links
Advertisement
Table of Contents

Related Manuals for Life Fitness LBR-LR


Summary of Contents for Life Fitness LBR-LR
- Page 1 Life Fitness Leg Raise LBR-LR Assembly Instructions 1024012-0001 REV AB...
- Page 3 Latin America and Caribbean* Germany, Austria, and Switzerland Hong Kong Life Fitness, LLC Life Fitness Europe GMBH Life Fitness Asia Pacific LTD 10601 W Belmont Ave Neuhofweg 9 26/F, Global Trade Square Franklin Park, IL 60131 U.S.A. 85716 Unterschleißheim...
- Page 4 User and Service Documents Link https://lifefitness9512.zendesk.com/hc/en-us https://www.lftechsupport.com/web/document-library/documents Additional information is available online using the links above. أ علاه إل ر إبط باستخدإم إ لإ ن تر نت على إضافية معلومات تتوفر 点击上面的链接可在线获取更多信息。 Flere oplysninger er tilgængelige online gennem linket ovenfor. Bijkomende informatie is online beschikbaar via bovenstaande link.
-
Page 5: Table Of Contents
Copyright 2023, Life Fitness, LLC. All Rights Reserved. Life Fitness, Hammer Strength, Cybex, ICG and SCIFIT are registered trademarks of Life Fitness, LLC and its affiliated companies and subsidiaries. Disclaimer: Images and specifications are current as of the date of publication and are subject to change. -
Page 6: Safety Information
• DO NOT use or permit use of any equipment that is damaged and/or has worn or broken parts. For all Life Fitness Family of Brands equipment, use only replacement parts supplied by Life Fitness Family of Brands. -
Page 7: Product Labels
• Before use, examine all accessories approved for use with the Life Fitness Family of Brands equipment for damage or wear. Plate Loaded, Free Weight, and Body Weight Systems • Never exceed the load rating for any plate loaded station, body weight station, bench or other free weight device;... -
Page 8: Label Locations
Label Locations Item Description Qty. General Warning Serial Number FCC Compliant Bolt to Floor Locations Remove 8 X 3/4 Phillips panhead screws and paint guards to access bolt to floor holes. Replace and re-tighten screws to 8-10 In-lbs after unit is bolted to the floor. Item Description Qty. -
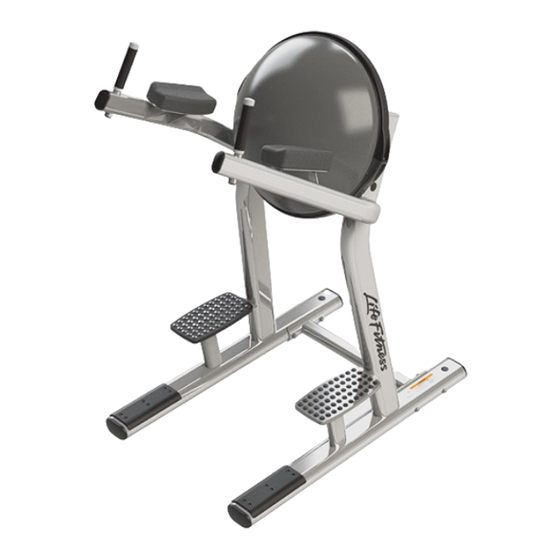
Page 9: Assembly
2. Assembly Components and Hardware Components Item Description Qty. Base Frame Assembly Elbow Pad Paint Guard Hardware Bag Multi-Language General Warning Sheet Air Pump Hardware Item Description Qty. M10 x 25mm Screw 3/8" Washer Plastic Insert 8 x 3/4 Pan Head Screw 1"... -
Page 10: Assembly Procedure
Assembly Procedure Assemble Leg Raise 1. Remove and discard of the four shipping cones and hardware from base frame assembly. Item Description Qty. Jam Nut Nylon Washer Base Frame Shipping Cone 2. Install elbow pads, high point facing out, onto base frame assembly with the 3/8" washers and M10 x 25mm screws. - Page 11 4. Install paint guards onto both sides of the base frame assembly with hardware and tighten to 8-10 in-lbs (0.9-1.1 Nm). Item Description Qty. Base Frame Assembly Paint Guard 8 X 3/4 Pan Head Screw 5. Gently tap 1" hole plugs into base frame assembly. Item Description Qty.
- Page 12 7. Remove Bosu ball plug and fill using the supplied air pump to 9 inches (23cm) tall. If no air is required, gently tap bearing housing cap into Bosu ball assembly. Item Description Qty. Bearing Housing Cap Bosu Ball Plug Page 10 of 16...
-
Page 13: Product Information
3. Product Information Specifications Machine Weight: 160 lbs. 72.6 kg. Size (L x W x H): in. = 46 x 33 x 62 cm = 116.8 x 83.8 x 157.5 Live Area (L x W): in. = 64 x 57 cm = 162.5 x 144.8 Max User Weight: 300 lbs. -
Page 14: Bolt To Floor Guide Introduction
4. Bolt to Floor Guide Introduction Life Fitness Family of Brands designs its products to be stable when used as designed. Because strength training is dynamic, we cannot predict how users will ultimately use the products in all circumstances. Therefore, Life Fitness Family of Brands recommends that strength training equipment be secured to a solid, level surface to stabilize and eliminate rocking or tipping over. -
Page 15: Anchor Type - Static
3000psi (20 N/mm2) beyond anchor length Pullout Force Life Fitness specifies Hilti ™ static and dynamic anchors. According to the anchor manufacturer, the recommended design pullout force (in tension) for the specified anchors, when properly installed in cracked concrete, is provided in the side table. -
Page 16: Static Anchor Procedure
• Vacuum (for debris) Static Anchor • Floor scanner / rebar detector (optional) • 1” L-shape SDS rotary hammer • 1/4" x 12" (6mm x 305mm) carbide drill bit (for 1/4” (6mm) anchors) • 3/8" x 12" (8mm x 305mm) carbide drill bit (for 3/8” (8mm) anchors) •... - Page 17 4. Insert fastener and tighten to 18 Foot-Pounds (24Nm) for 1/4” (6mm) anchor or 40 Foot-Pounds (54Nm) for 3/8” (8mm) anchor. NOTE: If the legs/frame do not contact the mounting surface DO NOT pull down with the fastener or anchor. Loosen frame hardware and re-tighten to allow machine to align.
-
Page 18: Foot Dimensions
Foot Dimensions Use below image to determine foot specifications. Page 16 of 16...
Need help?
Do you have a question about the LBR-LR and is the answer not in the manual?
Questions and answers