Table of Contents
Advertisement
Available languages
Available languages
Quick Links
设 计
陈壮筹
DESIGN
2020.10.13
校 对
黄志胜
CO.BY
标准化
STANDARD
业务
杨 萌
seller
批 准
AUTHORI
ZE
技术要求
2.
印刷颜色:单色
3.制件必须符合QMB-J53.005 产品说明书及其它类似印刷件技术规范;
4.除客户特别要求外均参照美的冰箱最新版相关企业标准执行;
标记
MARKER
1.
自62310-E6061101订单起更新参数页DP1440W型号重量
2.
自xxx订单起DP1442S型号更改为DP1446S型号
图纸名称 PART NAME
DP1442S
DP1444IN
DP1440W
图样标记
版本号
REL
REV.NO.
0
共 页
TOTAL SHEETS
变更内容
说明书
重量(g)
比例
WEIGHT
scale
1:1
第 页
NO. OF SHEETS
图号/物料编码 PART NO.
16131000A40148
材料 MATERIAL
80g 双胶纸
美的冰箱事业部
MIDEA REFRIGERATION
DIVISION
修改日期
签名
2021.10.25 黄洁月
2021.10.27 黄洁月
Advertisement
Chapters
Table of Contents

Related Manuals for INVENTOR DP1446S


Summary of Contents for INVENTOR DP1446S
- Page 1 重量(g) 比例 杨 萌 seller REV.NO. WEIGHT scale 批 准 AUTHORI 美的冰箱事业部 MIDEA REFRIGERATION DIVISION 共 页 第 页 TOTAL SHEETS NO. OF SHEETS 技术要求 印刷颜色:单色 3.制件必须符合QMB-J53.005 产品说明书及其它类似印刷件技术规范; 4.除客户特别要求外均参照美的冰箱最新版相关企业标准执行; 标记 变更内容 修改日期 签名 MARKER 自62310-E6061101订单起更新参数页DP1440W型号重量 2021.10.25 黄洁月 自xxx订单起DP1442S型号更改为DP1446S型号 2021.10.27 黄洁月...
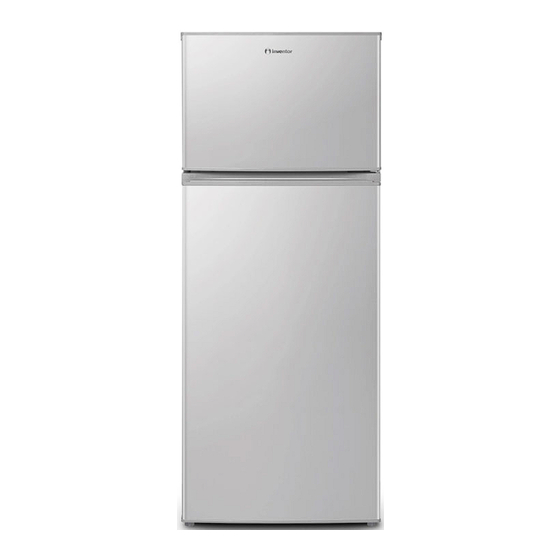
- Page 2 DOUBLE DOOR DP1446S DP1444IN DP1440W...
-
Page 3: Table Of Contents
Contents SAFETY WARNINGS ......................1 INSTALLTION ........................3 Location ........................3 Reversing the Door Swing(optionnal) ..............3 Door Handle Install Illumination (optional) ............... 7 Door Space Requirements ..................8 Levelling the Unit ....................... 8 Cleaning Before Use ....................8 Before Using Your Unit ....................8 Interior Accessories .................... -
Page 4: Safety Warnings
1. SAFETY WARNINGS Warning : risk of fire / flammable materials THIS appliance is intended to be used in household and similar applications such as staff kitchen areas in shops, offices and other working environments; farm houses and by clients in hotels, motels and other residential type environments;... - Page 5 -Leave the shelves in place so that children may not easily climb inside. refrigerator must be disconnected from the source of electrical supply before attempting the installation of accessory. REFRIGERANT and cyclopentane foaming material used for the appliance are flammable. Therefore, when the appliance is scrapped, it shall be kept away from any fire source and be recovered by a special recovering company with corresponding qualification other than be disposed by combustion, so as to prevent damage to the environment or any other harm.
-
Page 6: Installtion
2. INSTALLTION 2.1 Location When selecting a position for your unit you should make sure the floor is flat and firm, and the room is well ventilated. Avoid locating your unit near a heat source, e.g. cooker, boiler or radiator. Also avoid direct sunlight as it may increase the electrical consumption. - Page 7 2) Remove the screws fixed the top-hinge with cross-slot screwdriver. 3) Replace the top-hinge and the top-door limit block and the door bearing bush to the other side. Remove the nut with sleeve.Take off the washer then remove the axes to the other side and fixed.
- Page 8 5) Replace the bottom door bearing bush and the limit block. 6) Replace the bottom hinge to the other side then fix it with screws 7) Replace the mid-hinge. 8) Set the bottom door right position,fix the mid-hinge.
- Page 9 9) Replace the top-hinge. 10) Set the top door right position,fix the top-hinge and the cover. 11) Install the four screw caps and two catches to corresponding position. ·Ensure the Appliance is unplugged and empty. ·Adjust the two leveling feet to their highest position. ·We recommend you have someone to assist you.
-
Page 10: Door Handle Install Illumination (Optional)
2.3 Door Handle Install Illumination (optional) Note: Figures in the user manual are only for reference. The actual product may differ slightly. The refrigerator must be disconnected from the source of electrical supply before attempting the installation of accessory. Step 1: take out two plug pins from the door (Side of door open) Step 2: Install the door handle to the door and fasten it with screws Step 3: Cover screw caps of the handle into screw holes *The picture above is only for reference. -
Page 11: Door Space Requirements
Door Space Requirements The unit's door must be able to open fully as shown. W×D≥902×1052mm Levelling the Unit To do this adjust the two levelling feet at the front of the unit. If the unit is not level, the door and magnetic seal alignments will not be covered properly. -
Page 12: Interior Accessories
◆ Before Plugging in You must check that you have a socket which is compatible with the plug supplied with the unit. ◆ Before Turning On! Do not turn on until two hours after moving the unit. 2.8 Interior Accessories Various glass or plastic storage shelves are included with your appliance - different models have different combinations. -
Page 13: Operation
4. OPERATION 4.1 Switching On Your Unit Setting“Off” :UnitOff Setting“Min” :Less Cool Temperature Setting“Med” or “MID” :Normal Operation(adequate for most situations) Setting“Max” :Coolest Temperature ◆During high ambient temperatures e.g. on hot summer days. It may be necessary to set the thermostat to the Coolest setting(position“Max”).This may cause the compressor running continuously in order to maintain a low temperature in the cabinet. -
Page 14: Cleaning
5. CLEANING Defrosting NOTE THIS UNIT DOES NOT HAVE AN AUTO DEFROST SYSTEM. Please use a plastic ice shovel when clearing the frosting of the evaporator. Do not use metal sharp objects. 5.2 Cleaning the Interior and the Exterior of the Unit ... -
Page 15: Care When Handling / Moving Your Unit
6.2 Care When Handling / Moving Your Unit Hold the unit around its sides or base when moving it. Under no circumstances should it be lifted by holding the edges of the top surface. 6.3 Servicing The unit should be serviced by an authorized engineer and only genuine spare parts should be used. -
Page 16: For Energy Saving
8. FOR ENERGY SAVING Warning for energy 1)Refrigerating appliances might not operate consistently (possibility of defrosting of contents or temperature becoming too warm in the frozen food compartment) when sited for an extended period of time below the cold end of the range of temperatures for which the refrigerating appliance is designed. - Page 17 INVENTOR:...
- Page 18 Serial Number of the unit* Address* Date of Purchase* Postal Code* Invoice Number* Phone Number* Additional Details E-mail* Subscribe to Inventor's Newsletter With the current warranty card you accept the terms and conditions. SEND essage will be þ sent to your email...
- Page 19 Περιεχό ενα Ο ΗΓΙΕΣ ΑΣΦΑΛΕΙΑΣ ..........................1 ΕΓΚΑΤΑΣΤΑΣΗ ............................3 Τοποθέτηση ............................. 3 Απαιτού ενο χώρο για την πόρτα ..................3 Ισοστάθ ιση του ψυγείου ......................Καθαρισ ό πριν την χρήση ...................... Πριν χρησι οποιήσετε το ψυγείο .................... Εσωτερικά εξαρτή ατα ....................... ΠΑΡΟΥΣΙΑΣΗ...
- Page 21 -Του ενός -,των δύο -και τα τριών αστέρων διαμερίσματα δεν είναικατάλληλα για την κατάψυξη των νωπών τροφίμων. (σημείωση 3)
-
Page 22: Εγκατασταση
2. ΕΓΚΑΤΑΣΤΑΣΗ 2.1 Τοποθέτηση Κατά την επιλογή της θέσης, βεβαιωθείτε πως το δάπεδο είναι επίπεδο και σταθερό και πως ο χώρος αερίζεται επαρκώς με μια μέση θερμοκρασία 16ºC-43ºC. Μην τοποθετείτε το ψυγείο κοντά σε πηγές θερμότητας. Επιπλέον, αποφύγετε την απευθείας έκθεση στην ηλιακή ακτινοβολία... - Page 23 2.5 Πριν χρησιμοποιήσετε το ψυγείο Βεβαιωθείτε πως δεν είναι φθαρμένο το καλώδιο τροφοδοσίας και μην χρησιμοποιείτε το ψυγείο αν το καλώδιο τροφοδοσίας ή η πρίζα είναι φθαρμένα. Μην τοποθετείτε εύφλεκτα, εκρηκτικά, ασταθή και διαβρωτικά αντικείμενα μέσα στο ψυγείο, για την αποφυγή βλάβης του ψυγείου ή πυρκαγιάς. Μην...
-
Page 25: Καθαρισμοσ
Κατά την πρώτη εκκίνηση λειτουργίας του ψυγείου σας, θέστε τον θερμοστάτη στη θέση Med. Αφήστε το ψυγείο να λειτουργεί για 24 ώρες πριν τοποθετήσετε τρόφιμα στους θαλάμους. Ο θερμοστάτης ελέγχει τη θερμοκρασία. Όταν ο θερμοστάτης είναι σε θέση OFF, το ψυγείο δεν θα... -
Page 26: Συντηρηση
5.3 Συ βουλέ για τον καθαρισ ό Μπορεί να ε φανιστούν συ πυκνώ ατα στο εξωτερικό του ψυγείου. Μπορεί να αφείλεται σε αλλάγή τη θερ οκρασία του χώρου. Απλά σκουπίστε τα. Εάν το πρόβλη α παρα είνει, επικοινωνήστε ε εξειδικευ ένο τεχνικό για να σα βοηθήσει. 6. - Page 27 4. Αφαιρέστε τι 2 βίδε για να αφαιρέσετε τον εντεσέ και αφαιρέστε την πόρτα. 5. Ξεβιδώστε τι βίδε και αφαιρέστε τον βραχίωνα του εντεσέ από τη βάση. Μπορεί να χρειαστεί γαλλικό κλειδί για να χαλαρώσετε τι βίδε . Αφαιρέστε την ακίδα του εντεσέ και...
- Page 28 9. Τοποθετήστε τον εντεσέ στην άλλη πλευρά και σφίξτε τη βίδα 10. Τοποθετήστε τον εντεσέ τη πόρτα και σφίξτε τι βίδε 11. Τοποθετήστε την πόρτα και τον εντεσέ και σφίξτε τι βίδε 12. Τοποθετήστε το κάλυ α...
-
Page 29: Αντι Ετώπιση Προβλη Άτων
7. Αντι ετώπιση προβλη άτων Τα παρακάτω απλά θέ ατα πορούν να επιλυθούν από τον χρήστη. Εάν τα προβλή ατα παρα είνουν επικοινωνήστε ε τον προ ηθευτή σα . Ελέγξτε εάν ο καταψύκτη είναι συνδεδε ένο ε την παροχή ρεύ ατο . Χα... -
Page 30: Συμβουλεσ Για Εξοικονομηση Ενεργειασ
8. ΣΥΜΒΟΥΛΕΣ ΓΙΑ ΕΞΟΙΚΟΝΟΜΗΣΗ ΕΝΕΡΓΕΙΑΣ Προσπαθήστε να ην ανοίγετε συχνά την πόρτα του ψυγείου ειδικά όταν ο καιρό είναι υγρό και ζεστό . Εφόσον ανοίξετε την πόρτα κλείστε την α έσω . Να ελέγχετε περιοδικά εάν υπάρχει επαρκή κυκλοφορία του αέρα στο πίσω έρο του ψυγείου. Σε... - Page 31 Sub Normal Normal την Inventor: Επαγγελματίες, επισκευαστές και τελικοί χρήστες Επαγγελματίες, επισκευαστές και τελικοί χρήστες Επαγγελματίες, επισκευαστές και τελικοί χρήστες Επαγγελματίες, επισκευαστές και τελικοί χρήστες Επαγγελματίες, επισκευαστές και τελικοί χρήστες...
- Page 32 Ημερομηνία αγοράς μηχανήματος* Τ.Κ.* Αριθμός παραστατικού* Τηλέφωνο* Επιπλέον στοιχεία Διεύθυνση email* Να εγγραφώ στο newsletter της Inventor * Απαραίτητο πεδίο Αποστέλοντας τη φόρμα εγγύησης αποδέχεστε τους όρους και τις προϋποθέσεις. AΠΟΣΤΟΛΗ þ Μόλις ολοκληρωθεί η υποβολή της εγγύησης θα λάβετε την επιβεβαίωση...
- Page 33 Cuprins Măsuri de siguran ă ..................... Instalarea ......................... Pozi ionarea ..................... Distan e necesare ..................Fixare........................Înainte de folosire ..................Accesoriile din interior ................. Functionare ........................Pornirea ......................Zgomotele din interior ................. Instruc iuni privind stocarea de alimente ..........Schimbarea lampei interioare ..............Cură...
- Page 34 1. MĂSURI DE SIGRAN Ă Aten ie : risc de incendiu / materiale in amabile Acest aparat este destinat utilizarii in gospodarii sau alte locuri similare cum ar bucatariile magazinelor, birouri sau alte locuri de munca; ferme, clientii hotelurilor, moteluri si alte medii de tip rezidential;...
- Page 35 Agentul frigori c si spuma de ciclopentan sunt materiale in amabile. Prin urmare, atunci cand reciclati frigiderul acesta trebuie sa e tinut departe de orice sursa de incendiu si sa e reciclat de o companie specializata, pentru a preveni deteriorarea mediului inconjurator.
- Page 36 2. INSTALARE 2.1 Poziționarea Asigurați-vă că locul ales pentru poziționarea frigiderului este pe o podea plată și fermă, și camera bine ventilată cu temperatura medie a camerei între 16 și 43 . Evitați instalarea frigiderului lângă o sursă de căldură, cum ar fi aragazul, boilerul sau radiatorul.
- Page 37 2.5 Înainte de utilizare Nu deteriorați cablul de alimentare sub nicio formă, astfel încât să se asigure utilizarea în siguranță, nu utilizați frigiderul când cablul de alimentare este deteriorat sau ștecherul este defect. Nu puneți obiecte inflamabile, explozive, volatile și extrem de corozive în frigider, pentru a preveni producerea de daune produse de incendiu sau accidente.
- Page 39 Pentru prima dată când porniți frigiderul, setați butonul termostatului la "Med". Da-ți un timp frigiderului să se răcească complet înainte de a adăuga alimente. Cel mai bun timp de așteptare este de 24 de ore înainte de adăugarea de alimente.Butonul termostatului controlează tempera- tura.
- Page 40 5.3 Sfaturi privind cura area Condensarea poate să apară pe exteriorul unită ii. Aceasta se poate datora unei schimbări de temperature din camera. Șterge i orice reziduu de umiditate. În cazul în care 6. ÎNTRE INEREA 6.1 Schimbarea becului interior 6.2 Manipulare / Mutarea frigiderului ine i frigiderul de păr ile laterale sau de bază...
- Page 41 5. Desface i șuruburile și scoate i suportul balamalei din Scoate i balama și re-pozi iona i-o în loca ia pe partea opusă Scoate i șuruburile și piciorul reglabil din partea opusă 6. Va veni sub prag, o schimbare de la o parte în cealaltă parte.
- Page 42 9. Instala i balamaua în partea de jos, strângând șuruburile 11. Instala i ușa și balamaua cu șuruburi. 12. Instala i capacul.
- Page 43 7. Probleme în func ionare Atunci când frigiderul nu este folosit pentru o perioadă lungă de timp, deconecta i-l de la re eaua de alimentare, scoate i toate produsele alimentare și cură a i aparatul, apoi lăsa i ușa deschisă pentru a preveni producerea mirosurilor neplăcute. Tensiunea este scăzută;...
- Page 44 8. SFATURI PENTRU ECONOMISIREA ENERGIEI Încerca i pe cât posibil să nu deschideși ușa de prea multe ori, mai ales atunci când vremea este umedă și caldă. După ce a i deschis ușa, închide i cât mai repede posibil. spatele aparatului). În condi ii normale de temperatură, vă...
- Page 45 Tropical: ’Acest aparat frigorific este destinat să fie utilizat la temperaturi ambientale cuprinse între 16 °C și 43 °C’. Piesele comandate din tabelul următor pot fi achiziționate de pe canalul INVENTOR: Piesă Comandată Furnizat de Timp Minim Necesar Pentru Furnizare Personal profesional de întreținere...
- Page 46 Numarul de Serie al aparatului* Adresa* Data de achizitie* Cod Postal* Numar Factura* Numar de telefon* Detalii aditionale E-mail* Abonati-va la Newsletter-ul Inventor * Camp obligatoriu Termenii si Conditiile. TRIMITE þ Odata ce garantia a fost activata, veti primi un email de confirmare...
- Page 49 REFRIGERATOR DOUBLE DOOR...
- Page 50 REFRIGERATOR DOUBLE DOOR DP1446S DP1444IN DP1440W ENGLISH | ΕΛΛΗΝΙΚΑ | ROMANA...
- Page 52 Contents English ........................4 Ελληνικά ........................5 Romanian .......................6...
- Page 53 DP1440W DP1446S DP1444IN 0.605/221 0.482/176 0.482/176...
- Page 54 DP1446S DP1440W DP1444IN 0.605/221 0.482/176 0.482/176...
- Page 55 DP1446S DP1440W DP1444IN 0.605/221 0.482/176 0.482/176...
- Page 56 NOTES ..............................................................................................................................................................................................................................................................................................................................................................................................................................................................................................................................................................................................................................................................................................................................................................................................................................................................................................................................................................................................................................................................................................................................................................................................................................
- Page 57 DOUBLE DOOR Scan here to download the latest version of this manual. Σαρώστε εδώ για να κατεβάσετε την τελευταία έκδοση του εγχειριδίου. INVENTOR A.G. S.A. Importer/Manufacturer: 24th km National Road Athens - Lamia & 2 Thoukididou Str., Ag. Stefanos, 145 65,...
Need help?
Do you have a question about the DP1446S and is the answer not in the manual?
Questions and answers