Table of Contents
Advertisement
Quick Links
Advertisement
Table of Contents

Related Manuals for Ryobi RACWDV30MC


Summary of Contents for Ryobi RACWDV30MC
- Page 1 RACWDV30MC WET AND DRY VACUUM CLEANER M CLASS OWNER’S OPERATING MANUAL...
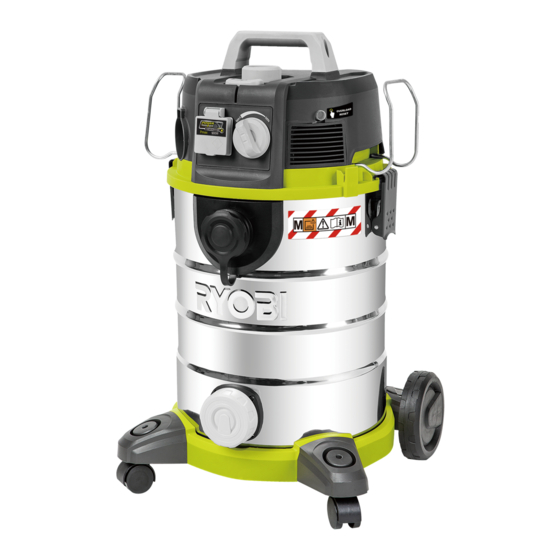
- Page 2 DESCRIPTION Components list 1. Stainless steel tube 15. Safety float valve 2. Universal floor nozzle 16. Washable HEPA12 cartridge filter 3. Anti-static crevice tool 17. ON/OFF/PTO switch 4. Anti-static dust brush 18. Connector for the vacuum hose 5. Anti-static hose 19.
- Page 3 Important! It is essential that you read the instructions in this manual before operating this machine. Subject to technical modifications...
-
Page 4: General Power Tool Safety Warnings
Don’t vacuum up liquids that are hotter than 60°C or any GENERAL POWER TOOL SAFETY WARNINGS poisonous or flammable dusts. Never lay the appliance on its side. Pay particular WARNING! attention to a horizontal position and adequate stability This appliance complies with the compulsory safety on stairs. -
Page 5: Special Safety Rules
Only store the appliance in a safe and dry location WARNING outside the reach of children. Always switch off and unplug the machine from the Please also pay particular attention to the following electrical outlet before assembling, opening, emptying “Special Safety Rules”. the dirt container, before connecting/disconnecting the This appliance is not intended for use by persons attachments, or carrying out maintenance or... -
Page 6: Specifications
SPECIFICATIONS NOISE/VIBRATION INFORMATION Model No.: RACWDV30MC Noise emission values determined according to EN Supply voltage: 220-240V ~ 50Hz 60335-2-69. Motor power: 1500W Typically, the A-weighted sound pressure level of the Max power take off: 900W power tool is ≤78 dB(A). - Page 7 Lightly squeeze the ends of the hose retaining bracket together, then click them onto the motor housing. Insert the handle into the slots on the motor head and fasten into place. Insert the large end of the hose into the front inlet of the tank, then turn to lock it in place firmly.
- Page 8 Floor nozzle Brush Squeegee Floor nozzle attachment Squeegee Brush Squeegee Brush Brush Squeegee FLOOR NOZZLE COMBINATIONS The floor nozzle comes supplied with additional attachments to ensure correct suction across different floor A: Brush and Squeegee Combination: For use with surfaces and applications. mixture of wet or dry liquids.
-
Page 9: Operation
OPERATION POWER SWITCH Position Status Vacuum Operation ON Vacuum and PTO OFF Power Take-Off ON POWER TAKE-OFF (PTO) OPERATION WARNING Avoid overloading of the PTO outlet, ensure the tool is not rated over 900W Avoid underload, PTO outlet will not work with load under 100W The moment you switch on the power tool, the vacuum cleaner will also switch on. - Page 10 DRY VACUUMING-STANDARD 1. Firstly install the paper dust bag onto the inlet of the APPLICATION hose. 2. Carefully install the cartridge filter over the filter cage. WARNING 3. Push the filter until it sits flush forming a tight seal. 4. Turn clockwise to secure against the filter cage. BEFORE INSTALLING, REMOVING OR CLEANING 5.
-
Page 11: Wet Vacuuming
WET VACUUMING WARNING WARNING BEFORE INSTALLING, REMOVING OR CLEANING The foam filter must be removed after wet vacuuming, THE VACUUM CLEANER FILTER, ENSURE THAT and a cartridge filter must be installed before dry THE POWER CORD IS SWITCHED OFF AND vacuuming again. - Page 12 M CLASS APPLICATION WARNING when using M class applications, appropriate PPE must be worn (eg. P2, OEL value etc) IMPORTANT! TO MAINTAIN M CLASS APPLICATION, THE VACUUM CLEANER MUST BE USE D WITH THE PLATIC DISPOSAL BAG. 1. Install the cartridge filter following the same procedure as the standard application. 2.
- Page 13 Cartridge Filter + Plastic disposal bag FOR M CLASS APPLICATION Cartridge Filter + Dust Bag + Plastic disposal bag Cartridge Filter + Dust Bag FOR STANDARD APPLICATION Cartridge Filter FILTER AND BAG RECOMMENDATION IMPORTANT! The filter needs to be maintained regularly and dust bag needs to be emptied. Follow the instruction on page 7-9 on how to empty dust bag for WD dust and M Class Dust.
- Page 14 SELF-CLEANING FILTER SYSTEM Self-Cleaning Filter System The Self-Cleaning function should be used regularly. How often The Self-cleaning needs to be carried out will depend on the type and quantity of dust that has been vacuumed. A clogged filter can trigger air flow reduction and cause press 3-4 times decrease of suction power.
- Page 15 Cleaning Foam Filter (only for wet application) Carefully remove the foam filter from the filter cage. Use a mild soap and water solution to wash foam filter and rinse with clean water, air dry before next use. STORAGE Wind up the hose around the motor head and put it on the hose retaining bracket.
-
Page 16: Environmental Protection
ENVIRONMENTAL PROTECTION Recycle raw materials instead of disposing of as waste. The machine, accessories and packaging should be sorted for environmental-friendly recycling. SYMBOL Safety Alert Volts Hertz Alternating Current Watts Regulatory Compliance Mark (RCM). Product meets applicable regulatory requirements. Please read the instructions carefully before starting the machine. -
Page 17: Troubleshooting
TROUBLE SHOOTING WARNING To reduce the risk of personal injury, unplug the cleaner before performing maintenance/troubleshooting checks. Problem Cause Solution The appliance doesn’t work Check the power supply. No power Check Overload Protection switch. Check if switch is in position II without appliance plugged in Functional fault in the power cord, switch, Have the damaged part checked by... - Page 20 Techtronic Industries (Australia) Pty. Ltd. 31Gilby Road, Mt. Waverley, VIC 3149, Australia Techtronic Industries N.Z. Limited Unit C, 70 Business Parade South, Highbrook, Auckland 2013, New Zealand...
Need help?
Do you have a question about the RACWDV30MC and is the answer not in the manual?
Questions and answers