Advertisement
Quick Links
Advertisement

Related Manuals for Ryobi RACWDV1


Summary of Contents for Ryobi RACWDV1
- Page 1 RACWDV1 WET AND DRY VACUUM CLEANER OWNER’S OPERATING MANUAL...
- Page 2 Important! It is essential that you read the instructions in this manual before operating this machine. Subject to technical modifications...
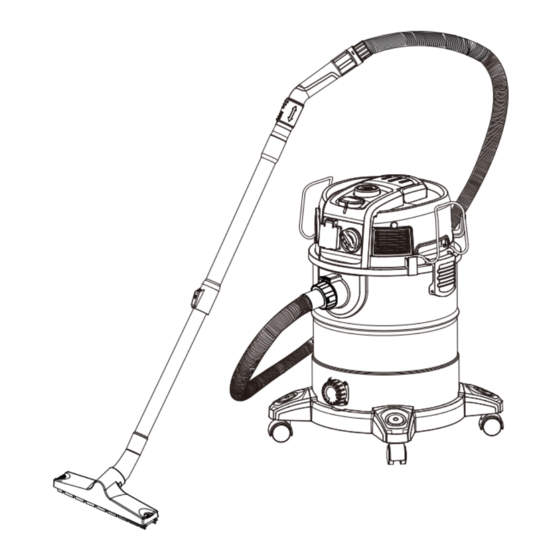
- Page 3 DESCRIPTION Components list 1. Telescopic Wand 15. Safety float valve 2. Floor tool 16. Cartridge filter cap 3. Crevice tool 17. HEPA Cartridge filter 4. Round brush 18. ON/OFF switch 5. Hose set 19. Connection for the vacuum hose 6. Castor (x4) 20.
- Page 4 DESCRIPTION Please refer to pages 2 - 4 for instructions...
- Page 5 DESCRIPTION Please refer to pages 2 - 4 for instructions...
- Page 6 DESCRIPTION Please refer to pages 2 - 4 for instructions...
- Page 7 DESCRIPTION Fig. 20 Fig. 20 Fig. 21 Fig. 22 Fig. 23 Fig. 24 Fig. 25 Please refer to pages 2 - 4 for instructions...
- Page 8 DESCRIPTION Fig. 26 Fig. 27 Fig. 28 Fig. 29 press 3-4 times Fig. 30 Fig. 31 Please refer to pages 2 - 4 for instructions...
- Page 9 DESCRIPTION Fig. 32 Fig. 33 Fig. 34 Fig. 35 Please refer to pages 2 - 4 for instructions...
- Page 10 Don’t vacuum up liquids that are hotter than 60°C or any GENERAL POWER TOOL SAFETY WARNINGS poisonous or flammable dusts. Never lay the appliance on its side. Pay particular WARNING! attention to a horizontal position and adequate stability This appliance complies with the compulsory safety on stairs.
- Page 11 Do not use blower as a sprayer in wet mode. Wear a dust mask and protective eye wear. SPECIFICATIONS WARNING Model No.: RACWDV1 Always switch off and unplug the machine from the Supply voltage: 240V ~ 50Hz electrical outlet before assembling, opening, emptying...
-
Page 12: Operation
Ensure that the power cord is disconnected from the Please check the parts using the components list to outlet. make sure they are complete and that there has been no damage in transport. Ensure that the cartridge filter is completely mounted. Ensure that the filter is inserted all the way. -
Page 13: Maintenance
capacity. You will notice an increase in the pitch of motor WARNING sound. When this happens, turn o f the machine, disconnect from power supply, and drain the liquid into a suitable Keep bystanders clear from blowing debris. receptacle or drain. To continue vacuuming, refit the container with the drain cap. -
Page 14: Environmental Protection
Installing Foam Filter Follow instructions to remove dry dust filter first before changing to foam filter. Carefully slide foam filter down over the filter cage making sure the whole cage is covered. (Fig. 9 & 27) Cleaning Foam Filter Carefully remove foam filter. (Fig. 28) Use a mild soap and water solution to wash foam filter and rinse with clean water. -
Page 15: Troubleshooting
TROUBLE SHOOTING WARNING To reduce the risk of personal injury, unplug the cleaner before performing maintenance/troubleshooting checks. Problem Cause Solution The appliance doesn’t work Check the power supply. No power Check Overload Protection switch. Check if switch is in position II without appliance plugged in Functional fault in the power cord, switch, Have the damaged part checked by... - Page 18 Techtronic Industries (Australia) Pty. Ltd. 31Gilby Road, Mt. Waverley, VIC 3149, Australia Techtronic Industries N.Z. Limited Unit C, 70 Business Parade South, Highbrook, Auckland 2013, New Zealand...
Need help?
Do you have a question about the RACWDV1 and is the answer not in the manual?
Questions and answers